> ## Documentation Index
> Fetch the complete documentation index at: https://docs.brightdata.com/llms.txt
> Use this file to discover all available pages before exploring further.
# SSL 证书
您可以在没有 SSL 证书的情况下使用 Bright Data 产品:
1. 使用 **Bright Data Proxy API**。阅读更多内容: [API 与原生访问](/cn/api-reference/authentication)
2. 通过我们的 [KYC 验证流程](/cn/proxy-networks/residential/network-access#kyc-verification) 获取账户**验证**
使用 SSL 证书可以在 **原生代理模式**下,与 [住宅代理](/cn/proxy-networks/residential/introduction)、[Web Unlocker API](/cn/scraping-automation/web-unlocker/introduction) 或 [SERP API](/cn/scraping-automation/serp-api/introduction) 建立端到端加密连接。
如果您只是进行初步测试,也可以不安装 SSL 证书,稍后再使用。
使用 SSL 证书非常简单。下载证书,然后根据使用环境选择相应方式加载即可。
## 下载 SSL 证书
Bright Data 推出了**新的** SSL 证书,可用于代理端口:`33335`。
1. **右键点击**此[链接](https://www.bright.cn/static/brightdata_proxy_ca.zip),将文件“另存为”到本地。
2. **解压文件**并选择要使用的证书。大多数用户——尤其是新用户——应使用**新版** SSL 证书。
## Bright Data 新版 SSL 证书
Bright Data 新版 SSL 证书即将支持浏览器扩展。**如果您正在使用浏览器扩展,请暂时不要升级到新证书。**
Bright Data 现在使用更新后的 SSL 证书,有效期至 2034 年 9 月。使用此证书时,必须将原生代理端口设置为 `33335`,这是用于新证书加密流量的端口。
如果您仍在使用旧版 SSL 证书,请注意它已被弃用,将于 2026 年 9 月到期,且使用端口 `22225`。为了确保稳定安全的使用体验,请切换到**新版证书与端口 `33335`**。更多信息请参阅:[FAQ:该使用端口 22225 还是 33335?](/cn/general/faqs#which-port-shall-i-use-22225-or-33335)
## 在代码中使用 SSL 证书
如果您编写爬虫代码,在大多数情况下无需在系统中安装证书。只需在代码中加载证书即可。例如,CURL:
```sh theme={null}
curl --proxy brd.superproxy.io:33335 --proxy-user brd-customer--zone-: --cacert "https://geo.brdtest.com/mygeo.json"
```
您可以参考 Bright Data 控制台中的示例代码查看具体语法。
## 安装 SSL 证书
在某些情况下(例如某些无法从本地加载证书的第三方工具),仍需要在您的计算机上安装证书。
### 我应该将证书安装在哪里?
SSL 证书需要安装在**运行实际爬虫代码或应用程序的主机上**。
大多数情况下,这是您的个人电脑;但如果您在云服务器上运行代码,则必须将证书安装到该服务器上。
### 安装步骤
只需 2 分钟 — 按以下步骤操作即可:
* 如果还没有下载,请**右键点击**此[链接](https://www.bright.cn/static/brightdata_proxy_ca.zip),将文件“另存为”到本地。
* 双击 ca.crt 文件
* 按照 Windows 的提示安装证书
* 重启电脑
* 重启后,您就可以连接所需的 Bright Data 产品(住宅代理、Web Unlocker API 或 SERP API)
* 下载[证书](https://www.bright.cn/static/brightdata_proxy_ca.zip)(见本文顶部说明)
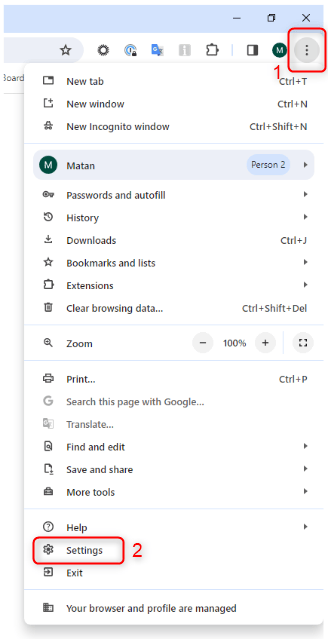
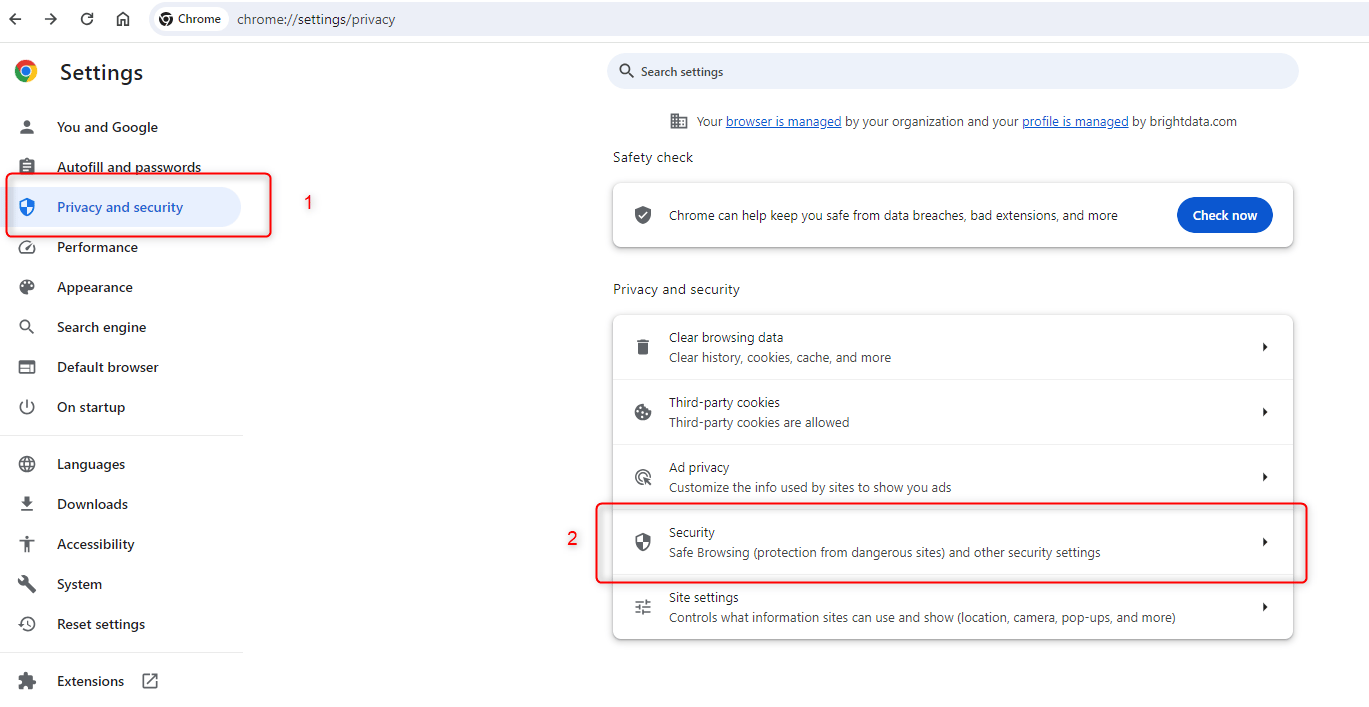
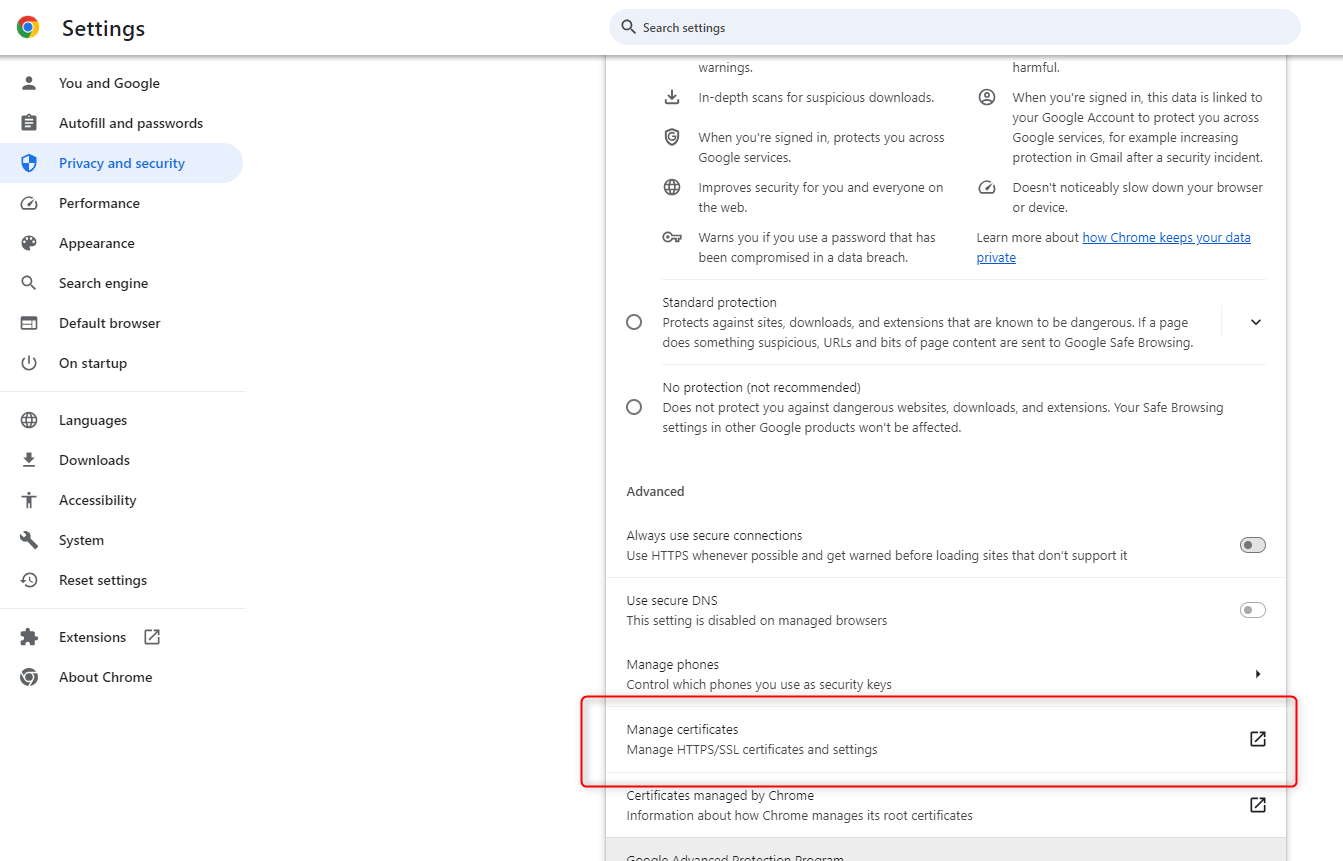
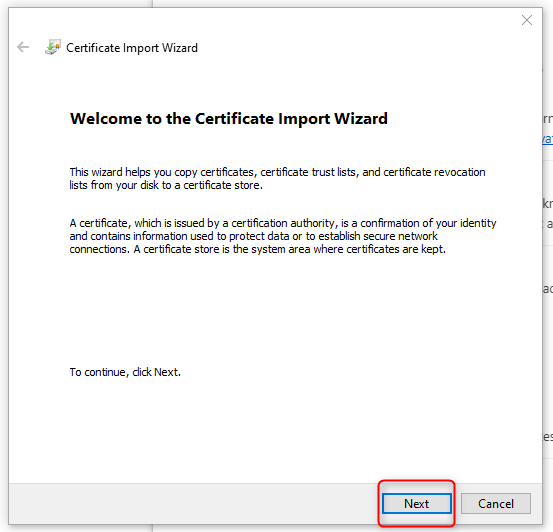
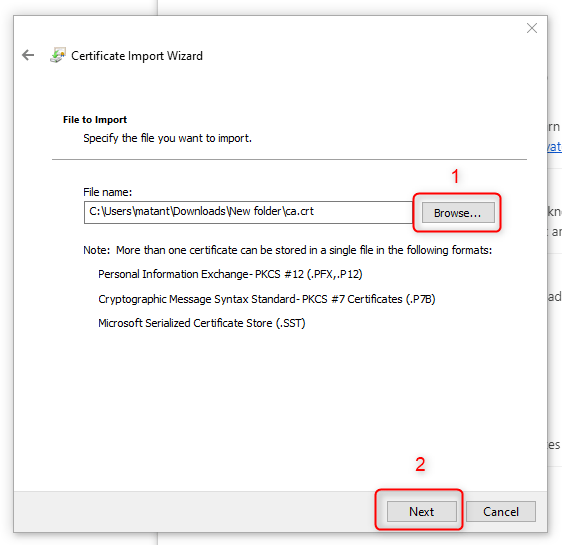
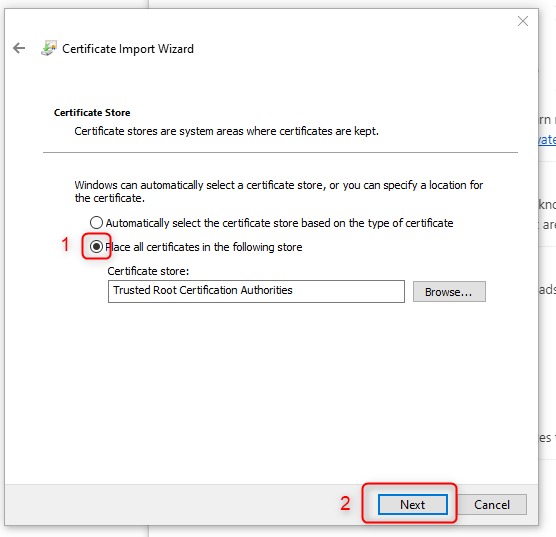
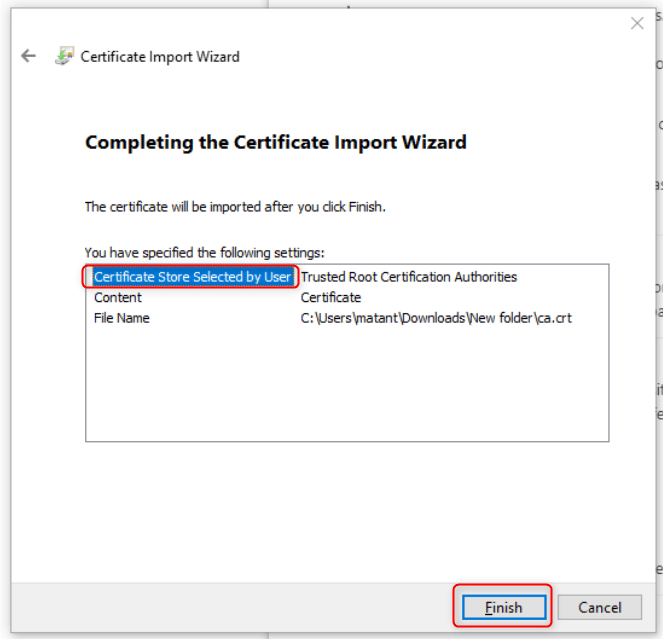
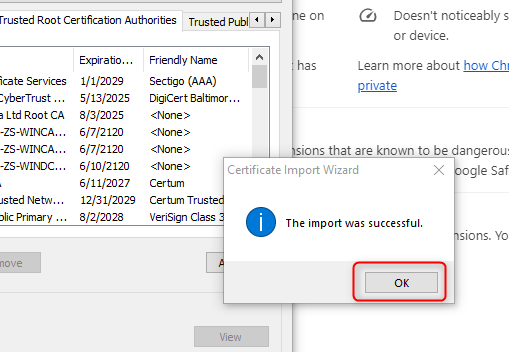 * 在地址栏输入:`about:preferences#advanced`
* 在“安全性”下点击“查看证书”
* 选择“证书机构”标签页,点击下方“导入”
* 浏览并选择下载的证书文件,点击“打开”
* 弹窗中勾选“信任此 CA 来识别网站”
* 点击确定完成安装
* 确保 Firefox 使用 Bright Data 代理,并访问受保护网站测试
* 将下载的 `ca.crt` 文件复制到 `/usr/local/share/ca-certificates/`
* 运行 `sudo update-ca-certificates`(输出应显示新增 1 个证书)
* 访问任意 SSL 网站测试是否正常
* 双击下载的证书文件,将打开“钥匙串访问”
* 双击证书“luminati.io”查看设置
* 在“使用此证书时”选择“始终信任”
* 关闭窗口并按提示输入密码
* 重启浏览器访问任意 SSL 网站测试
* 打开 Safari
* 打开本页面并点击[此链接](https://www.bright.cn/static/brightdata_proxy_ca.zip)下载证书(请先阅读以下两项)
* 点击“安装”并输入密码
* 点击右上角“安装”,然后“完成”
* 进入 iPhone“设置”
* 打开“关于本机”
* 打开“证书信任设置”
* 启用“luminati.io”证书
* 在任意浏览器访问 SSL 网站测试是否正常
* 下载[证书](https://www.bright.cn/static/brightdata_proxy_ca.zip)并保存到手机
* 使用“我的文件”找到下载的 zip 文件并解压
* 打开 设置 → 安全和隐私 → 更多安全设置
* 在“凭据存储”下点击“从设备存储安装”
* 选择“CA 证书”并点击“仍要安装”
* 输入密码
* 选择刚解压的证书并点击“完成”
* 在任意浏览器访问 SSL 网站测试是否正常
## 如何忽略 SSL 错误?
在某些情况下,你需要安装我们的证书或忽略 SSL 错误,才能访问特定的产品或功能。如果你不想安装我们的证书,你可以选择忽略 SSL 错误。请查看以下不同编程语言的代码示例,**高亮的部分**就是你需要添加到代码中以忽略 SSL 错误的内容。
```sh Curl theme={null}
# Add -k to ignore ssl errors
curl --proxy brd.superproxy.io:33335 --proxy-user brd-customer--zone-: -k "http://brdtest.com/myip.json"
```
```js NodeJS theme={null}
#!/usr/bin/env node
/*This sample code assumes the request-promise package is installed. If it is not installed run: "npm install request-promise"*/
require('request-promise')({
url: 'http://brdtest.com/myip.json',
proxy: 'http://brd-customer--zone-:@brd.superproxy.io:33335',
// Make sure you set reject rejectUnauthorized to false
rejectUnauthorized: false,
})
.then(function(data){ console.log(data); },
function(err){ console.error(err); });
```
```python Python theme={null}
#!/usr/bin/env python
print('If you get error "ImportError: No module named \'six\'" install six:\n'+\
'$ sudo pip install six');
import sys
# Make sure you add these two line to ignore ssl error
import ssl
ssl._create_default_https_context = ssl._create_unverified_context
if sys.version_info[0]==2:
import six
from six.moves.urllib import request
opener = request.build_opener(
request.ProxyHandler(
{'http': 'http://brd-customer--zone-:@brd.superproxy.io:33335',
'https': 'http://brd-customer--zone-:@brd.superproxy.io:33335'}))
print(opener.open('http://brdtest.com/myip.json').read())
if sys.version_info[0]==3:
import urllib.request
opener = urllib.request.build_opener(
urllib.request.ProxyHandler(
{'http': 'http://brd-customer--zone-:@brd.superproxy.io:33335',
'https': 'http://brd-customer--zone-:@brd.superproxy.io:33335'}))
print(opener.open('http://brdtest.com/myip.json').read())
```
```cs C# theme={null}
using System;
using System.Net;
class Example
{
static void Main()
{
// Make sure you add this line to ignore ssl error
ServicePointManager.ServerCertificateValidationCallback += (sender, cert, chain, sslPolicyErrors) => true;
var client = new WebClient();
client.Proxy = new WebProxy("brd.superproxy.io:33335");
client.Proxy.Credentials = new NetworkCredential("brd-customer--zone-", "");
Console.WriteLine(client.DownloadString("http://brdtest.com/myip.json"));
}
}
```
```ruby Ruby theme={null}
#!/usr/bin/ruby
require 'uri'
require 'net/http'
require 'net/https'
uri = URI.parse('http://brdtest.com/myip.json')
proxy = Net::HTTP::Proxy('brd.superproxy.io', 33335, 'brd-customer--zone-', '')
req = Net::HTTP::Get.new(uri)
# Make sure you add verify_mode => OpenSSL::SSL::VERIFY_NONE
result = proxy.start(uri.host,uri.port, :use_ssl => uri.scheme == 'https', :verify_mode => OpenSSL::SSL::VERIFY_NONE) do |http|
http.request(req)
send
puts result.body
```
```java Java theme={null}
package example;
import org.apache.http.HttpHost;
import org.apache.http.client.fluent.*;
public class Example {
public static void main(String[] args) throws Exception {
HttpHost proxy = new HttpHost("brd.superproxy.io", 33335);
String res = Executor.newInstance()
.auth(proxy, "brd-customer--zone-", "")
.execute(Request.Get("http://brdtest.com/myip.json").viaProxy(proxy))
.returnContent().asString();
System.out.println(res);
}
}
/*In the above example, we are not explicitly ignoring SSL
I will share with you a short code I wrote that does ignore SSL using JAVA (was taken from cloud proxy manager examples) */
import java.io.*;
import java.net.*;
import java.security.cert.X509Certificate;
import javax.net.ssl.*;
import java.util.Base64;
public class Example {
public static void main(String[] args) throws Exception {
// Disable restricted headers for proxy authentication
System.setProperty("jdk.http.auth.tunneling.disabledSchemes", "");
// Set up a TrustManager that does not validate certificate chains
SSLContext sc = SSLContext.getInstance("SSL");
TrustManager trust_manager = new X509TrustManager() {
public X509Certificate[] getAcceptedIssuers() {
return null;
}
public void checkClientTrusted(X509Certificate[] certs, String authType) {
}
public void checkServerTrusted(X509Certificate[] certs, String authType) {
}
};
TrustManager[] trust_all = new TrustManager[] { trust_manager };
sc.init(null, trust_all, new java.security.SecureRandom());
HttpsURLConnection.setDefaultSSLSocketFactory(sc.getSocketFactory());
// Set up the proxy and open a connection
URL url = new URL("https://geo.brdtest.com/mygeo.json");
Proxy proxy = new Proxy(Proxy.Type.HTTP, new InetSocketAddress("brd.superproxy.io", 33335));
URLConnection yc = url.openConnection(proxy);
// Set default Authenticator for proxy authentication
Authenticator.setDefault(new Authenticator() {
@Override
public PasswordAuthentication getPasswordAuthentication() {
return new PasswordAuthentication("brd-customer--zone-", "".toCharArray());
}
});
// Read and print the response from the server
BufferedReader in = new BufferedReader(new InputStreamReader(yc.getInputStream()));
String inputLine;
while ((inputLine = in.readLine()) != null)
System.out.println(inputLine);
in.close();
}
}
```
```vba VBA theme={null}
Imports System.Net
Module Module1
Sub Main()
' Make sure you add this line to ignore ssl error
ServicePointManager.ServerCertificateValidationCallback = Function(se, cert, chain, sslerror) True
Dim Client As New WebClient
Client.Proxy = New WebProxy("http://brd.superproxy.io:33335")
Client.Proxy.Credentials = New NetworkCredential("brd-customer--zone-", "")
Console.WriteLine(Client.DownloadString("http://brdtest.com/myip.json"))
End Sub
End Module
```
```php PHP theme={null}
-zone-:');
// Make sure you add this line to ignore ssl error
curl_setopt($curl, CURLOPT_SSL_VERIFYPEER, 0);
curl_exec($curl);
?>
```
```perl Perl theme={null}
#!/usr/bin/perl
use LWP::UserAgent;
# Make sure you add this line to ignore ssl error
use IO::Socket::SSL qw( SSL_VERIFY_NONE );
my $agent = LWP::UserAgent->new();
$agent->proxy(['http', 'https'], "http://brd-customer--zone-:\@brd.superproxy.io:33335");
$agent->ssl_opts(verify_hostname => 0, SSL_verify_mode => SSL_VERIFY_NONE);
print $agent->get('http://brdtest.com/myip.json')->content();
```
## Bright Data Proxy Manager SSL 分析
某些功能要求 Proxy Manager 访问 HTTPS 流量。你可以在代理端口的配置页面启用 **SSL Analyzing(SSL 分析)** 来实现。
一旦你允许 Proxy Manager 终止 SSL,你还需要[信任 Bright Data 证书颁发机构(CA)](https://www.bright.cn/static/brightdata_proxy_ca.zip)。
在底层,Proxy Manager 会与目标站点建立一个安全加密的 HTTPS 连接,解密流量以记录请求并根据你的设置执行规则,然后再以加密的 HTTPS 连接将响应返回给你的客户端,使用我们的 CA 所签署的证书。
* 在地址栏输入:`about:preferences#advanced`
* 在“安全性”下点击“查看证书”
* 选择“证书机构”标签页,点击下方“导入”
* 浏览并选择下载的证书文件,点击“打开”
* 弹窗中勾选“信任此 CA 来识别网站”
* 点击确定完成安装
* 确保 Firefox 使用 Bright Data 代理,并访问受保护网站测试
* 将下载的 `ca.crt` 文件复制到 `/usr/local/share/ca-certificates/`
* 运行 `sudo update-ca-certificates`(输出应显示新增 1 个证书)
* 访问任意 SSL 网站测试是否正常
* 双击下载的证书文件,将打开“钥匙串访问”
* 双击证书“luminati.io”查看设置
* 在“使用此证书时”选择“始终信任”
* 关闭窗口并按提示输入密码
* 重启浏览器访问任意 SSL 网站测试
* 打开 Safari
* 打开本页面并点击[此链接](https://www.bright.cn/static/brightdata_proxy_ca.zip)下载证书(请先阅读以下两项)
* 点击“安装”并输入密码
* 点击右上角“安装”,然后“完成”
* 进入 iPhone“设置”
* 打开“关于本机”
* 打开“证书信任设置”
* 启用“luminati.io”证书
* 在任意浏览器访问 SSL 网站测试是否正常
* 下载[证书](https://www.bright.cn/static/brightdata_proxy_ca.zip)并保存到手机
* 使用“我的文件”找到下载的 zip 文件并解压
* 打开 设置 → 安全和隐私 → 更多安全设置
* 在“凭据存储”下点击“从设备存储安装”
* 选择“CA 证书”并点击“仍要安装”
* 输入密码
* 选择刚解压的证书并点击“完成”
* 在任意浏览器访问 SSL 网站测试是否正常
## 如何忽略 SSL 错误?
在某些情况下,你需要安装我们的证书或忽略 SSL 错误,才能访问特定的产品或功能。如果你不想安装我们的证书,你可以选择忽略 SSL 错误。请查看以下不同编程语言的代码示例,**高亮的部分**就是你需要添加到代码中以忽略 SSL 错误的内容。
```sh Curl theme={null}
# Add -k to ignore ssl errors
curl --proxy brd.superproxy.io:33335 --proxy-user brd-customer--zone-: -k "http://brdtest.com/myip.json"
```
```js NodeJS theme={null}
#!/usr/bin/env node
/*This sample code assumes the request-promise package is installed. If it is not installed run: "npm install request-promise"*/
require('request-promise')({
url: 'http://brdtest.com/myip.json',
proxy: 'http://brd-customer--zone-:@brd.superproxy.io:33335',
// Make sure you set reject rejectUnauthorized to false
rejectUnauthorized: false,
})
.then(function(data){ console.log(data); },
function(err){ console.error(err); });
```
```python Python theme={null}
#!/usr/bin/env python
print('If you get error "ImportError: No module named \'six\'" install six:\n'+\
'$ sudo pip install six');
import sys
# Make sure you add these two line to ignore ssl error
import ssl
ssl._create_default_https_context = ssl._create_unverified_context
if sys.version_info[0]==2:
import six
from six.moves.urllib import request
opener = request.build_opener(
request.ProxyHandler(
{'http': 'http://brd-customer--zone-:@brd.superproxy.io:33335',
'https': 'http://brd-customer--zone-:@brd.superproxy.io:33335'}))
print(opener.open('http://brdtest.com/myip.json').read())
if sys.version_info[0]==3:
import urllib.request
opener = urllib.request.build_opener(
urllib.request.ProxyHandler(
{'http': 'http://brd-customer--zone-:@brd.superproxy.io:33335',
'https': 'http://brd-customer--zone-:@brd.superproxy.io:33335'}))
print(opener.open('http://brdtest.com/myip.json').read())
```
```cs C# theme={null}
using System;
using System.Net;
class Example
{
static void Main()
{
// Make sure you add this line to ignore ssl error
ServicePointManager.ServerCertificateValidationCallback += (sender, cert, chain, sslPolicyErrors) => true;
var client = new WebClient();
client.Proxy = new WebProxy("brd.superproxy.io:33335");
client.Proxy.Credentials = new NetworkCredential("brd-customer--zone-", "");
Console.WriteLine(client.DownloadString("http://brdtest.com/myip.json"));
}
}
```
```ruby Ruby theme={null}
#!/usr/bin/ruby
require 'uri'
require 'net/http'
require 'net/https'
uri = URI.parse('http://brdtest.com/myip.json')
proxy = Net::HTTP::Proxy('brd.superproxy.io', 33335, 'brd-customer--zone-', '')
req = Net::HTTP::Get.new(uri)
# Make sure you add verify_mode => OpenSSL::SSL::VERIFY_NONE
result = proxy.start(uri.host,uri.port, :use_ssl => uri.scheme == 'https', :verify_mode => OpenSSL::SSL::VERIFY_NONE) do |http|
http.request(req)
send
puts result.body
```
```java Java theme={null}
package example;
import org.apache.http.HttpHost;
import org.apache.http.client.fluent.*;
public class Example {
public static void main(String[] args) throws Exception {
HttpHost proxy = new HttpHost("brd.superproxy.io", 33335);
String res = Executor.newInstance()
.auth(proxy, "brd-customer--zone-", "")
.execute(Request.Get("http://brdtest.com/myip.json").viaProxy(proxy))
.returnContent().asString();
System.out.println(res);
}
}
/*In the above example, we are not explicitly ignoring SSL
I will share with you a short code I wrote that does ignore SSL using JAVA (was taken from cloud proxy manager examples) */
import java.io.*;
import java.net.*;
import java.security.cert.X509Certificate;
import javax.net.ssl.*;
import java.util.Base64;
public class Example {
public static void main(String[] args) throws Exception {
// Disable restricted headers for proxy authentication
System.setProperty("jdk.http.auth.tunneling.disabledSchemes", "");
// Set up a TrustManager that does not validate certificate chains
SSLContext sc = SSLContext.getInstance("SSL");
TrustManager trust_manager = new X509TrustManager() {
public X509Certificate[] getAcceptedIssuers() {
return null;
}
public void checkClientTrusted(X509Certificate[] certs, String authType) {
}
public void checkServerTrusted(X509Certificate[] certs, String authType) {
}
};
TrustManager[] trust_all = new TrustManager[] { trust_manager };
sc.init(null, trust_all, new java.security.SecureRandom());
HttpsURLConnection.setDefaultSSLSocketFactory(sc.getSocketFactory());
// Set up the proxy and open a connection
URL url = new URL("https://geo.brdtest.com/mygeo.json");
Proxy proxy = new Proxy(Proxy.Type.HTTP, new InetSocketAddress("brd.superproxy.io", 33335));
URLConnection yc = url.openConnection(proxy);
// Set default Authenticator for proxy authentication
Authenticator.setDefault(new Authenticator() {
@Override
public PasswordAuthentication getPasswordAuthentication() {
return new PasswordAuthentication("brd-customer--zone-", "".toCharArray());
}
});
// Read and print the response from the server
BufferedReader in = new BufferedReader(new InputStreamReader(yc.getInputStream()));
String inputLine;
while ((inputLine = in.readLine()) != null)
System.out.println(inputLine);
in.close();
}
}
```
```vba VBA theme={null}
Imports System.Net
Module Module1
Sub Main()
' Make sure you add this line to ignore ssl error
ServicePointManager.ServerCertificateValidationCallback = Function(se, cert, chain, sslerror) True
Dim Client As New WebClient
Client.Proxy = New WebProxy("http://brd.superproxy.io:33335")
Client.Proxy.Credentials = New NetworkCredential("brd-customer--zone-", "")
Console.WriteLine(Client.DownloadString("http://brdtest.com/myip.json"))
End Sub
End Module
```
```php PHP theme={null}
-zone-:');
// Make sure you add this line to ignore ssl error
curl_setopt($curl, CURLOPT_SSL_VERIFYPEER, 0);
curl_exec($curl);
?>
```
```perl Perl theme={null}
#!/usr/bin/perl
use LWP::UserAgent;
# Make sure you add this line to ignore ssl error
use IO::Socket::SSL qw( SSL_VERIFY_NONE );
my $agent = LWP::UserAgent->new();
$agent->proxy(['http', 'https'], "http://brd-customer--zone-:\@brd.superproxy.io:33335");
$agent->ssl_opts(verify_hostname => 0, SSL_verify_mode => SSL_VERIFY_NONE);
print $agent->get('http://brdtest.com/myip.json')->content();
```
## Bright Data Proxy Manager SSL 分析
某些功能要求 Proxy Manager 访问 HTTPS 流量。你可以在代理端口的配置页面启用 **SSL Analyzing(SSL 分析)** 来实现。
一旦你允许 Proxy Manager 终止 SSL,你还需要[信任 Bright Data 证书颁发机构(CA)](https://www.bright.cn/static/brightdata_proxy_ca.zip)。
在底层,Proxy Manager 会与目标站点建立一个安全加密的 HTTPS 连接,解密流量以记录请求并根据你的设置执行规则,然后再以加密的 HTTPS 连接将响应返回给你的客户端,使用我们的 CA 所签署的证书。