> ## Documentation Index
> Fetch the complete documentation index at: https://docs.brightdata.com/llms.txt
> Use this file to discover all available pages before exploring further.
# 如何将 Bright Data 与 SaleFreaks 集成
**账户管理不是 Bright Data 平台支持的使用场景**(自 2026 年 4 月 1 日起生效)。这包括在 TikTok、Instagram 等类似平台上进行账户管理。Bright Data 代理不得用于此类用途。详情请参阅[可接受使用政策](https://brightdata.com/acceptable-use-policy)。
### 您的代理访问信息
Bright Data 代理按“代理区域”(Proxy zones)进行分组。每个区域包含其对应的代理配置。
要获取代理区域的访问权限:
1. 登录 Bright Data 控制面板
2. 选择现有代理区域或新建一个代理区域
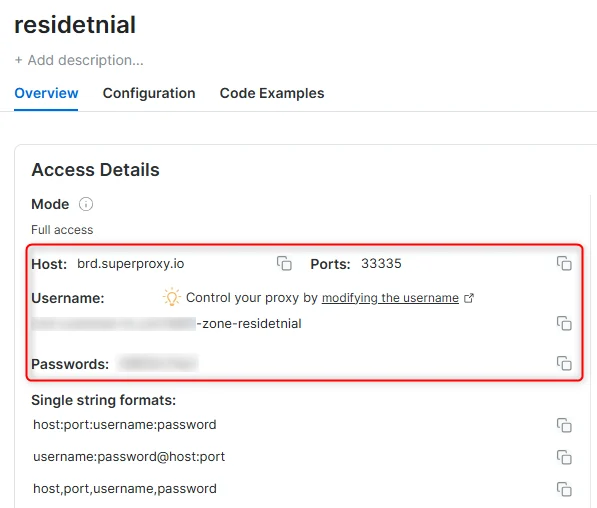
3. 点击新的区域名称,并选择 **概览(Overview)** 选项卡
4. 在概览选项卡中,找到 **访问详情(Access details)**,并单击复制图标将代理访问信息复制到剪贴板
5. 您需要以下信息:代理主机(Proxy Host)、代理端口(Proxy Port)、代理区域用户名(Proxy Zone username)和代理区域密码(Proxy Zone password)
6. 点击复制图标,将文本复制到剪贴板,并粘贴到您的工具的代理配置中
### 访问详情示例
 ### 住宅代理访问
要使用 Bright Data 的 **住宅代理(Residential Proxies)**,您必须是经过 KYC 验证的企业账户。请与 Bright Data 合规团队完成 KYC 验证;不存在自动或无需 KYC 的访问方式。尚未完成 KYC 时,请使用 ISP 或数据中心代理。[了解更多...](/proxy-networks/residential/network-access)
### 目标是搜索引擎?
如果您的目标是 Google、Bing 或 Yandex 等搜索引擎,则需要使用专门的搜索引擎结果页(**SERP**)代理 API。请使用 Bright Data SERP API 来访问搜索引擎。\
[点击此处了解 Bright Data SERP 代理 API。](/scraping-automation/serp-api/introduction)
### 避免工具中的 `PROXY ERROR`
一些工具会使用搜索引擎作为代理测试目标:如果您的代理测试失败,这可能就是原因。请确保您的测试目标域名不是搜索引擎(此设置在工具配置中,而非 Bright Data 代理的控制范围内)。
## 什么是 SaleFreaks?
SaleFreaks 是一款自动化工具,专为帮助代发货卖家更高效地管理他们的在线商店而设计。它能够自动化代发货流程的多个环节,例如产品来源、订单履行以及库存管理。该平台通常与 eBay、Amazon 等主流电商平台集成使用。
## 将 SaleFreaks 与 Bright Data 代理集成的步骤
**步骤 1. 注册 Bright Data**:
1. 注册后进入 Bright Data 控制面板
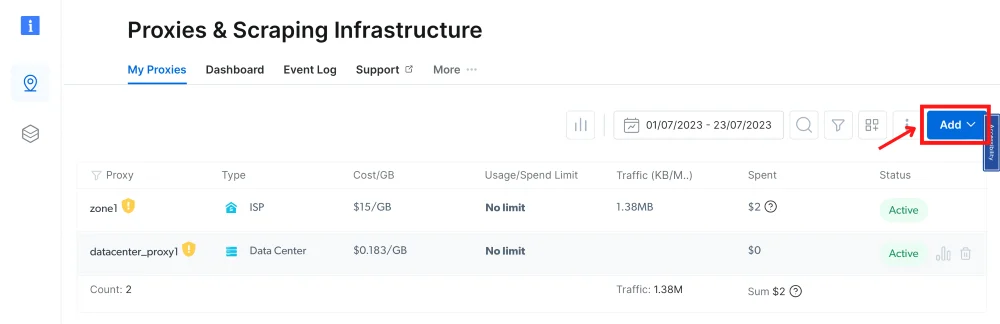
2. 前往 **“Proxy & Scraping Infrastructure”**(代理与抓取基础设施)
3. **添加(Add)** 一个新的专用 **Zone** 用于代理用途
### 住宅代理访问
要使用 Bright Data 的 **住宅代理(Residential Proxies)**,您必须是经过 KYC 验证的企业账户。请与 Bright Data 合规团队完成 KYC 验证;不存在自动或无需 KYC 的访问方式。尚未完成 KYC 时,请使用 ISP 或数据中心代理。[了解更多...](/proxy-networks/residential/network-access)
### 目标是搜索引擎?
如果您的目标是 Google、Bing 或 Yandex 等搜索引擎,则需要使用专门的搜索引擎结果页(**SERP**)代理 API。请使用 Bright Data SERP API 来访问搜索引擎。\
[点击此处了解 Bright Data SERP 代理 API。](/scraping-automation/serp-api/introduction)
### 避免工具中的 `PROXY ERROR`
一些工具会使用搜索引擎作为代理测试目标:如果您的代理测试失败,这可能就是原因。请确保您的测试目标域名不是搜索引擎(此设置在工具配置中,而非 Bright Data 代理的控制范围内)。
## 什么是 SaleFreaks?
SaleFreaks 是一款自动化工具,专为帮助代发货卖家更高效地管理他们的在线商店而设计。它能够自动化代发货流程的多个环节,例如产品来源、订单履行以及库存管理。该平台通常与 eBay、Amazon 等主流电商平台集成使用。
## 将 SaleFreaks 与 Bright Data 代理集成的步骤
**步骤 1. 注册 Bright Data**:
1. 注册后进入 Bright Data 控制面板
2. 前往 **“Proxy & Scraping Infrastructure”**(代理与抓取基础设施)
3. **添加(Add)** 一个新的专用 **Zone** 用于代理用途
 **步骤 2. 选择代理类型**:
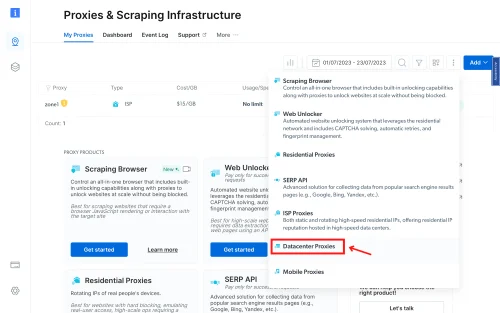
本示例将演示如何设置数据中心代理(Datacenter Proxies)。
**步骤 2. 选择代理类型**:
本示例将演示如何设置数据中心代理(Datacenter Proxies)。
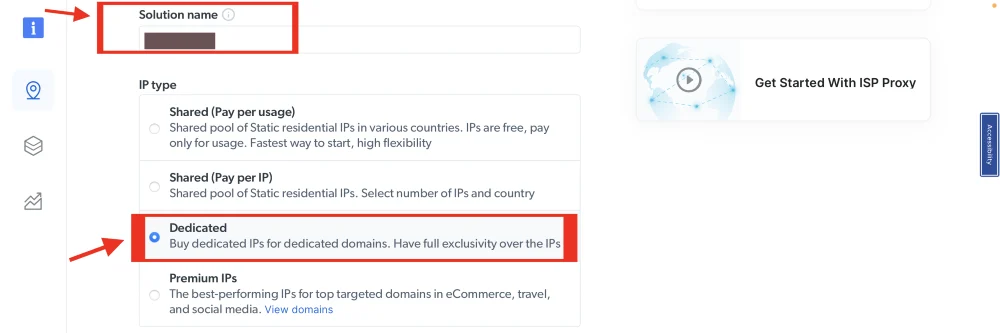
 **步骤 3. 命名代理解决方案**:
 **步骤 4. 选择 IP 数量**:
填写所需的 IP 数量。
**步骤 4. 选择 IP 数量**:
填写所需的 IP 数量。
 **步骤 5. 国家与城市选择**:
选择您希望的 IP 国家与城市。
**步骤 5. 国家与城市选择**:
选择您希望的 IP 国家与城市。
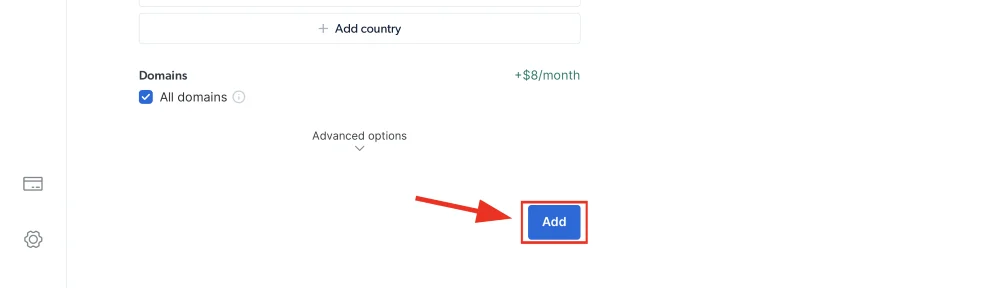
 **步骤 6. 添加 Zone**:
点击 **“Add”** 按钮以创建 Zone。
**步骤 6. 添加 Zone**:
点击 **“Add”** 按钮以创建 Zone。
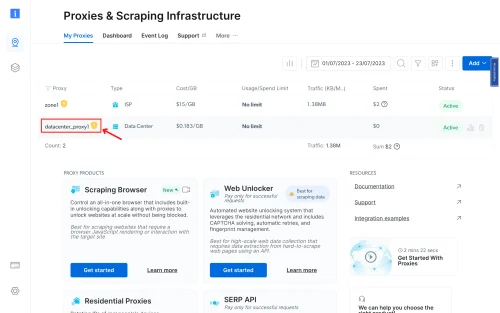
 **步骤 7. Zone 已准备就绪**:
您可以随时点击 Zone 名称进入编辑,并获取下一步需要的数据。若要添加更多代理,请前往 “configuration” 页面。
**步骤 7. Zone 已准备就绪**:
您可以随时点击 Zone 名称进入编辑,并获取下一步需要的数据。若要添加更多代理,请前往 “configuration” 页面。
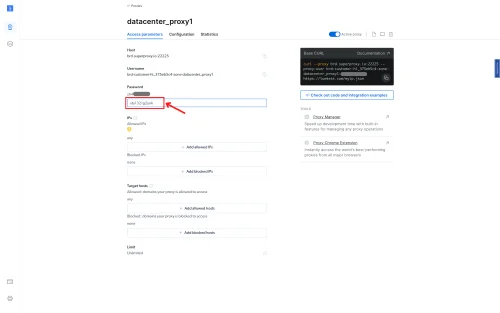
 **步骤 8. 添加新密码**:
若需要添加新的代理密码,点击 **“Add password”**(添加密码)按钮(现在您可以在 “Access parameters” 页面添加更多代理密码)。
**步骤 8. 添加新密码**:
若需要添加新的代理密码,点击 **“Add password”**(添加密码)按钮(现在您可以在 “Access parameters” 页面添加更多代理密码)。
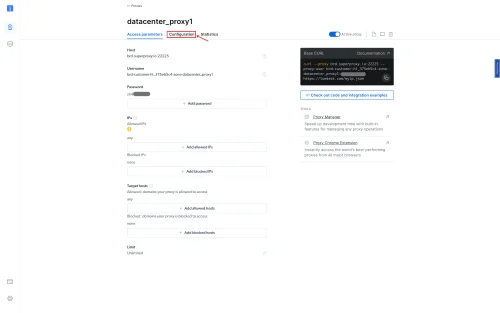
 **步骤 9. 前往配置页面**:
添加新密码后,进入配置(configuration)页面。
**步骤 9. 前往配置页面**:
添加新密码后,进入配置(configuration)页面。
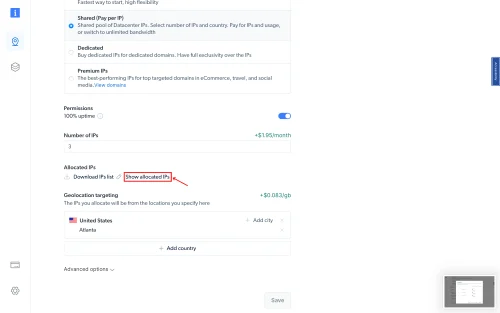
 **步骤 10. 查看 IPs**:
要查看您的 IP,请点击 **Show allocated IPs**。
**步骤 10. 查看 IPs**:
要查看您的 IP,请点击 **Show allocated IPs**。
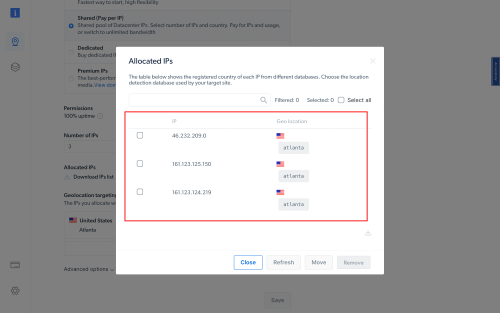
 **步骤 11. 查看已分配的 IP 列表**:
在此处可以看到所有已分配的 IP 地址列表。
**步骤 11. 查看已分配的 IP 列表**:
在此处可以看到所有已分配的 IP 地址列表。
 **步骤 12. 点击下载 IP 列表按钮**:
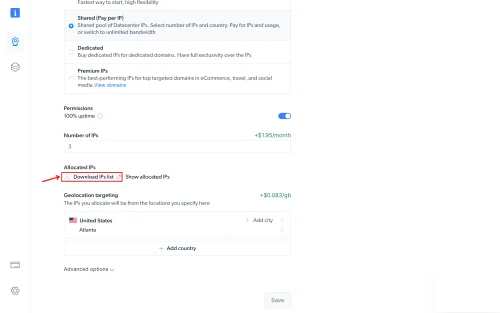 **提示**:如果您在步骤 10 中选择了 “new password”,请等待几分钟再下载已分配 IP 的文件,以便新密码同步并正确反映在文件中。
**步骤 13. 打开文件编辑器**:
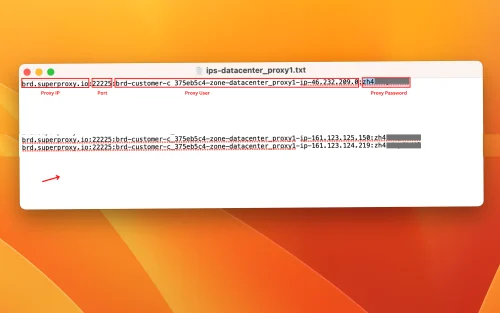
使用任意文本编辑器打开下载的文件,格式会类似如下示例:
**提示**:如果您在步骤 10 中选择了 “new password”,请等待几分钟再下载已分配 IP 的文件,以便新密码同步并正确反映在文件中。
**步骤 13. 打开文件编辑器**:
使用任意文本编辑器打开下载的文件,格式会类似如下示例:
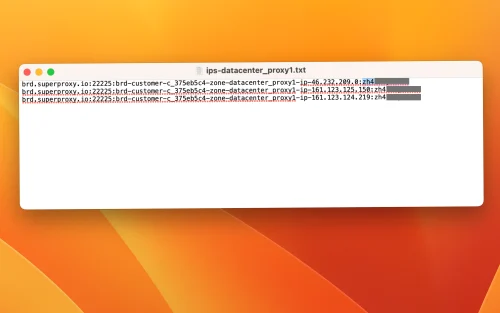 **步骤 14. 输入字段说明**:
为方便使用,我们已将您需要填写的字段分解如下:
* Proxy type: **`HTTP`**
* Proxy IP: brd.superproxy.io
* Proxy Port: `44445`
* Proxy user: `lum-customer-{your_customer_id}-zone-{your_zone}-ip-191.101.212.175`
* Proxy password: `zh4*********`
**步骤 14. 输入字段说明**:
为方便使用,我们已将您需要填写的字段分解如下:
* Proxy type: **`HTTP`**
* Proxy IP: brd.superproxy.io
* Proxy Port: `44445`
* Proxy user: `lum-customer-{your_customer_id}-zone-{your_zone}-ip-191.101.212.175`
* Proxy password: `zh4*********`
 **步骤 15. 登录 SaleFreaks**:
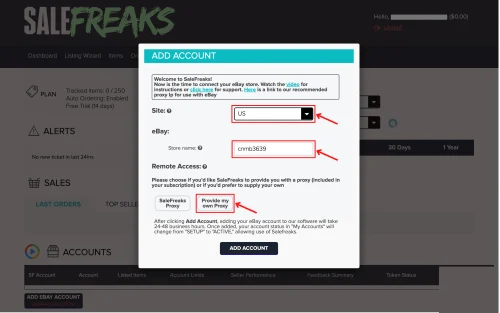
登录 salesfreak.com 后,会弹出添加账号窗口。选择您的 eBay marketplace,输入您的店铺名称,并点击“provide my own proxy”(使用我自己的代理)。
**步骤 15. 登录 SaleFreaks**:
登录 salesfreak.com 后,会弹出添加账号窗口。选择您的 eBay marketplace,输入您的店铺名称,并点击“provide my own proxy”(使用我自己的代理)。
 **步骤 16. 填写 SaleFreaks 字段**:
将从 Bright Data 下载的文件中获取的代理信息填写到 SaleFreaks 的文本字段中。
**步骤 16. 填写 SaleFreaks 字段**:
将从 Bright Data 下载的文件中获取的代理信息填写到 SaleFreaks 的文本字段中。
 **步骤 17. 温馨提示**:
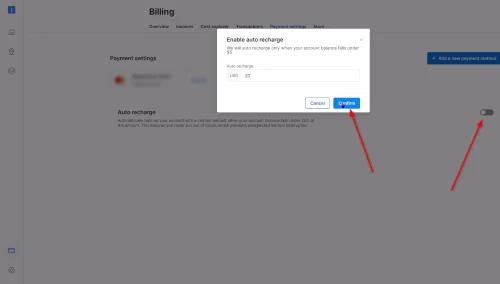
为避免账号被暂停(这将导致所有已分配 IP 失效),我们建议启用自动充值(auto-recharge)功能,以确保账户不会因余额不足而停用。金额可以从 \$20 起。
**步骤 17. 温馨提示**:
为避免账号被暂停(这将导致所有已分配 IP 失效),我们建议启用自动充值(auto-recharge)功能,以确保账户不会因余额不足而停用。金额可以从 \$20 起。
 **重要提示**:
如果您使用 Bright Data 的 Residential Proxies、Web Unlocker API 或 SERP API,则需要安装 SSL 证书来确保与目标网站的端到端安全连接。
该过程非常简单,请参阅 [此指南](/cn/general/account/ssl-certificate#installation-of-the-ssl-certificate) 获取安装说明。
**重要提示**:
如果您使用 Bright Data 的 Residential Proxies、Web Unlocker API 或 SERP API,则需要安装 SSL 证书来确保与目标网站的端到端安全连接。
该过程非常简单,请参阅 [此指南](/cn/general/account/ssl-certificate#installation-of-the-ssl-certificate) 获取安装说明。