> ## Documentation Index
> Fetch the complete documentation index at: https://docs.brightdata.com/llms.txt
> Use this file to discover all available pages before exploring further.

# 如何在 xpander.ai 中设置 Bright Data

[xpander.ai](https://xpander.ai/) 是一个用于构建自主 AI 代理（AI Agents）的后端即服务（Backend-as-a-Service）平台。它是一个无代码解决方案，可帮助企业开发者高效地构建、测试和部署 AI 代理，并提供开源 SDK 以通过代码构建和运行 AI 代理。

## 可用的 Bright Data 工具

<Card>
  <CardGroup cols={1}>
    <Card title="按 Dataset ID 启动数据采集任务" icon="1">
      使用 Scrapers 启动指定数据集的数据采集任务。
    </Card>

    <Card title="按 URL 执行代理请求" icon="2">
      通过 Bright Data 的代理网络发送 HTTP 请求以访问任意网页内容。
    </Card>

    <Card title="按 ID 下载数据集快照" icon="3">
      以多种格式下载数据集快照，并将数据传递给 AI。
    </Card>
  </CardGroup>
</Card>

## 如何将 Bright Data 集成到 xpander.ai 中

<Steps>
  <Step title="先决条件" stepNumber="0">
    * [xpander.ai account](https://app.xpander.ai/login)
    * [Bright Data API key](/cn/api-reference/authentication#如何生成新的-api-key？)
  </Step>

  <Step title="创建新代理" stepNumber="1">
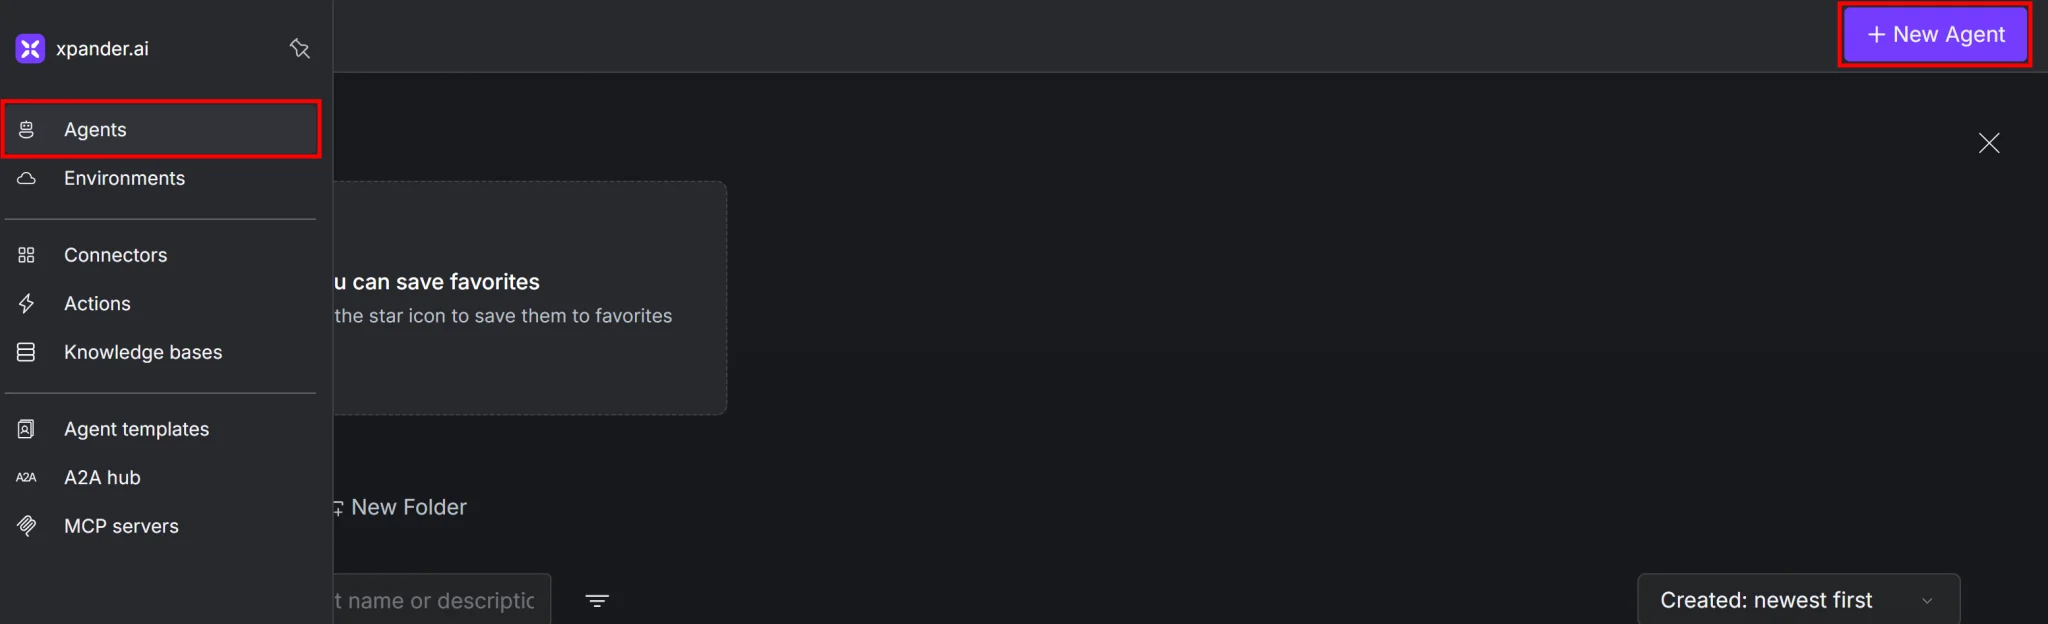
    1. 在你的 [profile dashboard](https://app.xpander.ai/agents) 中点击 “New Agent” 按钮：

    <Frame>
      <img src="https://mintcdn.com/brightdata/z2V3XghEDR2bikNt/images/integrations/xpander-ai/new-agent-button.png?fit=max&auto=format&n=z2V3XghEDR2bikNt&q=85&s=fceebc949769dea8ddd6f65ea2735ab0" alt="Clicking the “Agents > New Agent” button" data-og-width="2048" width="2048" data-og-height="624" height="624" data-path="images/integrations/xpander-ai/new-agent-button.png" data-optimize="true" data-opv="3" srcset="https://mintcdn.com/brightdata/z2V3XghEDR2bikNt/images/integrations/xpander-ai/new-agent-button.png?w=280&fit=max&auto=format&n=z2V3XghEDR2bikNt&q=85&s=bfd3c4660c778e1be7acd3776982bd51 280w, https://mintcdn.com/brightdata/z2V3XghEDR2bikNt/images/integrations/xpander-ai/new-agent-button.png?w=560&fit=max&auto=format&n=z2V3XghEDR2bikNt&q=85&s=dcd18172bdaa45221db2f05c829b1f76 560w, https://mintcdn.com/brightdata/z2V3XghEDR2bikNt/images/integrations/xpander-ai/new-agent-button.png?w=840&fit=max&auto=format&n=z2V3XghEDR2bikNt&q=85&s=6458dfc4abe49bc9c5ba060b3266d7a6 840w, https://mintcdn.com/brightdata/z2V3XghEDR2bikNt/images/integrations/xpander-ai/new-agent-button.png?w=1100&fit=max&auto=format&n=z2V3XghEDR2bikNt&q=85&s=6ae95c5507c5606aa647a35bea579200 1100w, https://mintcdn.com/brightdata/z2V3XghEDR2bikNt/images/integrations/xpander-ai/new-agent-button.png?w=1650&fit=max&auto=format&n=z2V3XghEDR2bikNt&q=85&s=6e02a221bc6af288df5a2428ccf16d42 1650w, https://mintcdn.com/brightdata/z2V3XghEDR2bikNt/images/integrations/xpander-ai/new-agent-button.png?w=2500&fit=max&auto=format&n=z2V3XghEDR2bikNt&q=85&s=499ea42d515fd17c3b821bc168453705 2500w" />
    </Frame>
  </Step>

  <Step title="基础配置" stepNumber="2">
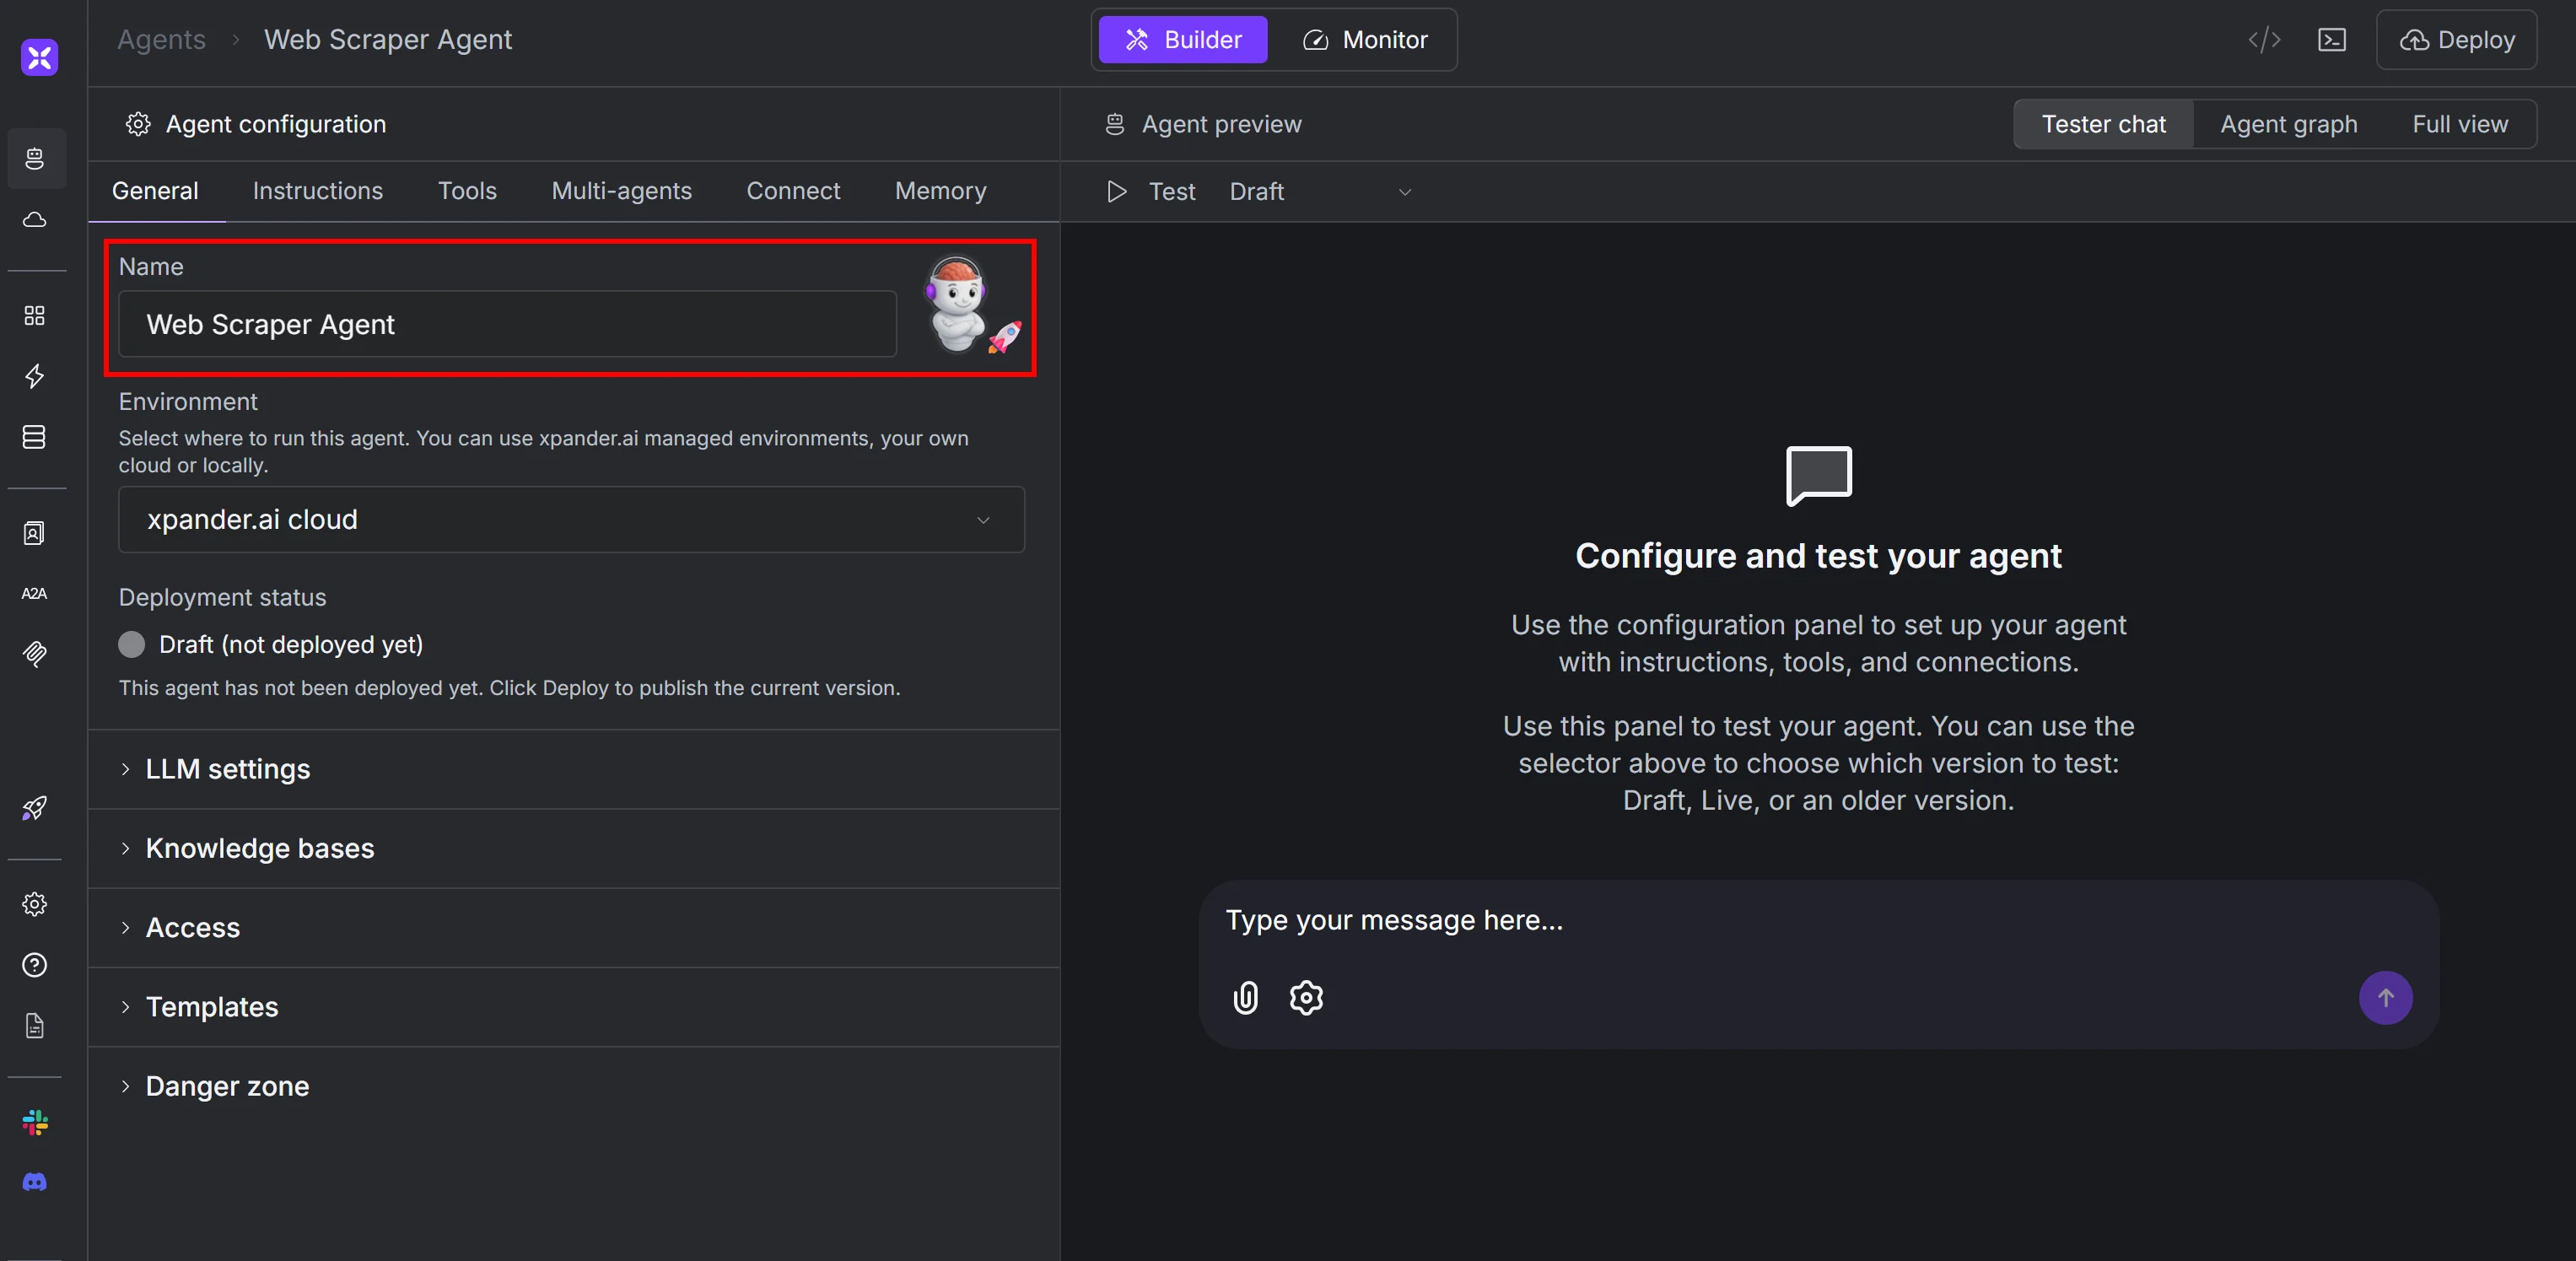
    1. 为你的代理选择一个合适的名称。例如，如果你想创建一个网页抓取代理，可以命名为 “Web Scraper Agent”。

    <Frame>
      <img src="https://mintcdn.com/brightdata/z2V3XghEDR2bikNt/images/integrations/xpander-ai/new-agent-name.png?fit=max&auto=format&n=z2V3XghEDR2bikNt&q=85&s=95dc67fb1eb54549b82393c33e6b5f23" alt="Calling the new agent “Web Scraper Agent”" width="3054" height="1495" data-path="images/integrations/xpander-ai/new-agent-name.png" />
    </Frame>

    2. “General” 选项卡中的其他设置保持默认即可。默认情况下，xpander.ai 会使用 [OpenAI 的 GPT-4o](https://openai.com/index/hello-gpt-4o/) 作为语言模型。
  </Step>

  <Step title="添加 Bright Data 集成工具" stepNumber="3">
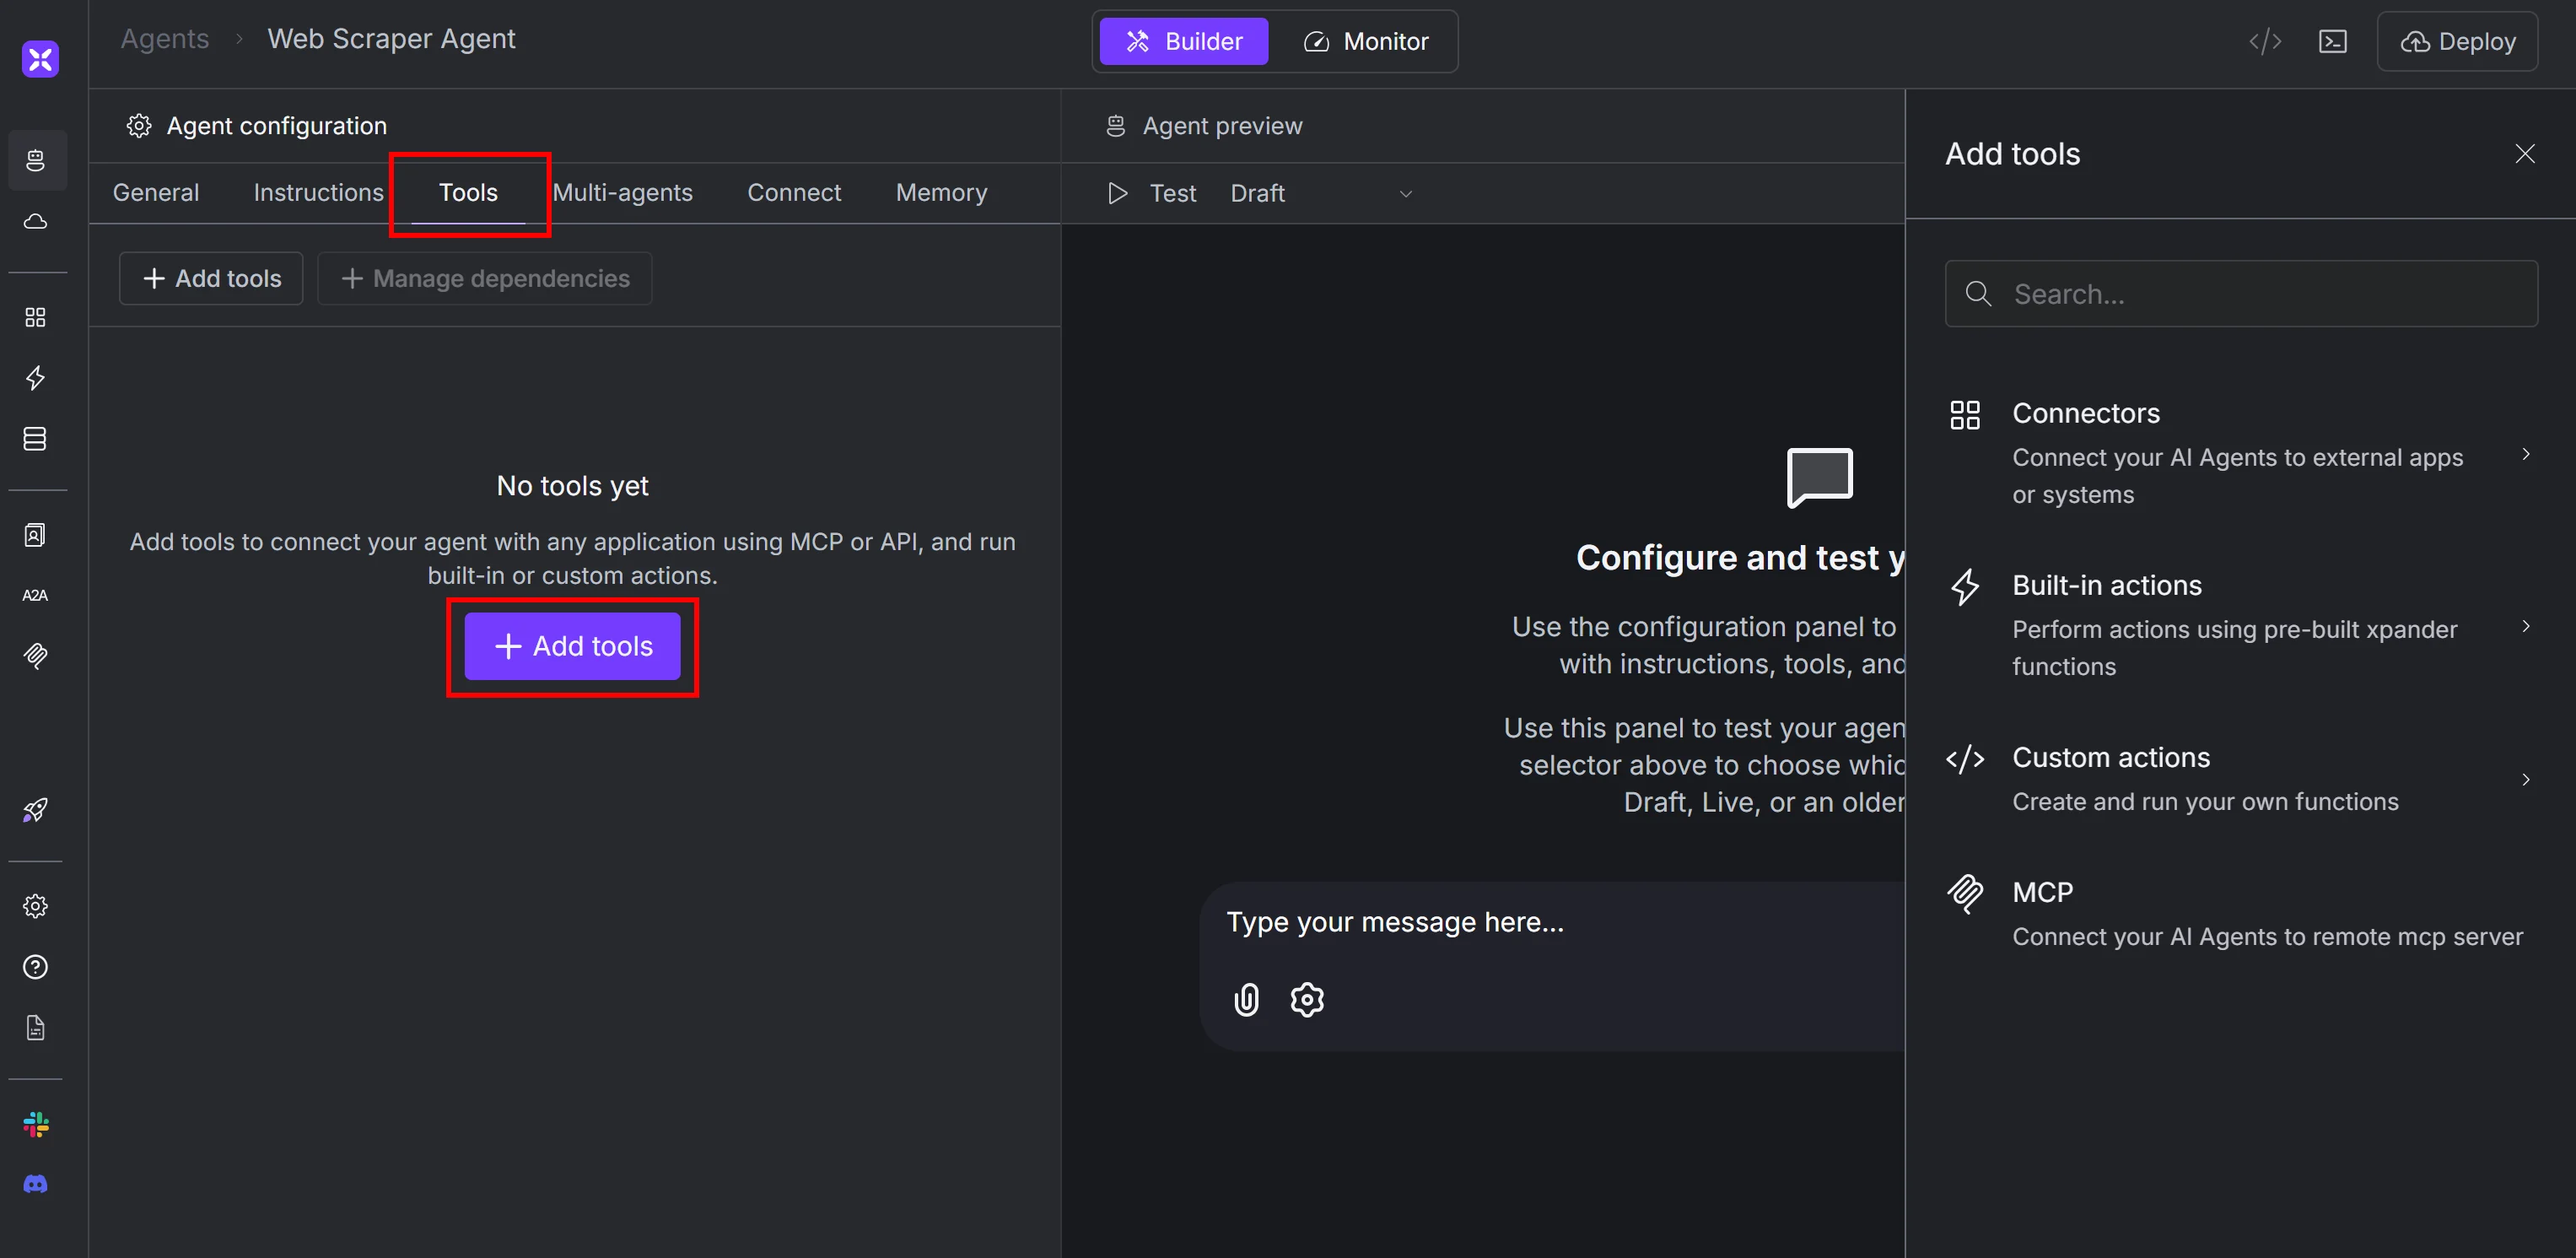
    1. 进入代理的 “Tools” 选项卡，然后点击 “Add tools”：

    <Frame>
      <img src="https://mintcdn.com/brightdata/z2V3XghEDR2bikNt/images/integrations/xpander-ai/add-tools-button.png?fit=max&auto=format&n=z2V3XghEDR2bikNt&q=85&s=c726e9e6003117c4c140b5a9aec6231f" alt="Clicking the “Add tools” button" width="3054" height="1491" data-path="images/integrations/xpander-ai/add-tools-button.png" />
    </Frame>

    2. 在右侧面板搜索 “bright data”，然后选择 Bright Data 集成：

    <Frame>
      <img src="https://mintcdn.com/brightdata/z2V3XghEDR2bikNt/images/integrations/xpander-ai/select-bright-data-connector.png?fit=max&auto=format&n=z2V3XghEDR2bikNt&q=85&s=39632947789b651e0706f0e19d88732b" alt="Selecting the Bright Data connector" width="825" height="495" data-path="images/integrations/xpander-ai/select-bright-data-connector.png" />
    </Frame>
  </Step>

  <Step title="配置 Bright Data Connector" stepNumber="4">
    将会出现以下弹窗：

    <Frame>
      <img src="https://mintcdn.com/brightdata/z2V3XghEDR2bikNt/images/integrations/xpander-ai/connector-configuration-form.png?fit=max&auto=format&n=z2V3XghEDR2bikNt&q=85&s=ed0a601236d549fc9a9a39cf18d8d91e" alt="Filling out the Bright Data connector configuration form" width="1176" height="1485" data-path="images/integrations/xpander-ai/connector-configuration-form.png" />
    </Frame>

    按如下方式填写：

    | 配置选项                 | 值                            |
    | :------------------- | :--------------------------- |
    | Connector 名称         | Bright Data Connector（或任意名称） |
    | Authentication mode  | API Key                      |
    | Authentication scope | Integration user             |
    | API Key              | \[Your Bright Data API key]  |
    | Authentication type  | Bearer                       |

    填写完毕后点击 “Save”。
  </Step>

  <Step title="选择 Bright Data 工具" stepNumber="5">
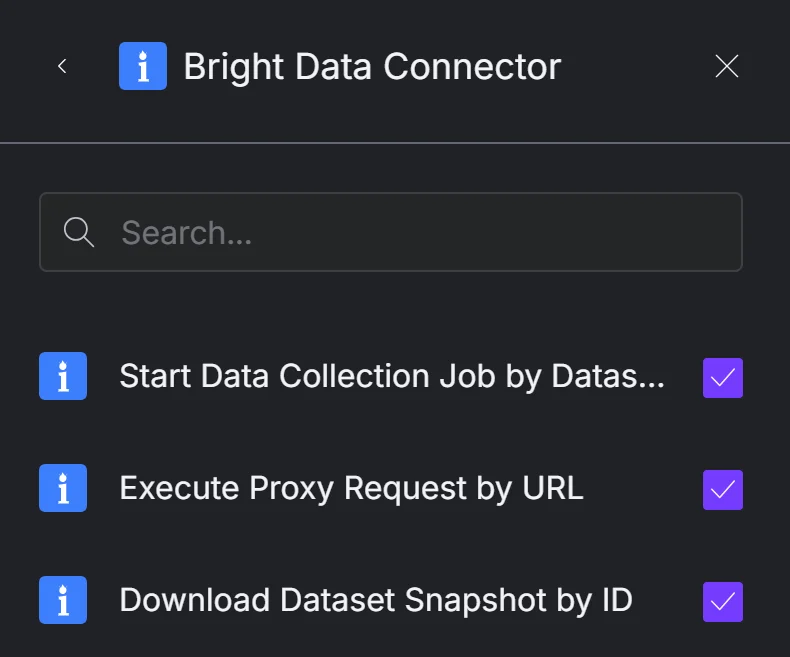
    系统会提示你选择要启用的 Bright Data 工具：

    <Frame>
      <img src="https://mintcdn.com/brightdata/z2V3XghEDR2bikNt/images/integrations/xpander-ai/select-bright-data-tools.png?fit=max&auto=format&n=z2V3XghEDR2bikNt&q=85&s=d41d86c017165693614fe81eef89731f" alt="Selecting the Bright Data tools to enable" width="790" height="657" data-path="images/integrations/xpander-ai/select-bright-data-tools.png" />
    </Frame>

    我们建议选择所有工具，以获得完整的网页抓取能力。目前可用的工具包括：

    * **Start Data Collection Job by Dataset ID**：使用 [Scraperss](https://www.bright.cn/products/web-scraper) 启动指定数据集的采集任务。
    * **Execute Proxy Request by URL**：通过 [Bright Data 的代理网络](https://www.bright.cn/proxy-types/) 发送 HTTP 请求。
    * **Download Dataset Snapshot by ID**：以多种格式下载数据集快照并将数据传递给 AI。
  </Step>

  <Step title="将工具添加到你的代理" stepNumber="6">
    选择好后点击右下角的 “Add to agent”：

    <Frame>
      <img src="https://mintcdn.com/brightdata/z2V3XghEDR2bikNt/images/integrations/xpander-ai/add-to-agent-button.png?fit=max&auto=format&n=z2V3XghEDR2bikNt&q=85&s=31856f9ab4b658d1bb9daf16939c2dec" alt="Clicking the “Add to agent” button" width="811" height="127" data-path="images/integrations/xpander-ai/add-to-agent-button.png" />
    </Frame>

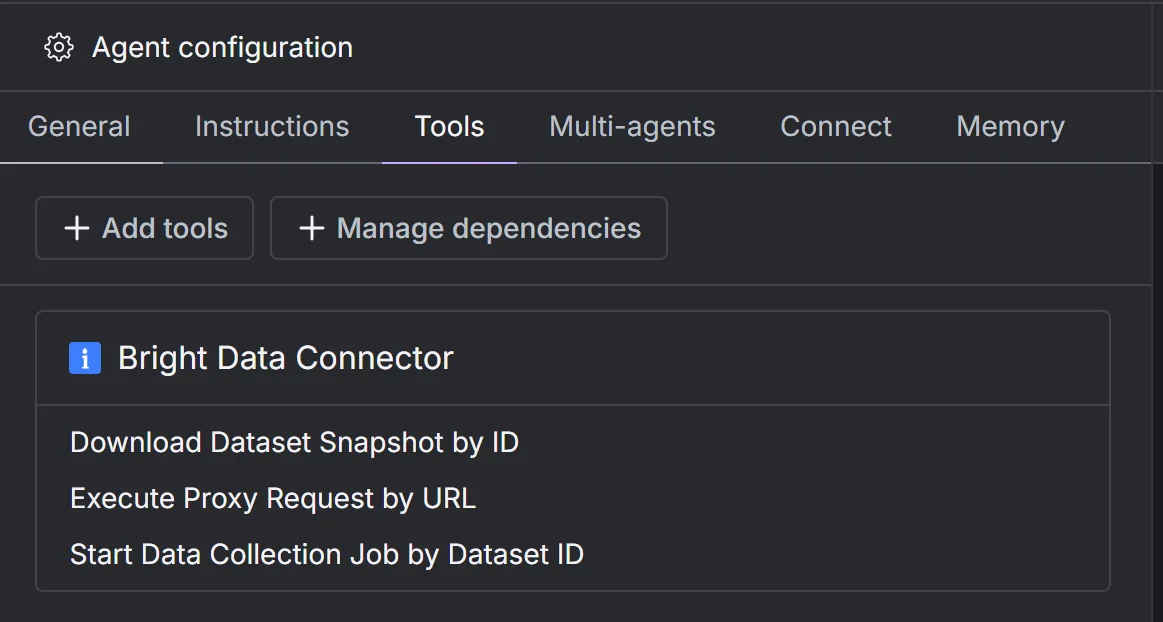
    现在 “Tools” 页面会显示已配置的 Bright Data 工具：

    <Frame>
      <img src="https://mintcdn.com/brightdata/z2V3XghEDR2bikNt/images/integrations/xpander-ai/configured-bright-data-tools.png?fit=max&auto=format&n=z2V3XghEDR2bikNt&q=85&s=8e6d49f4e93505384b4f553e69d129fd" alt="Note the configured Bright Data tools" width="1163" height="622" data-path="images/integrations/xpander-ai/configured-bright-data-tools.png" />
    </Frame>

    你可以点击任何工具查看或调整配置。

    太棒了！你的 AI 代理已经成功集成 Bright Data 并可开始网页抓取。
  </Step>

  <Step title="让你的代理更专业" stepNumber="7">
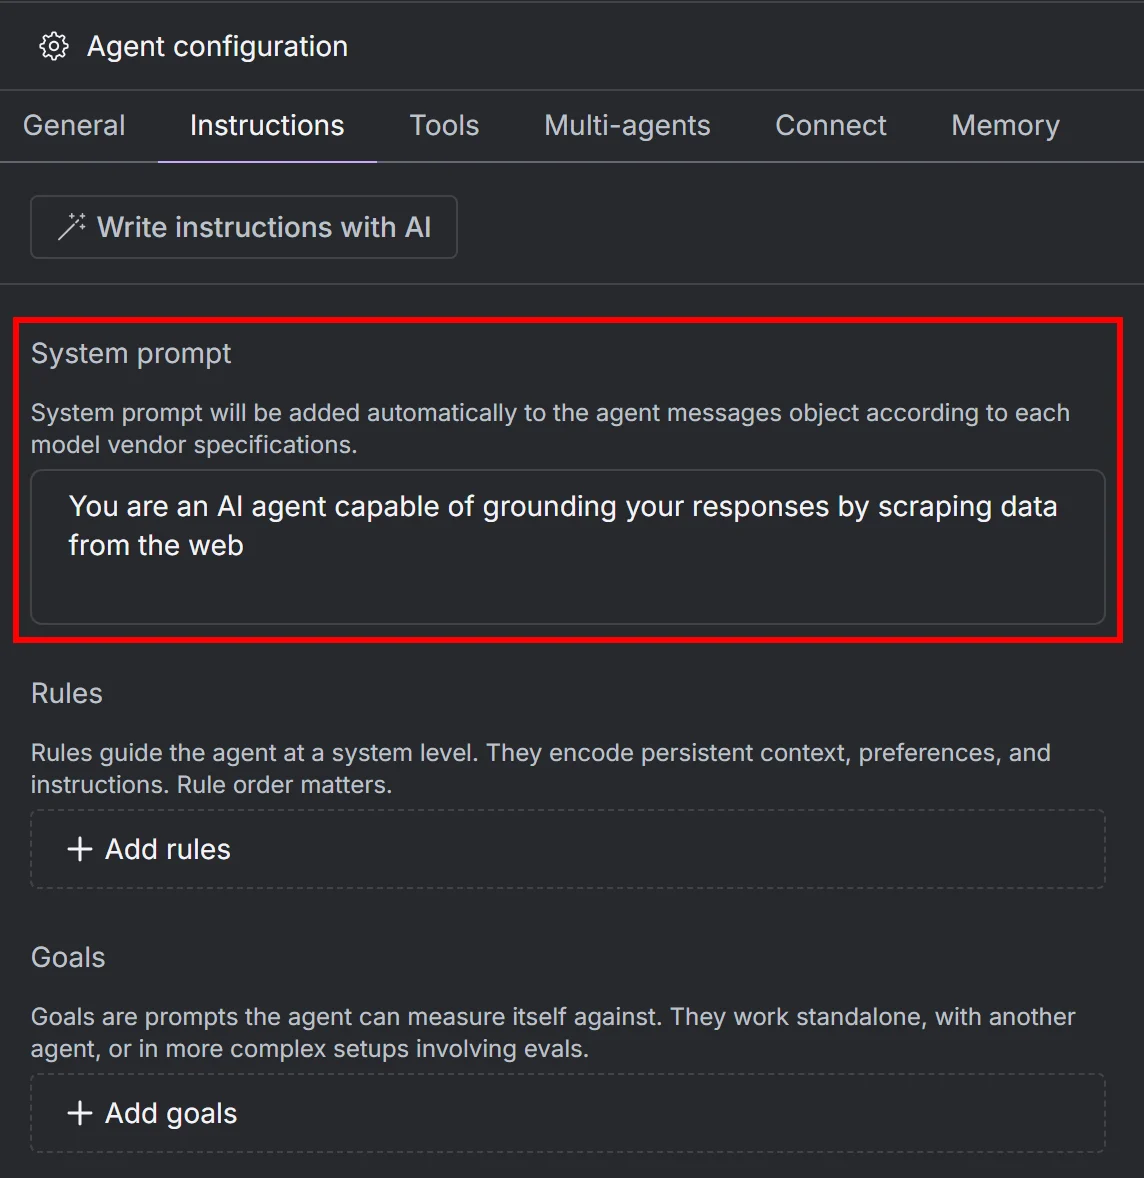
    为了让代理更智能，你可以添加自定义 [system prompt](https://www.promptlayer.com/glossary/system-prompt)。

    点击 “Instructions”，在 “System prompt” 文本框中粘贴类似内容：

    ```
    You are an AI agent capable of grounding your responses by scraping data from the web
    ```
    <Frame>
      <img src="https://mintcdn.com/brightdata/z2V3XghEDR2bikNt/images/integrations/xpander-ai/agent-system-prompt.png?fit=max&auto=format&n=z2V3XghEDR2bikNt&q=85&s=336b045b868b5616754e6c00d887761b" alt="Adding a system prompt to your agent" width="1144" height="1178" data-path="images/integrations/xpander-ai/agent-system-prompt.png" />
    </Frame>

    你还可以添加自定义规则和目标，让代理更专业。

    很好！你的 xpander 网页抓取代理已准备完毕。
  </Step>

  <Step title="查看代理工作流图" stepNumber="8">
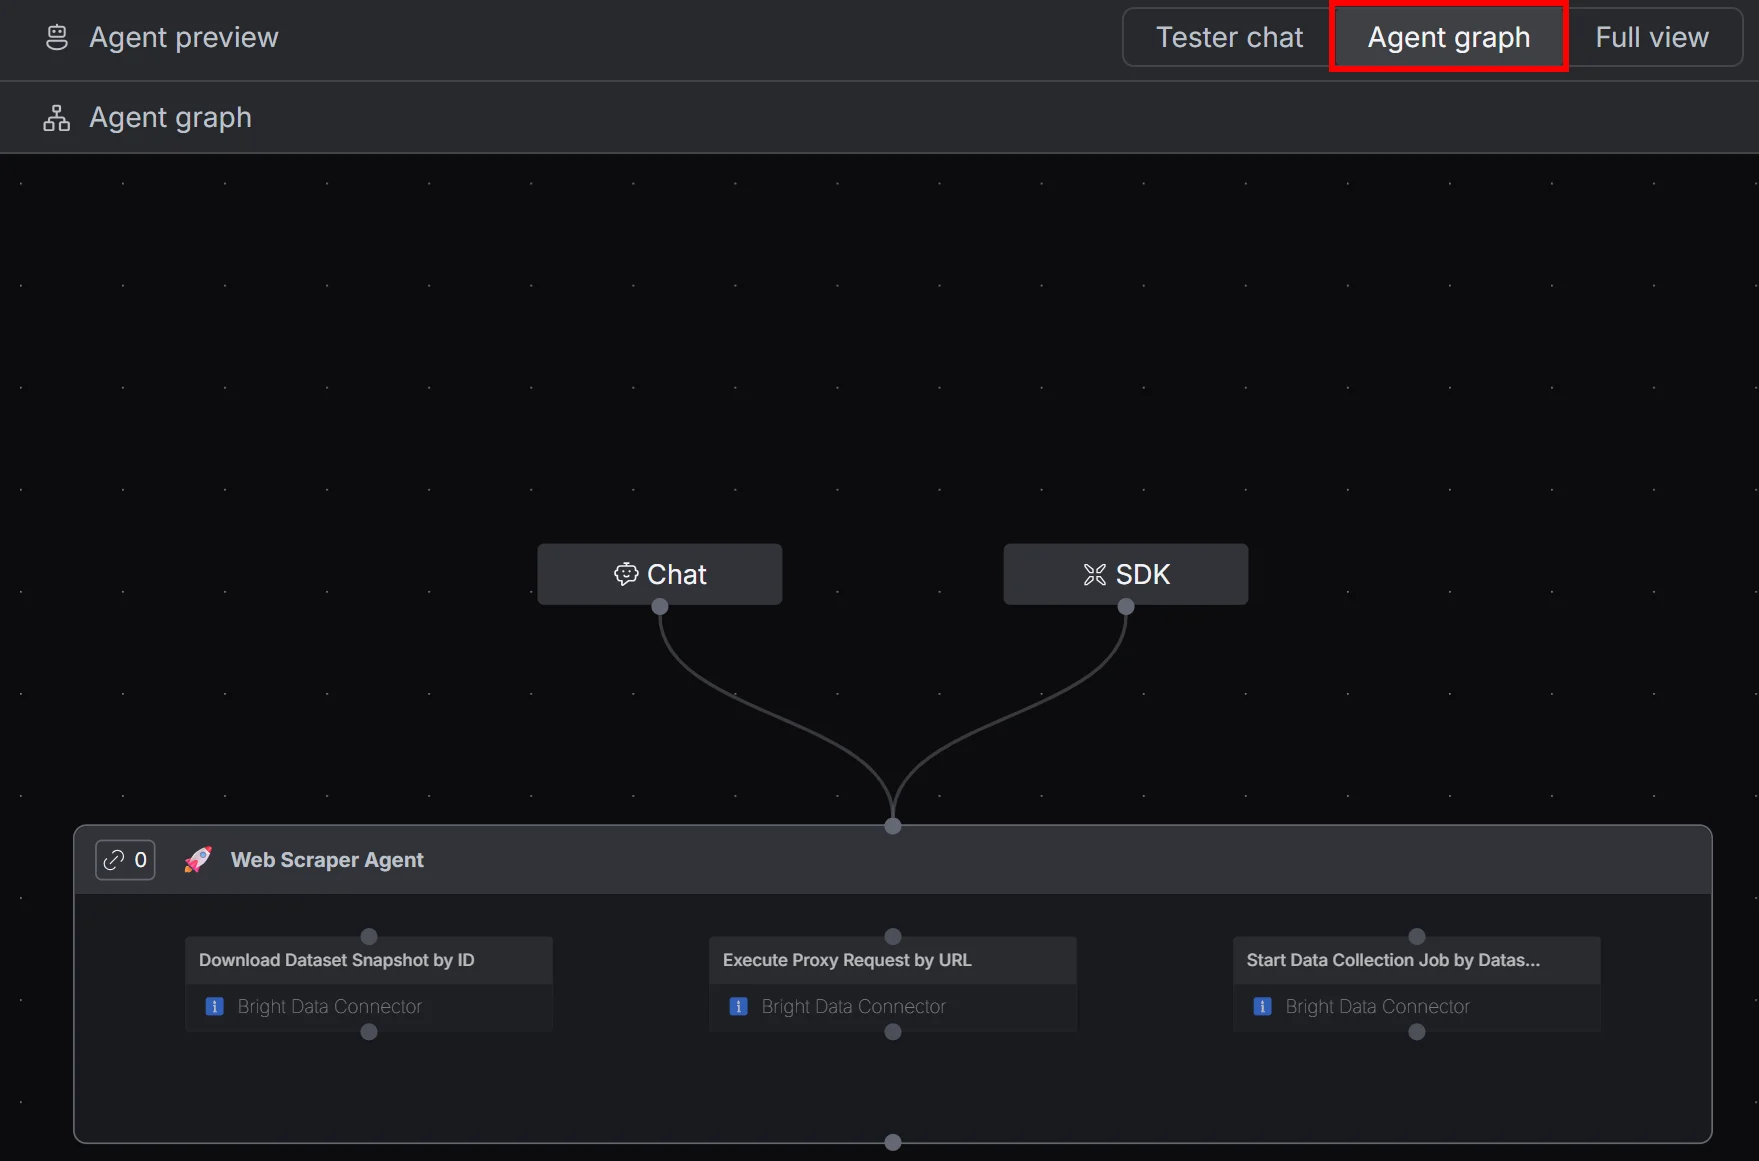
    点击 “Agent graph” 按钮查看你的代理工作流：

    <Frame>
      <img src="https://mintcdn.com/brightdata/z2V3XghEDR2bikNt/images/integrations/xpander-ai/agent-graph.png?fit=max&auto=format&n=z2V3XghEDR2bikNt&q=85&s=d5b4ab5bdc8364d87f434c179d2baf2b" alt="The agent graph" width="1759" height="1161" data-path="images/integrations/xpander-ai/agent-graph.png" />
    </Frame>

    你会看到一个代理节点，拥有三个已配置的 Bright Data 工具。

    做得很好！接下来你可以测试它的能力。
  </Step>

  <Step title="向代理发送提示词" stepNumber="9">
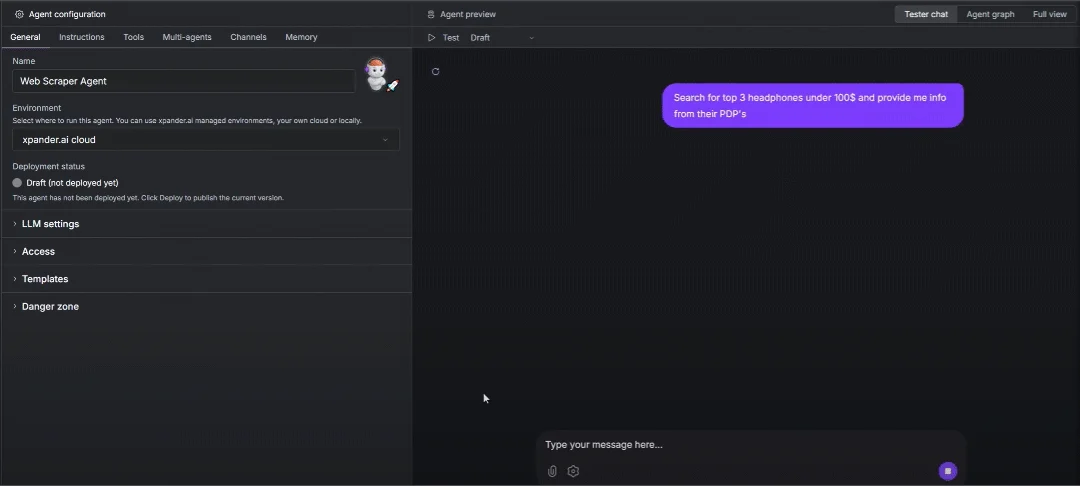
    返回 “Tester Chat” 选项卡，尝试使用以下提示：

    ```
    Search for top 3 headphones under \$100 and provide me info from their PDP's
    ```

    这会让代理在线查找 \$100 以下最好的 3 款耳机，并抓取它们的 [产品详情页（PDPs）](https://www.dynamicyield.com/glossary/product-detail-page/)。

    在输入框中发送提示：

    <Frame>
      <img src="https://mintcdn.com/brightdata/z2V3XghEDR2bikNt/images/integrations/xpander-ai/ai-scraping-agent-in-action.png?fit=max&auto=format&n=z2V3XghEDR2bikNt&q=85&s=9bd2b7ecc7eb71fd23acd4ade8287ab1" alt="The AI scraping agent in action" width="1080" height="486" data-path="images/integrations/xpander-ai/ai-scraping-agent-in-action.png" />
    </Frame>
  </Step>

  <Step title="分析代理响应" stepNumber="10">
    代理会使用 LLM 与 Bright Data 工具来：

    1. 搜索并找到符合条件的 3 个耳机产品
    2. 为每个商品启动采集任务并抓取 Amazon 数据
    3. 将信息总结为简短准确的回复，并附上 Amazon PDP 链接
  </Step>

  <Step title="检查工具调用" stepNumber="11">
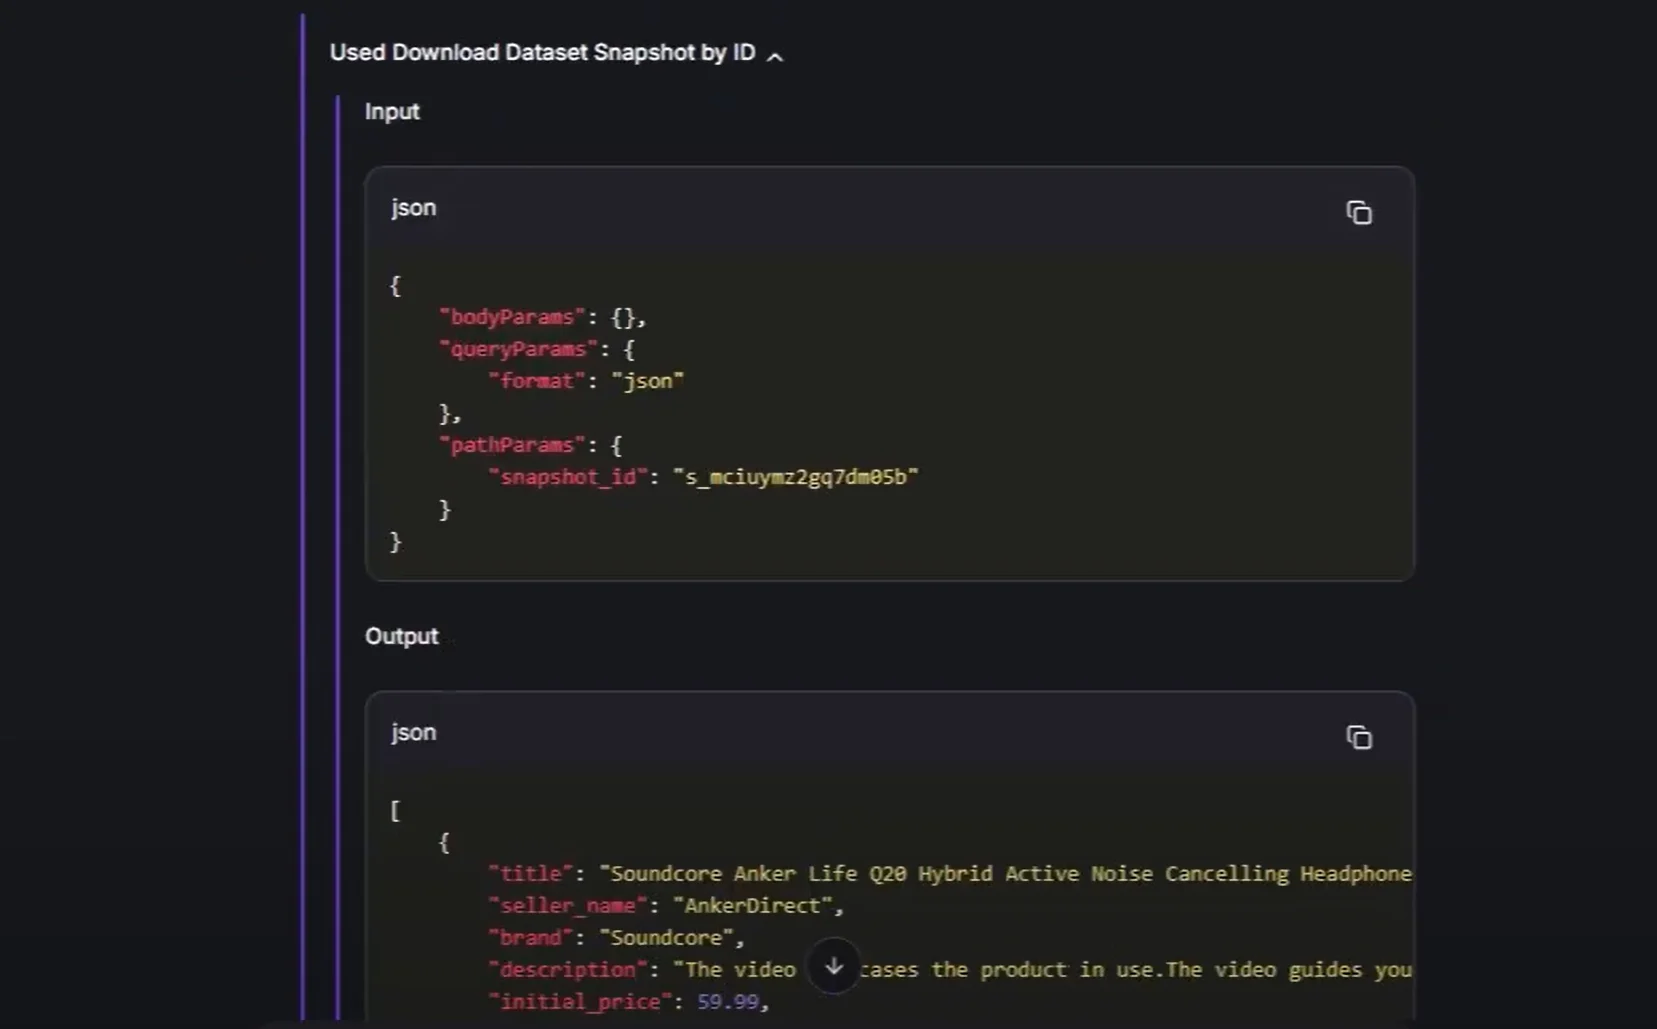
    展开工具调用可以看到如下内容：

    <Frame>
      <img src="https://mintcdn.com/brightdata/z2V3XghEDR2bikNt/images/integrations/xpander-ai/tool-call-io-details.png?fit=max&auto=format&n=z2V3XghEDR2bikNt&q=85&s=2e87ba23f86f6f861a21de5e13309679" alt="The I/O details from a tool call" width="1657" height="1029" data-path="images/integrations/xpander-ai/tool-call-io-details.png" />
    </Frame>

    这证明代理会自动选择并调用正确的 Bright Data 工具，并传入正确的参数以实时抓取数据（本例中为 Amazon 产品页）。
  </Step>
</Steps>

就这样！你已经在 xpander.ai 上获得一个由 Bright Data 数据基础设施驱动的完整网页抓取代理！