> ## Documentation Index
> Fetch the complete documentation index at: https://docs.brightdata.com/llms.txt
> Use this file to discover all available pages before exploring further.
# 使用 Bright Data 的 SERP API 发送您的第一个请求
> 通过易于理解的代码示例,逐步指导您发送第一个 SERP API 请求
## 几分钟内发送您的第一个请求
使用此现成代码示例,可在几分钟内测试 SERP API。
Bright Data 提供两种访问 SERP API 的方法,两者提供 **相同** 结果,同时适应不同客户的工作流程:
纯 REST API 方法,便于访问并实现直接集成。
适用于依赖代理路由的工作流程。
## 直接 API 访问(推荐)
一种简单、RESTful 的方式与 Bright Data 的 SERP API 交互。直接 API 访问抽象了代理管理,让您通过单一端点发送请求,确保使用简单且易于集成 REST API。
### 最适合:
* 集中端点:通过单一 RESTful 端点访问 SERP API。
* 简化直接集成:无需管理代理或路由。
* 单一 API key 认证:安全易用,替代用户名密码管理。
### 发送您的第一个请求
在 [设置](/cn/scraping-automation/serp-api/quickstart) SERP API zone 后,您将在 zone 的 **Overview** 标签页中找到工作请求示例和 API key:
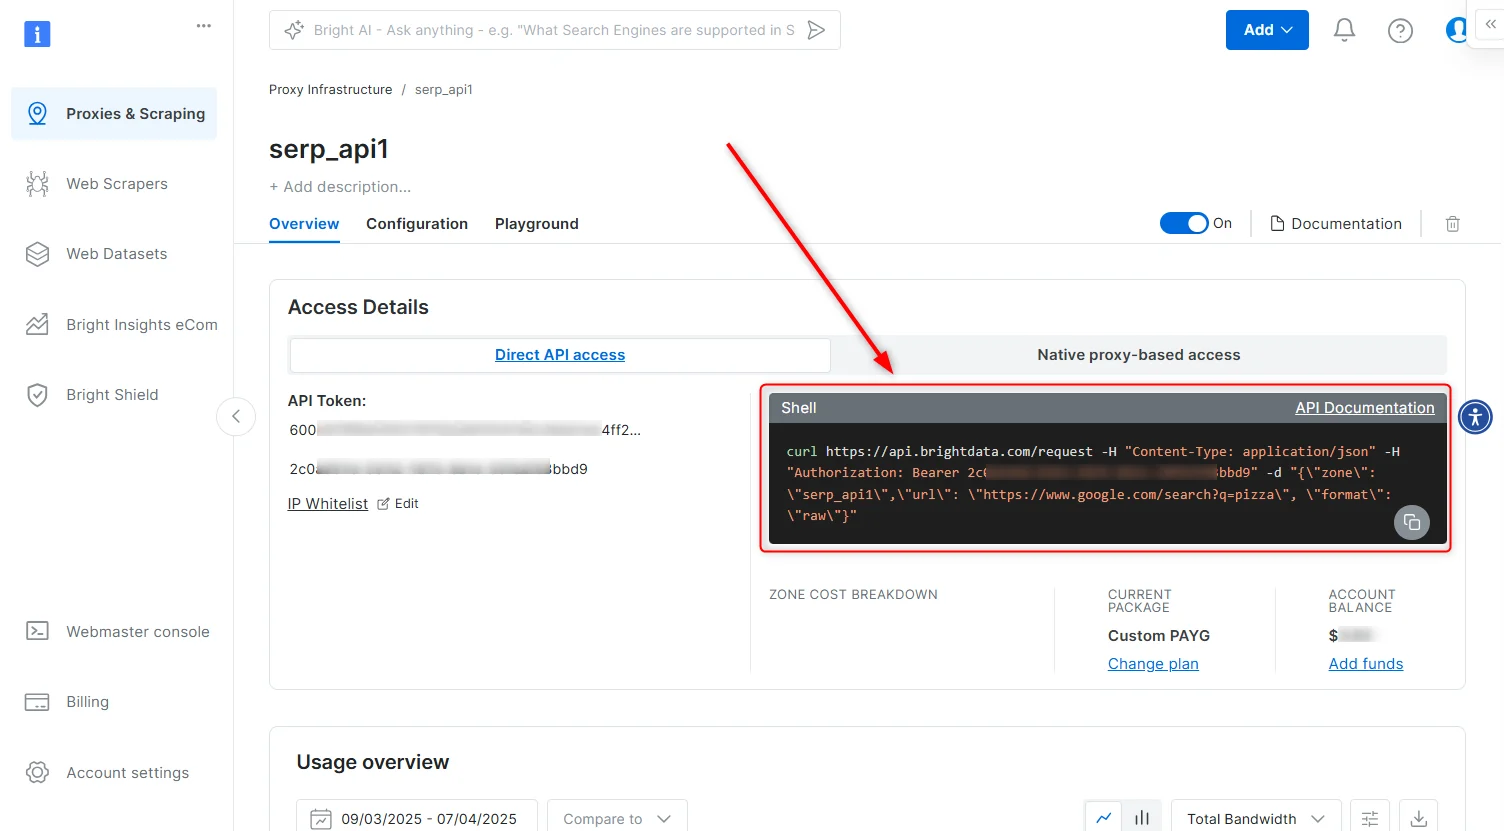 以下是简单 SERP API cURL 请求示例:
```sh Direct API access - cURL theme={null}
curl -H "Content-Type: application/json" -H "Authorization: Bearer [INSERT_YOUR_API_KEY]" -d '{"zone": "[INSERT_YOUR_SERP_API_ZONE_NAME]","url": "[INSERT_YOUR_TARGET_URL]", "format": "raw"}' https://api.brightdata.com/request
```
### 请求说明
1. API 端点: [`https://api.brightdata.com/request`](https://api.brightdata.com/request)
2. Authorization Header: `Authorization: Bearer [INSERT YOUR API key]`
* API key 可在 SERP API zone 中找到
3. Payload:
* `zone`:您的 SERP API **zone 名称**
* `url`:完整 SERP 目标 URL(包含查询参数)
* `format`:定义响应格式,使用 `raw` 可获取目标站点的原始响应
### 生成 Bright Data API key
Bright Data API key 是通过直接 API 访问 SERP API 的安全认证令牌。创建新的 SERP API zone 时,API key 会自动生成,可在 zone 的 **Overview** 标签页中找到:
以下是简单 SERP API cURL 请求示例:
```sh Direct API access - cURL theme={null}
curl -H "Content-Type: application/json" -H "Authorization: Bearer [INSERT_YOUR_API_KEY]" -d '{"zone": "[INSERT_YOUR_SERP_API_ZONE_NAME]","url": "[INSERT_YOUR_TARGET_URL]", "format": "raw"}' https://api.brightdata.com/request
```
### 请求说明
1. API 端点: [`https://api.brightdata.com/request`](https://api.brightdata.com/request)
2. Authorization Header: `Authorization: Bearer [INSERT YOUR API key]`
* API key 可在 SERP API zone 中找到
3. Payload:
* `zone`:您的 SERP API **zone 名称**
* `url`:完整 SERP 目标 URL(包含查询参数)
* `format`:定义响应格式,使用 `raw` 可获取目标站点的原始响应
### 生成 Bright Data API key
Bright Data API key 是通过直接 API 访问 SERP API 的安全认证令牌。创建新的 SERP API zone 时,API key 会自动生成,可在 zone 的 **Overview** 标签页中找到:
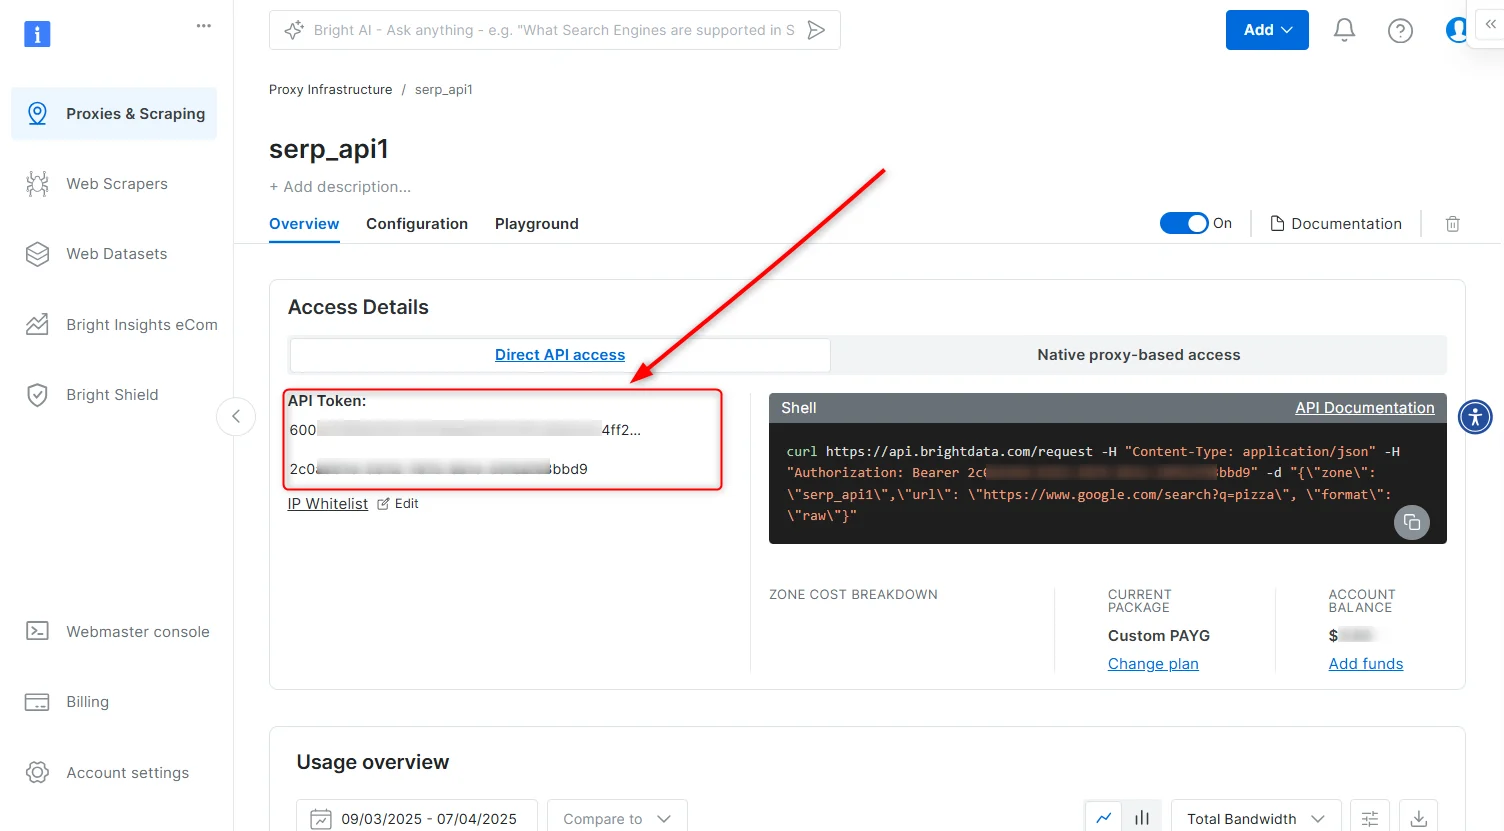 **生成新的 API key:**
* 前往 [账户设置](https://www.bright.cn/cp/setting/users)
* 向下滚动并点击 “Add API key”
* 按屏幕提示完成流程
强烈建议为 API key 设置过期时间以提高安全性
API key 仅在屏幕上显示一次,请确保复制并安全存储
## 基于代理的本地访问
访问 SERP API 时,需要提供以下凭据:
1. Customer ID
2. SERP API zone 名称
3. SERP API 密码
4. Bright Data SSL 证书
#### Customer ID
Customer ID 可在欢迎邮件中找到,或点击控制面板右上角账户首字母查看,或点击此处:[账户设置](https://www.bright.cn/cp/setting/customer_details)
#### Zone 名称和密码
在控制面板 Web Unlocker API zone 的 Overview 标签页中找到 zone 名称和密码
#### Bright Data SSL 证书
设置 Bright Data SSL 证书以防止 SSL 错误
SSL 证书可在 zone Overview 顶部菜单的 “SSL certificate” 向导中下载。更多说明见:[SSL 证书](/cn/general/account/ssl-certificate#how-to-download-the-ssl-certificate)
或者,可以选择 [忽略 SSL 错误](/cn/general/account/ssl-certificate#how-to-ignore-ssl-errors)
#### SERP API:HTTPS 代理示例代码
获取 API 凭据后,使用以下代码发送第一个请求:
```sh cURL theme={null}
curl "https://www.google.com/search?q=pizza" --proxy brd.superproxy.io:33335 --proxy-user brd-customer--zone-: -k
```
```js Node.js theme={null}
#!/usr/bin/env node
require('request-promise')({
url: 'https://www.google.com/search?q=pizza',
proxy: 'http://brd-customer--zone-:@brd.superproxy.io:33335',
})
.then(function (data) {
console.log(data);
},
function (err) {
console.error(err);
});
```
```python Python theme={null}
import pprint
import requests
host = 'brd.superproxy.io'
port = 33335
username = 'brd-customer--zone-'
password = ''
proxy_url = f'http://{username}:{password}@{host}:{port}'
proxies = {
'http': proxy_url,
'https': proxy_url
}
url = "https://www.google.com/search?q=pizza&brd_json=1"
response = requests.get(url, proxies=proxies, verify=False)
pprint.pprint(response.json())
```
```php PHP theme={null}
-zone-:');
curl_exec($curl);
?>
```
```ruby Ruby theme={null}
#!/usr/bin/ruby
require 'uri'
require 'net/http'
require 'net/https'
puts '要启用免费试用账户并获取 CUSTOMER, YOURZONE 和 YOURPASS,请联系 sales@brightdata.com'
uri = URI.parse('https://www.google.com/search?q=pizza')
proxy = Net::HTTP::Proxy('brd.superproxy.io', 33335, 'brd-customer--zone-', '')
req = Net::HTTP::Get.new(uri)
result = proxy.start(uri.host,uri.port, :use_ssl => uri.scheme == 'https') do |http|
http.request(req)
end
puts result.body
```
```cs C# theme={null}
using System;
using System.Net;
class Example {
static void Main() {
var client = new WebClient();
client.Proxy = new WebProxy("brd.superproxy.io:33335");
client.Proxy.Credentials = new NetworkCredential(
"brd-customer--zone-",
""
);
Console.WriteLine(client.DownloadString("https://www.google.com/search?q=pizza"));
}
```
```java Java theme={null}
package example;
import org.apache.http.HttpHost;
import org.apache.http.client.fluent.*;
public class Example {
public static void main(String[] args) throws Exception {
System.out.println("要启用免费试用账户并获取 CUSTOMER, YOURZONE 和 YOURPASS,请联系 sales@brightdata.com");
HttpHost proxy = new HttpHost("brd.superproxy.io", 33335);
String res = Executor.newInstance()
.auth(proxy, "brd-customer--zone-", "")
.execute(Request.Get("https://www.google.com/search?q=pizza").viaProxy(proxy))
.returnContent().asString();
System.out.println(res);
}
}
```
```perl Perl theme={null}
#!/usr/bin/perl
print '要启用免费试用账户并获取 CUSTOMER, YOURZONE 和 YOURPASS,请联系 sales@brightdata.com';
use LWP::UserAgent;
my $agent = LWP::UserAgent->new();
$agent->proxy(['http', 'https'], "http://brd-customer--zone-:\@brd.superproxy.io:33335");
print $agent->get('https://www.google.com/search?q=pizza')->content();
```
```vb VBA theme={null}
Imports System.Net
Module Module1
Sub Main()
Console.WriteLine("要启用免费试用账户并获取 CUSTOMER, YOURZONE 和 YOURPASS,请联系 sales@brightdata.com")
Dim Client As New WebClient
Client.Proxy = New WebProxy("http://brd.superproxy.io:33335")
Client.Proxy.Credentials = New NetworkCredential("brd-customer--zone-", "")
Console.WriteLine(Client.DownloadString("https://www.google.com/search?q=pizza"))
End Sub
End Module
```
**生成新的 API key:**
* 前往 [账户设置](https://www.bright.cn/cp/setting/users)
* 向下滚动并点击 “Add API key”
* 按屏幕提示完成流程
强烈建议为 API key 设置过期时间以提高安全性
API key 仅在屏幕上显示一次,请确保复制并安全存储
## 基于代理的本地访问
访问 SERP API 时,需要提供以下凭据:
1. Customer ID
2. SERP API zone 名称
3. SERP API 密码
4. Bright Data SSL 证书
#### Customer ID
Customer ID 可在欢迎邮件中找到,或点击控制面板右上角账户首字母查看,或点击此处:[账户设置](https://www.bright.cn/cp/setting/customer_details)
#### Zone 名称和密码
在控制面板 Web Unlocker API zone 的 Overview 标签页中找到 zone 名称和密码
#### Bright Data SSL 证书
设置 Bright Data SSL 证书以防止 SSL 错误
SSL 证书可在 zone Overview 顶部菜单的 “SSL certificate” 向导中下载。更多说明见:[SSL 证书](/cn/general/account/ssl-certificate#how-to-download-the-ssl-certificate)
或者,可以选择 [忽略 SSL 错误](/cn/general/account/ssl-certificate#how-to-ignore-ssl-errors)
#### SERP API:HTTPS 代理示例代码
获取 API 凭据后,使用以下代码发送第一个请求:
```sh cURL theme={null}
curl "https://www.google.com/search?q=pizza" --proxy brd.superproxy.io:33335 --proxy-user brd-customer--zone-: -k
```
```js Node.js theme={null}
#!/usr/bin/env node
require('request-promise')({
url: 'https://www.google.com/search?q=pizza',
proxy: 'http://brd-customer--zone-:@brd.superproxy.io:33335',
})
.then(function (data) {
console.log(data);
},
function (err) {
console.error(err);
});
```
```python Python theme={null}
import pprint
import requests
host = 'brd.superproxy.io'
port = 33335
username = 'brd-customer--zone-'
password = ''
proxy_url = f'http://{username}:{password}@{host}:{port}'
proxies = {
'http': proxy_url,
'https': proxy_url
}
url = "https://www.google.com/search?q=pizza&brd_json=1"
response = requests.get(url, proxies=proxies, verify=False)
pprint.pprint(response.json())
```
```php PHP theme={null}
-zone-:');
curl_exec($curl);
?>
```
```ruby Ruby theme={null}
#!/usr/bin/ruby
require 'uri'
require 'net/http'
require 'net/https'
puts '要启用免费试用账户并获取 CUSTOMER, YOURZONE 和 YOURPASS,请联系 sales@brightdata.com'
uri = URI.parse('https://www.google.com/search?q=pizza')
proxy = Net::HTTP::Proxy('brd.superproxy.io', 33335, 'brd-customer--zone-', '')
req = Net::HTTP::Get.new(uri)
result = proxy.start(uri.host,uri.port, :use_ssl => uri.scheme == 'https') do |http|
http.request(req)
end
puts result.body
```
```cs C# theme={null}
using System;
using System.Net;
class Example {
static void Main() {
var client = new WebClient();
client.Proxy = new WebProxy("brd.superproxy.io:33335");
client.Proxy.Credentials = new NetworkCredential(
"brd-customer--zone-",
""
);
Console.WriteLine(client.DownloadString("https://www.google.com/search?q=pizza"));
}
```
```java Java theme={null}
package example;
import org.apache.http.HttpHost;
import org.apache.http.client.fluent.*;
public class Example {
public static void main(String[] args) throws Exception {
System.out.println("要启用免费试用账户并获取 CUSTOMER, YOURZONE 和 YOURPASS,请联系 sales@brightdata.com");
HttpHost proxy = new HttpHost("brd.superproxy.io", 33335);
String res = Executor.newInstance()
.auth(proxy, "brd-customer--zone-", "")
.execute(Request.Get("https://www.google.com/search?q=pizza").viaProxy(proxy))
.returnContent().asString();
System.out.println(res);
}
}
```
```perl Perl theme={null}
#!/usr/bin/perl
print '要启用免费试用账户并获取 CUSTOMER, YOURZONE 和 YOURPASS,请联系 sales@brightdata.com';
use LWP::UserAgent;
my $agent = LWP::UserAgent->new();
$agent->proxy(['http', 'https'], "http://brd-customer--zone-:\@brd.superproxy.io:33335");
print $agent->get('https://www.google.com/search?q=pizza')->content();
```
```vb VBA theme={null}
Imports System.Net
Module Module1
Sub Main()
Console.WriteLine("要启用免费试用账户并获取 CUSTOMER, YOURZONE 和 YOURPASS,请联系 sales@brightdata.com")
Dim Client As New WebClient
Client.Proxy = New WebProxy("http://brd.superproxy.io:33335")
Client.Proxy.Credentials = New NetworkCredential("brd-customer--zone-", "")
Console.WriteLine(Client.DownloadString("https://www.google.com/search?q=pizza"))
End Sub
End Module
```