> ## Documentation Index
> Fetch the complete documentation index at: https://docs.brightdata.com/llms.txt
> Use this file to discover all available pages before exploring further.
# Initiate collection and delivery
> Trigger a Bright Data Scraper Studio collection by API, manually or on a schedule, and deliver to webhook, S3, GCS, Azure, SFTP, email or API download.
Once you save a scraper to production in Bright Data Scraper Studio, you can trigger a collection run three ways (API, manual, or scheduled) and deliver the results in five formats (JSON, NDJSON, CSV, XLSX) to six destinations (API download, webhook, S3, GCS, Azure, Alibaba Cloud OSS, SFTP, or email). This page covers every option.
## Prerequisites
* A scraper saved to production in the [Bright Data Scraper Studio IDE](https://brightdata.com/cp/scrapers)
* An API key for the API-trigger and API-delivery paths ([create one](https://brightdata.com/cp/setting))
## How do I save a scraper to production?
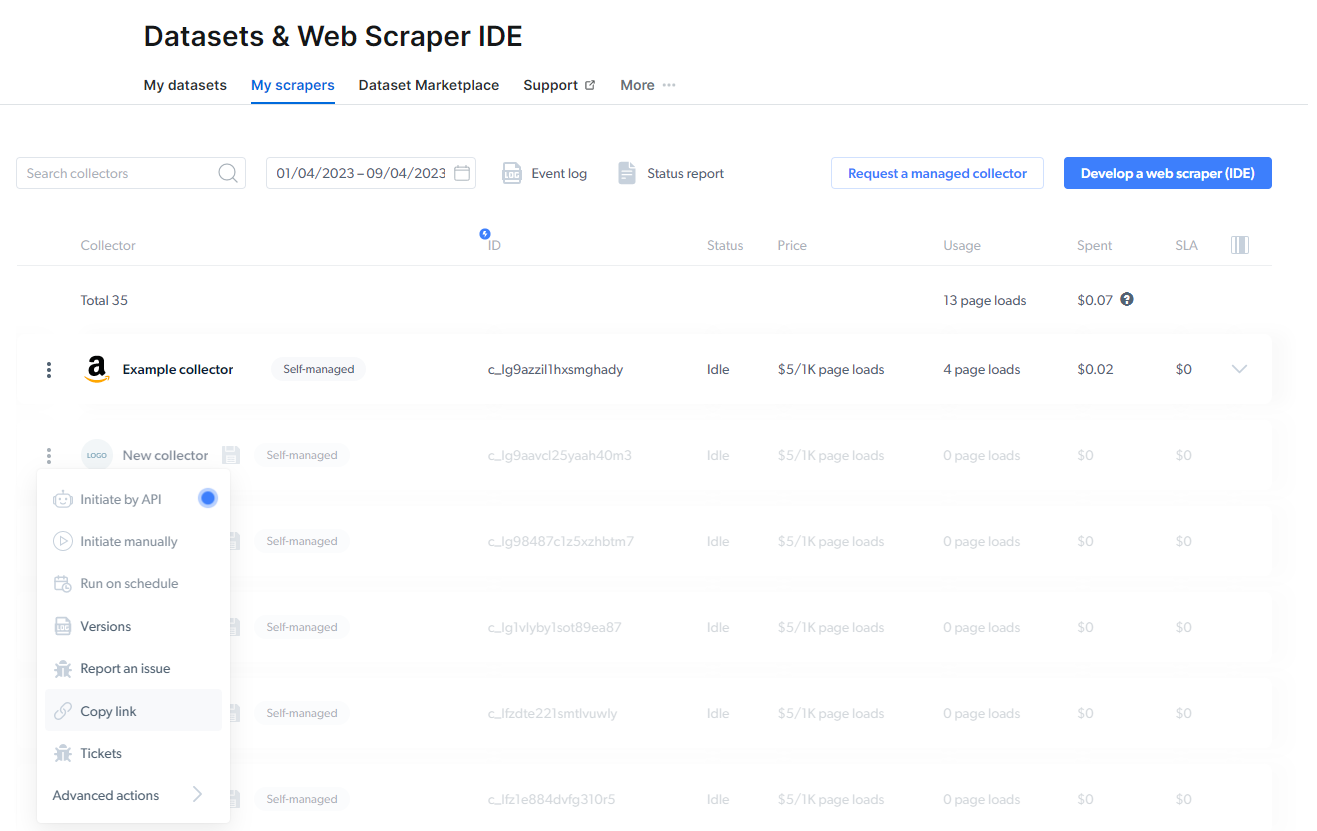
While you edit code in the Bright Data Scraper Studio IDE, the system auto-saves your work as a development draft. To make the scraper runnable outside the IDE, click **Save to Production** in the top-right corner of the IDE. All production scrapers appear under **My Scrapers** in the control panel. Inactive scrapers are shown faded.
 ## How do I trigger a scraper run?
Bright Data Scraper Studio supports three ways to initiate a collection.
Start a collection through the REST API without opening the control panel. See [Getting started with the API](/datasets/scraper-studio/quickstart) for authentication, request format, and response schema.
Before you send a request, create an API key. Go to [Dashboard > Account settings > API key](https://brightdata.com/cp/setting).
## How do I trigger a scraper run?
Bright Data Scraper Studio supports three ways to initiate a collection.
Start a collection through the REST API without opening the control panel. See [Getting started with the API](/datasets/scraper-studio/quickstart) for authentication, request format, and response schema.
Before you send a request, create an API key. Go to [Dashboard > Account settings > API key](https://brightdata.com/cp/setting).
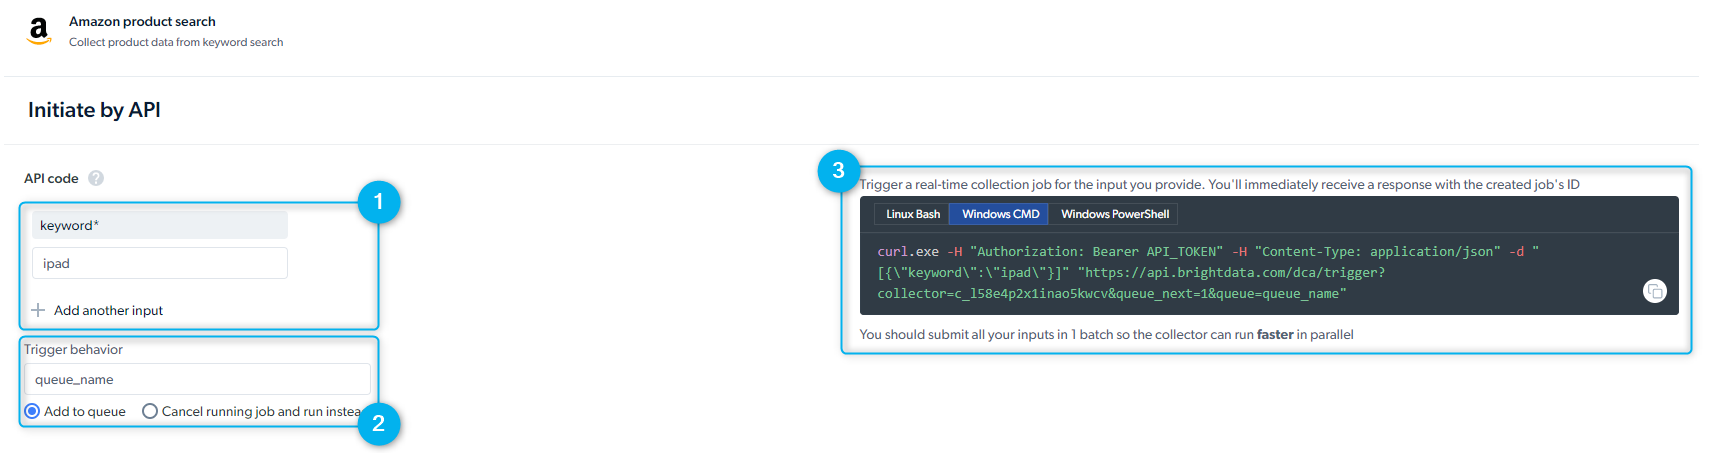 The API-trigger panel gives you three things:
1. **Inputs:** provide input values manually or through the API request body
2. **Trigger behavior:** queue multiple requests to run in parallel or sequentially; queued jobs run in the order they are submitted
3. **Preview of the API request:** Bright Data shows you a ready-to-run `curl` command. Select the **Linux Bash** viewer for `curl`. The response includes a `collection_id` you use to fetch the data later.
When delivery is set to **API download**, you must call the "Receive data" API endpoint to retrieve results. Webhook and cloud-storage destinations push data automatically.
Start a collection from the Bright Data control panel with no code.
The API-trigger panel gives you three things:
1. **Inputs:** provide input values manually or through the API request body
2. **Trigger behavior:** queue multiple requests to run in parallel or sequentially; queued jobs run in the order they are submitted
3. **Preview of the API request:** Bright Data shows you a ready-to-run `curl` command. Select the **Linux Bash** viewer for `curl`. The response includes a `collection_id` you use to fetch the data later.
When delivery is set to **API download**, you must call the "Receive data" API endpoint to retrieve results. Webhook and cloud-storage destinations push data automatically.
Start a collection from the Bright Data control panel with no code.
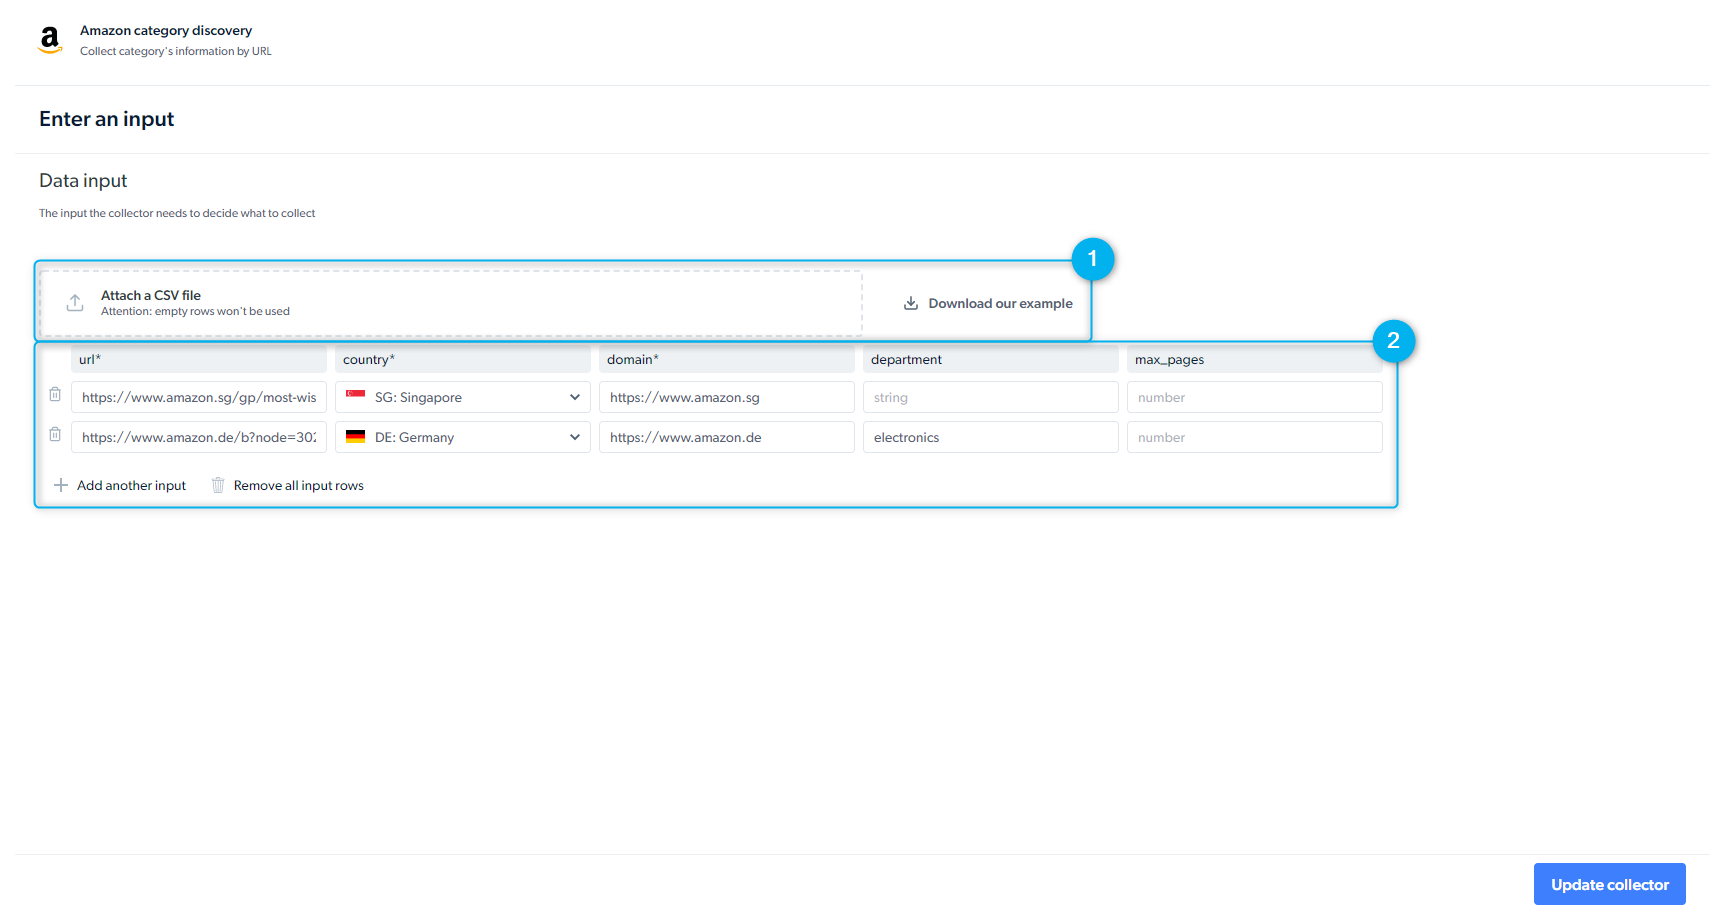
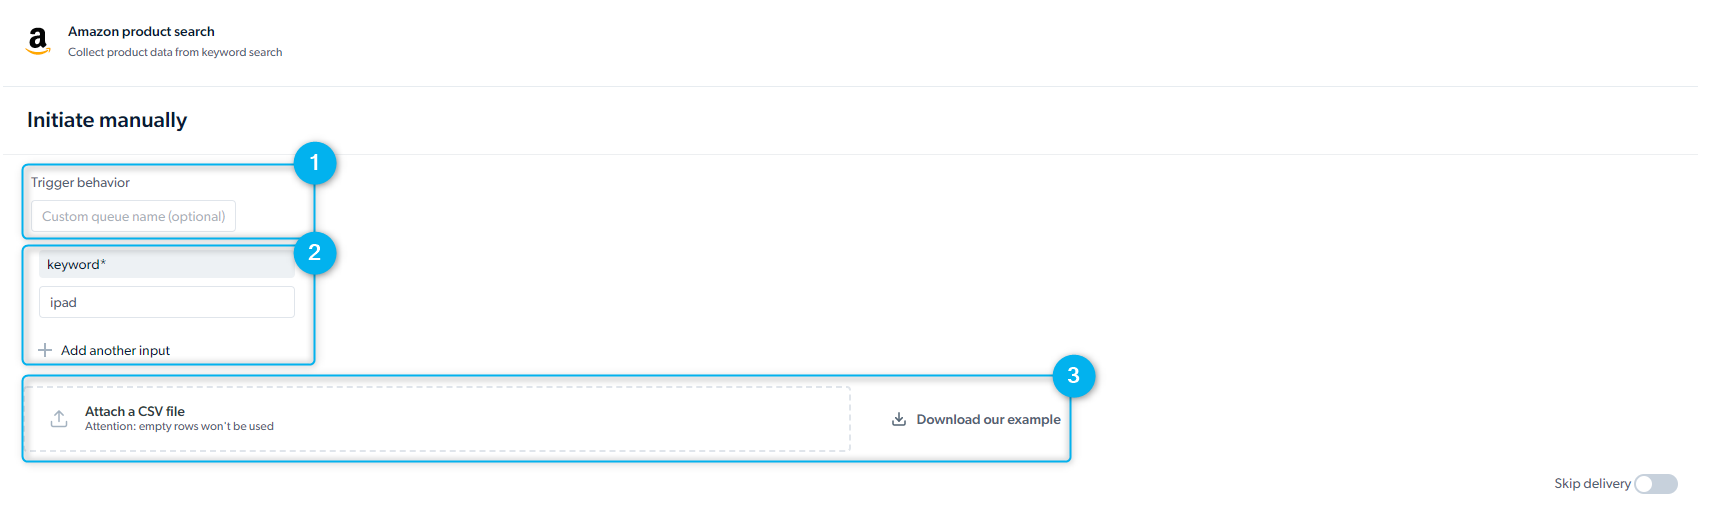 1. **Trigger behavior:** add several requests in parallel or queue additional jobs to run after earlier ones finish
2. **Set up inputs manually:** enter input values one at a time in the form
3. **Upload CSV file:** for large input sets, upload a CSV (for example, a list of URLs). Bright Data provides a template you can download and fill in.
Run the scraper on a recurring schedule.
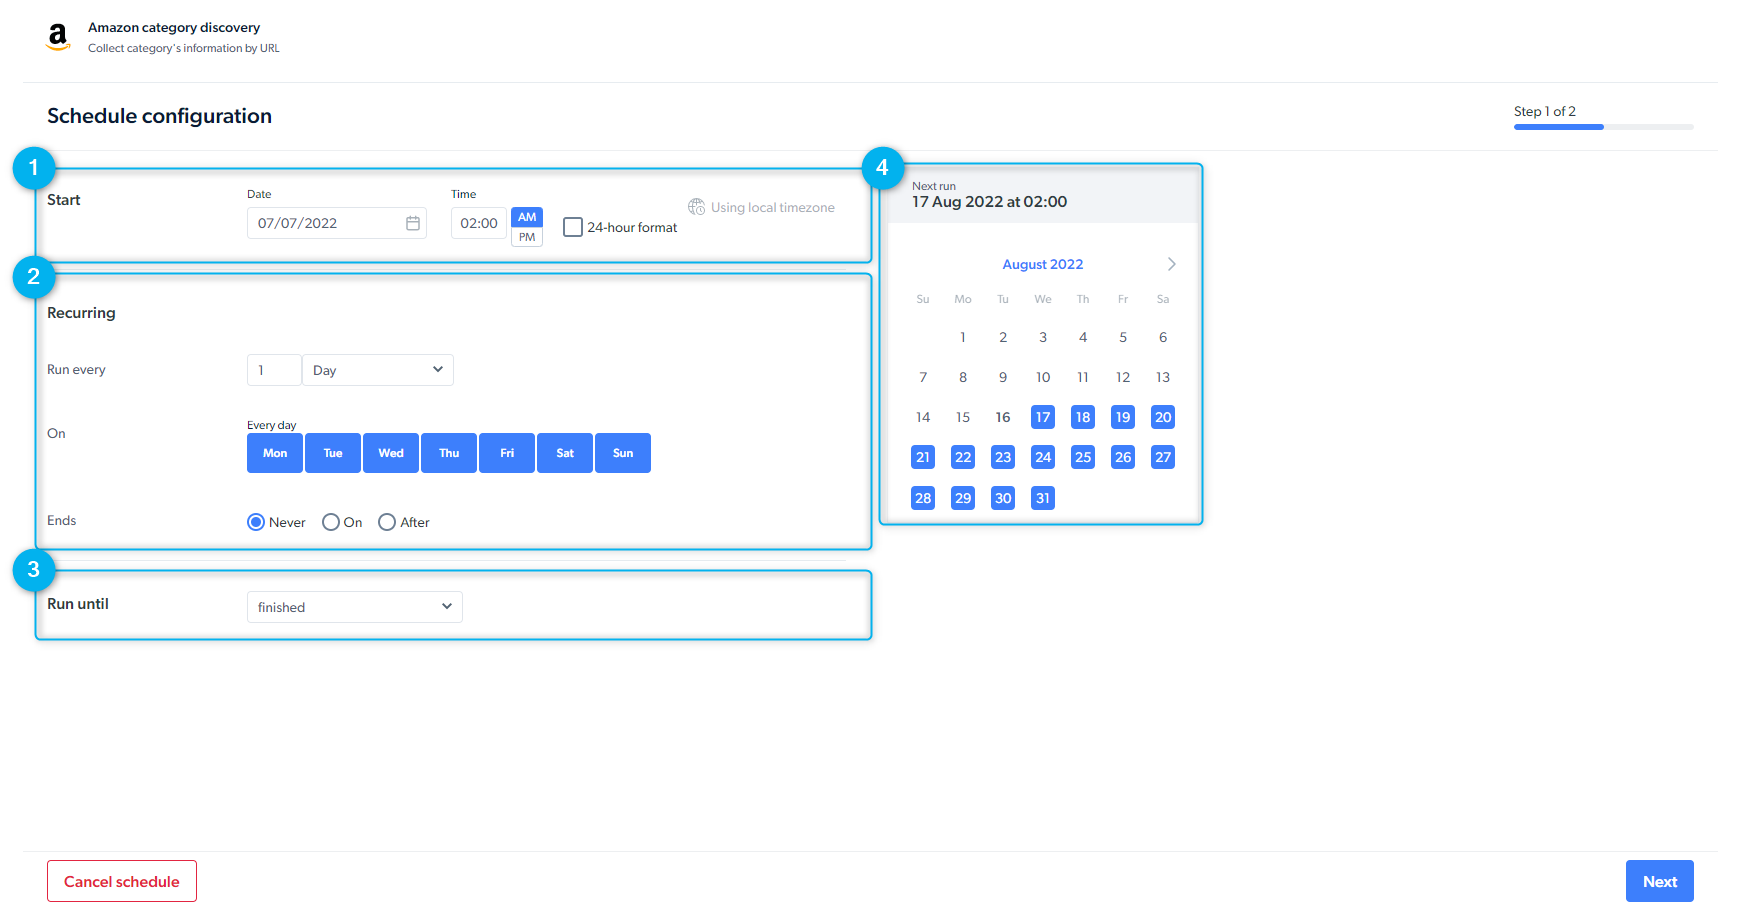
**Step 1, configure the schedule:**
1. Pick a start date and time
2. Choose a frequency (hourly, daily, weekly, or custom)
3. Set a deadline for when the scraper must finish
4. Review your configuration
1. **Trigger behavior:** add several requests in parallel or queue additional jobs to run after earlier ones finish
2. **Set up inputs manually:** enter input values one at a time in the form
3. **Upload CSV file:** for large input sets, upload a CSV (for example, a list of URLs). Bright Data provides a template you can download and fill in.
Run the scraper on a recurring schedule.
**Step 1, configure the schedule:**
1. Pick a start date and time
2. Choose a frequency (hourly, daily, weekly, or custom)
3. Set a deadline for when the scraper must finish
4. Review your configuration
 **Step 2, set inputs:**
1. Upload a CSV file with a large input set (for example, a list of URLs). Download the CSV template to match the expected format
2. Or enter inputs manually in the form
**Step 2, set inputs:**
1. Upload a CSV file with a large input set (for example, a list of URLs). Download the CSV template to match the expected format
2. Or enter inputs manually in the form
 ## What are the rate limits and concurrency limits?
Bright Data Scraper Studio enforces concurrency limits per scraper, based on whether the request is batch or real-time.
| Collection type | Concurrency limit |
| --------------- | ------------------------------------------- |
| Batch | Up to 1,000 concurrent requests per scraper |
| Real-time | No limit |
When you exceed the batch limit, Bright Data returns this error: `Maximum limit of 1000 jobs per scraper has been exceeded. Please reduce the number of parallel jobs.`
## Batch vs real-time collection
Bright Data Scraper Studio offers two collection methods, each optimized for a different use case.
| | Batch collection | Real-time collection |
| ----------------- | ---------------------------------------------- | ---------------------------------------- |
| Input size | Many inputs per job (list of URLs or keywords) | One input per request |
| Response timing | Results returned after the full job completes | Response returned in real time |
| Retention | 16 days | 7 days |
| Concurrency limit | 1,000 concurrent jobs | None |
| Use when | You are building a dataset and can wait | You need an answer inside a live request |
Both methods are reliable. Pick the one that matches the shape of your application.
## How do I configure delivery?
Open **My Scrapers**, click a scraper row, and choose **Delivery preferences** to set where and how Bright Data Scraper Studio delivers results.
* **Batch:** get results once the whole job finishes; efficient for large datasets
* **Split batch:** deliver partial results in smaller chunks as they become ready
* **Real-time:** get a fast response to a single request
* **Skip retries:** do not retry on error (speeds up collection at the cost of completeness)
* JSON
* NDJSON
* CSV
* XLSX
* Parquet
* Email
* API download (pull via REST API)
* Webhook (push via HTTPS POST)
* Cloud storage: Amazon S3, Google Cloud Storage, Azure Blob Storage, Alibaba Cloud OSS
* SFTP / FTP
Media files cannot be delivered via Email or API download. Use cloud storage, SFTP, or webhook when collecting images, videos, or other binary content.
* Results and errors in separate files
* Results and errors in one combined file
* Only successful results
* Only errors
* Notify when a collection completes
* Notify on success-rate thresholds
* Notify when an error occurs
## How do I configure the output schema?
The output schema defines the structure of your collected data: field names, data types, default values, and any additional metadata you want Bright Data Scraper Studio to attach (timestamps, screenshots, WARC snapshots).
## What are the rate limits and concurrency limits?
Bright Data Scraper Studio enforces concurrency limits per scraper, based on whether the request is batch or real-time.
| Collection type | Concurrency limit |
| --------------- | ------------------------------------------- |
| Batch | Up to 1,000 concurrent requests per scraper |
| Real-time | No limit |
When you exceed the batch limit, Bright Data returns this error: `Maximum limit of 1000 jobs per scraper has been exceeded. Please reduce the number of parallel jobs.`
## Batch vs real-time collection
Bright Data Scraper Studio offers two collection methods, each optimized for a different use case.
| | Batch collection | Real-time collection |
| ----------------- | ---------------------------------------------- | ---------------------------------------- |
| Input size | Many inputs per job (list of URLs or keywords) | One input per request |
| Response timing | Results returned after the full job completes | Response returned in real time |
| Retention | 16 days | 7 days |
| Concurrency limit | 1,000 concurrent jobs | None |
| Use when | You are building a dataset and can wait | You need an answer inside a live request |
Both methods are reliable. Pick the one that matches the shape of your application.
## How do I configure delivery?
Open **My Scrapers**, click a scraper row, and choose **Delivery preferences** to set where and how Bright Data Scraper Studio delivers results.
* **Batch:** get results once the whole job finishes; efficient for large datasets
* **Split batch:** deliver partial results in smaller chunks as they become ready
* **Real-time:** get a fast response to a single request
* **Skip retries:** do not retry on error (speeds up collection at the cost of completeness)
* JSON
* NDJSON
* CSV
* XLSX
* Parquet
* Email
* API download (pull via REST API)
* Webhook (push via HTTPS POST)
* Cloud storage: Amazon S3, Google Cloud Storage, Azure Blob Storage, Alibaba Cloud OSS
* SFTP / FTP
Media files cannot be delivered via Email or API download. Use cloud storage, SFTP, or webhook when collecting images, videos, or other binary content.
* Results and errors in separate files
* Results and errors in one combined file
* Only successful results
* Only errors
* Notify when a collection completes
* Notify on success-rate thresholds
* Notify when an error occurs
## How do I configure the output schema?
The output schema defines the structure of your collected data: field names, data types, default values, and any additional metadata you want Bright Data Scraper Studio to attach (timestamps, screenshots, WARC snapshots).
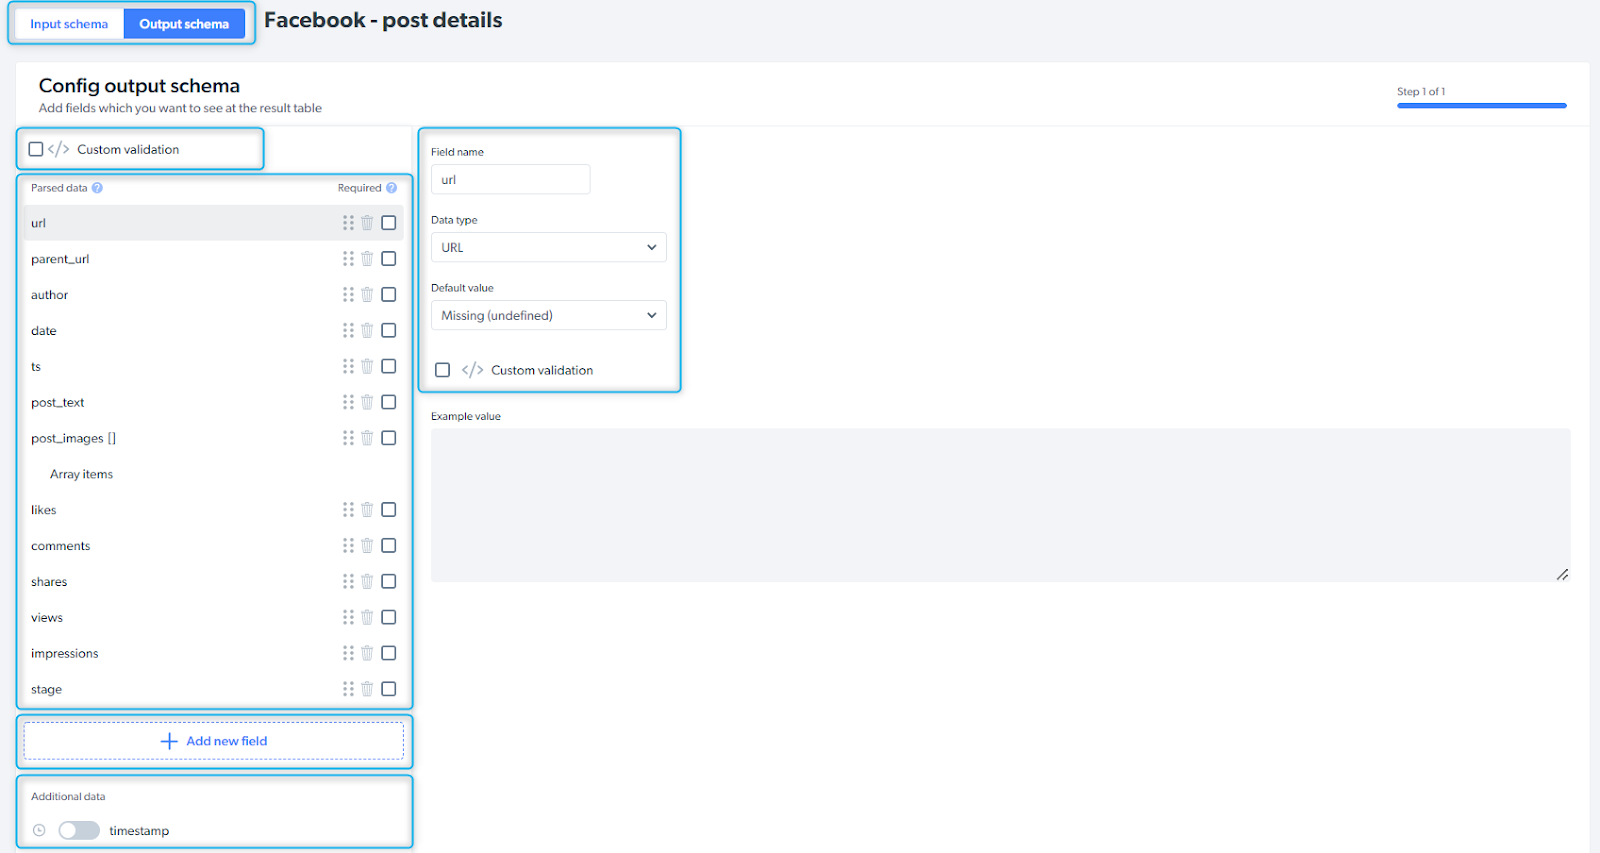 | Control | Description |
| ------------------------- | ----------------------------------------------------------------- |
| **Input / Output schema** | Tab switch for the two schema views |
| **Custom validation** | Define validation rules that run on every collected record |
| **Parsed data** | The raw fields the scraper's parser code emits |
| **Add new field** | Add a new field by name and type |
| **Additional data** | Optional metadata: timestamp, screenshot, WARC snapshot, and more |
## Related
Infrastructure limits, billing, and data retention
Archive raw HTTP responses alongside collected data
| Control | Description |
| ------------------------- | ----------------------------------------------------------------- |
| **Input / Output schema** | Tab switch for the two schema views |
| **Custom validation** | Define validation rules that run on every collected record |
| **Parsed data** | The raw fields the scraper's parser code emits |
| **Add new field** | Add a new field by name and type |
| **Additional data** | Optional metadata: timestamp, screenshot, WARC snapshot, and more |
## Related
Infrastructure limits, billing, and data retention
Archive raw HTTP responses alongside collected data