> ## Documentation Index
> Fetch the complete documentation index at: https://docs.brightdata.com/llms.txt
> Use this file to discover all available pages before exploring further.
# How to Set Up Bright Data on Android
> Configure Bright Data proxies on Android for both mobile data (APN) and Wi-Fi networks. Bright Data proxies span 195 countries.
### Your proxy access information
Bright Data proxies are grouped in "Proxy zones". Each zone holds the configuration for the proxies it holds.
To get access to the proxy zone:
1. Login to Bright Data control panel
2. Select the proxy zone or setup a new one
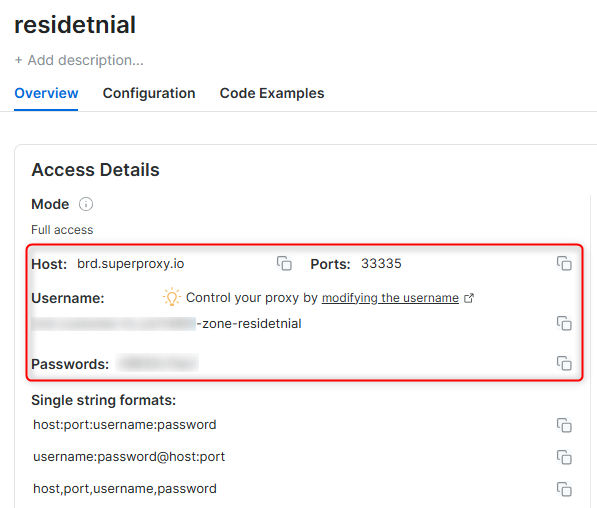
3. Click on the new zone name, and select the **Overview** tab.
4. In the overview tab, under **Access details** you can find the proxy access details, and copy them to clipboard on click.
5. You will need: Proxy Host, Proxy Port, Proxy Zone username and Proxy Zone password.
6. Click on the copy icons to copy the text to your clipboard and paste in your tool's proxy configuration.
### Access Details Section Example
 ### Residential proxy access
To access Bright Data's **Residential Proxies** you will need to either get verified by our compliance team, or install a certificate. [Read more...](https://docs.brightdata.com/proxy-networks/residential/network-access)
### Targeting search engines?
If you target a search engine like google, bing or yandex, you need a special Search Engine Results Page (**SERP**) proxy API. Use Bright Data SERP API to target search engines.
[Click here to read more about Bright Data SERP proxy API.](https://docs.brightdata.com/scraping-automation/serp-api/introduction)
### Correct setup of proxy test to avoid "PROXY ERROR"
In many tools you will see a "test proxy" function, which performs a conncectivity test to your proxy, and some add a geolocation test as well, to identify the location of the proxy.
To correctly test your proxy you should target those search queries to:
`https://geo.brdtest.com/welcome.txt` .
Some tools use popular search engines (like google.com) as a default test target. Bright Data will block those requests and you tool will show **proxy error** although your proxy is perfectly fine.
If your proxy test fails, this is probably the reason. Make sure that your test domain is not a search engine (this is done in the tool configuration, and not controlled by Bright Data).
Setting up Bright Data on Android allows you to route your device traffic through secure proxy connections. You can configure Bright Data for **mobile data (APN)** or **Wi-Fi networks**, depending on your use case. Follow the instructions below based on your preferred network type.
***
## Prerequisites
Before you begin, ensure you have:
* An active **Bright Data account**
* Your Bright Data **proxy credentials** (host, port, username, password)
* An Android device with permission to edit network settings
***
## Configuring a Proxy for a Mobile Network (APN)
### Step 1. Access Network Settings
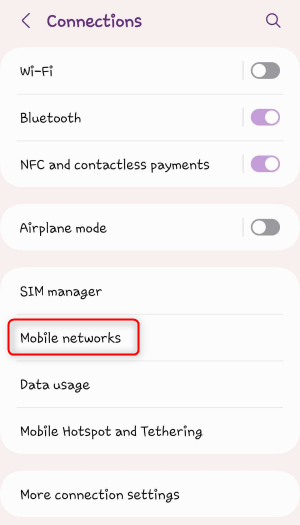
Open **Settings**, then navigate to **Network & Internet** (or **Connections**, depending on your device).
### Step 2. Locate APN Settings
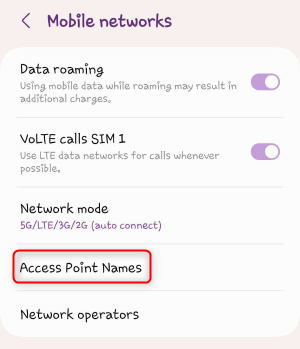
Tap **Mobile Networks**, then select **Access Point Names (APNs)**.
### Residential proxy access
To access Bright Data's **Residential Proxies** you will need to either get verified by our compliance team, or install a certificate. [Read more...](https://docs.brightdata.com/proxy-networks/residential/network-access)
### Targeting search engines?
If you target a search engine like google, bing or yandex, you need a special Search Engine Results Page (**SERP**) proxy API. Use Bright Data SERP API to target search engines.
[Click here to read more about Bright Data SERP proxy API.](https://docs.brightdata.com/scraping-automation/serp-api/introduction)
### Correct setup of proxy test to avoid "PROXY ERROR"
In many tools you will see a "test proxy" function, which performs a conncectivity test to your proxy, and some add a geolocation test as well, to identify the location of the proxy.
To correctly test your proxy you should target those search queries to:
`https://geo.brdtest.com/welcome.txt` .
Some tools use popular search engines (like google.com) as a default test target. Bright Data will block those requests and you tool will show **proxy error** although your proxy is perfectly fine.
If your proxy test fails, this is probably the reason. Make sure that your test domain is not a search engine (this is done in the tool configuration, and not controlled by Bright Data).
Setting up Bright Data on Android allows you to route your device traffic through secure proxy connections. You can configure Bright Data for **mobile data (APN)** or **Wi-Fi networks**, depending on your use case. Follow the instructions below based on your preferred network type.
***
## Prerequisites
Before you begin, ensure you have:
* An active **Bright Data account**
* Your Bright Data **proxy credentials** (host, port, username, password)
* An Android device with permission to edit network settings
***
## Configuring a Proxy for a Mobile Network (APN)
### Step 1. Access Network Settings
Open **Settings**, then navigate to **Network & Internet** (or **Connections**, depending on your device).
### Step 2. Locate APN Settings
Tap **Mobile Networks**, then select **Access Point Names (APNs)**.
 ### Step 3. Edit APN Details
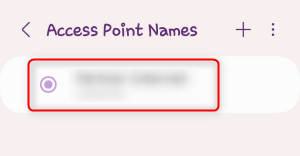
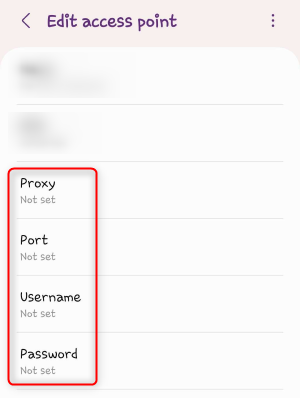
Select your active APN and update the following fields:
### Step 3. Edit APN Details
Select your active APN and update the following fields:
 * **Proxy**: `brd.superproxy.io`
* **Port**: `33335`
* **Username**: Your Bright Data proxy username
* **Password**: Your Bright Data proxy password
* **Proxy**: `brd.superproxy.io`
* **Port**: `33335`
* **Username**: Your Bright Data proxy username
* **Password**: Your Bright Data proxy password
 ### Step 4. Save and Reconnect
Save the APN settings and toggle **Mobile Data** off and back on to apply the changes.
***
## Configuring a Proxy for a Wi-Fi Network
### Step 1. Access Wi-Fi Settings
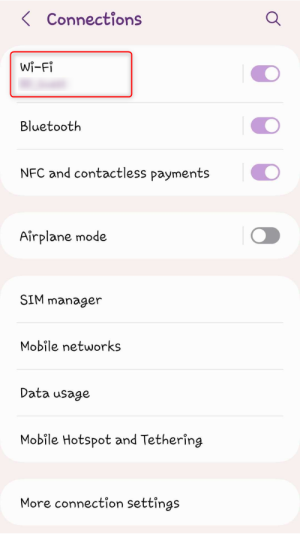
Open **Settings** → **Network & Internet (or Connections)** → **Wi-Fi**.
### Step 4. Save and Reconnect
Save the APN settings and toggle **Mobile Data** off and back on to apply the changes.
***
## Configuring a Proxy for a Wi-Fi Network
### Step 1. Access Wi-Fi Settings
Open **Settings** → **Network & Internet (or Connections)** → **Wi-Fi**.
 ### Step 2. Select Your Connected Network
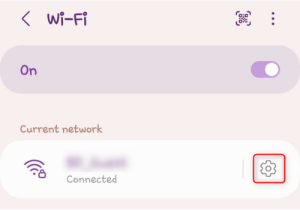
Tap your connected Wi-Fi network and choose **Settings** or **Edit**.
### Step 2. Select Your Connected Network
Tap your connected Wi-Fi network and choose **Settings** or **Edit**.
 ### Step 3. Enable Manual Proxy Configuration
Scroll to **Advanced options** and set **Proxy** to **Manual**.
### Step 4. Enter Proxy Details
Provide the following information:
* **Host**: `brd.superproxy.io`
* **Port**: `33335`
Tap **Save** to apply the configuration.
***
## Verify the Proxy Connection
After setup, open a browser on your device and visit:
[http://brdtest.com/myip.json](http://brdtest.com/myip.json)
Confirm that the displayed IP and location match your Bright Data proxy settings.
***
## Best Practices
* Use **ISP or Datacenter proxies** for better stability on mobile devices
* Avoid frequently switching networks when running proxy-dependent tasks
* Keep your Bright Data credentials secure
* Re-verify proxy settings after OS updates
***
## Conclusion
You’ve successfully configured **Bright Data on Android**. Your device traffic is now routed through secure, private proxy connections, ideal for privacy, geo-restricted access, and protected browsing. Enjoy a safer and more flexible mobile experience.
### Step 3. Enable Manual Proxy Configuration
Scroll to **Advanced options** and set **Proxy** to **Manual**.
### Step 4. Enter Proxy Details
Provide the following information:
* **Host**: `brd.superproxy.io`
* **Port**: `33335`
Tap **Save** to apply the configuration.
***
## Verify the Proxy Connection
After setup, open a browser on your device and visit:
[http://brdtest.com/myip.json](http://brdtest.com/myip.json)
Confirm that the displayed IP and location match your Bright Data proxy settings.
***
## Best Practices
* Use **ISP or Datacenter proxies** for better stability on mobile devices
* Avoid frequently switching networks when running proxy-dependent tasks
* Keep your Bright Data credentials secure
* Re-verify proxy settings after OS updates
***
## Conclusion
You’ve successfully configured **Bright Data on Android**. Your device traffic is now routed through secure, private proxy connections, ideal for privacy, geo-restricted access, and protected browsing. Enjoy a safer and more flexible mobile experience.