> ## Documentation Index
> Fetch the complete documentation index at: https://docs.brightdata.com/llms.txt
> Use this file to discover all available pages before exploring further.
# How to Use Bright Data with MuLogin
> Configure Bright Data proxies (400M+ IPs) in MuLogin to assign isolated IPs to each browser profile for anonymous, geo-targeted multi-account workflows.
**Account management is not a supported use case** on the Bright Data platform as of April 1, 2026. This includes managing accounts on platforms like TikTok, Instagram, or similar services. Bright Data proxies cannot be used for this purpose. See [Acceptable Use Policy](https://brightdata.com/acceptable-use-policy) for details.
### Your proxy access information
Bright Data proxies are grouped in "Proxy zones". Each zone holds the configuration for the proxies it holds.
To get access to the proxy zone:
1. Login to Bright Data control panel
2. Select the proxy zone or setup a new one
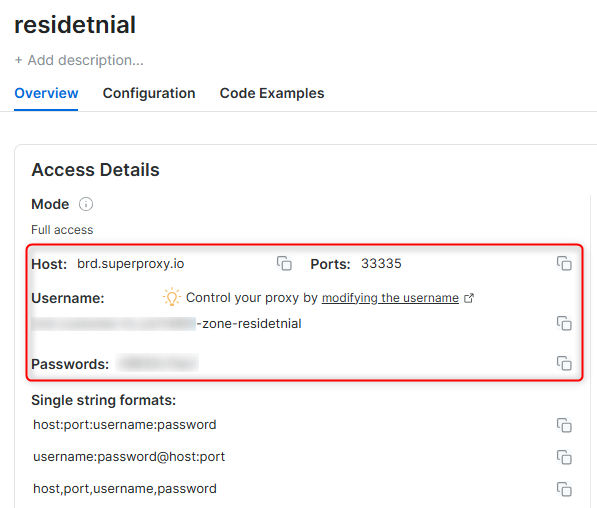
3. Click on the new zone name, and select the **Overview** tab.
4. In the overview tab, under **Access details** you can find the proxy access details, and copy them to clipboard on click.
5. You will need: Proxy Host, Proxy Port, Proxy Zone username and Proxy Zone password.
6. Click on the copy icons to copy the text to your clipboard and paste in your tool's proxy configuration.
### Access Details Section Example
 ### Residential proxy access
To access Bright Data's **Residential Proxies** you will need to either get verified by our compliance team, or install a certificate. [Read more...](https://docs.brightdata.com/proxy-networks/residential/network-access)
### Targeting search engines?
If you target a search engine like google, bing or yandex, you need a special Search Engine Results Page (**SERP**) proxy API. Use Bright Data SERP API to target search engines.
[Click here to read more about Bright Data SERP proxy API.](https://docs.brightdata.com/scraping-automation/serp-api/introduction)
### Correct setup of proxy test to avoid "PROXY ERROR"
In many tools you will see a "test proxy" function, which performs a conncectivity test to your proxy, and some add a geolocation test as well, to identify the location of the proxy.
To correctly test your proxy you should target those search queries to:
`https://geo.brdtest.com/welcome.txt` .
Some tools use popular search engines (like google.com) as a default test target. Bright Data will block those requests and you tool will show **proxy error** although your proxy is perfectly fine.
If your proxy test fails, this is probably the reason. Make sure that your test domain is not a search engine (this is done in the tool configuration, and not controlled by Bright Data).
## What is MuLogin?
MuLogin is a multi-profile browser management tool that helps you run multiple online accounts without them interfering with each other. It’s designed to protect your privacy, prevent detection, and streamline your digital operations. With MuLogin, you can handle multiple sessions seamlessly, perfect for web scraping, market research, and other data collection projects.
Maintain a consistent IP throughout your browser session by using the `-session` parameter in your username. This is essential because BrightData proxies default to rotating IPs with each request. [Learn more](https://docs.brightdata.com/proxy-networks/faqs#how-to-use-the-same-ip-for-an-extended-period-of-time-and-how-long-can-i-keep-it-long-session)
### Residential proxy access
To access Bright Data's **Residential Proxies** you will need to either get verified by our compliance team, or install a certificate. [Read more...](https://docs.brightdata.com/proxy-networks/residential/network-access)
### Targeting search engines?
If you target a search engine like google, bing or yandex, you need a special Search Engine Results Page (**SERP**) proxy API. Use Bright Data SERP API to target search engines.
[Click here to read more about Bright Data SERP proxy API.](https://docs.brightdata.com/scraping-automation/serp-api/introduction)
### Correct setup of proxy test to avoid "PROXY ERROR"
In many tools you will see a "test proxy" function, which performs a conncectivity test to your proxy, and some add a geolocation test as well, to identify the location of the proxy.
To correctly test your proxy you should target those search queries to:
`https://geo.brdtest.com/welcome.txt` .
Some tools use popular search engines (like google.com) as a default test target. Bright Data will block those requests and you tool will show **proxy error** although your proxy is perfectly fine.
If your proxy test fails, this is probably the reason. Make sure that your test domain is not a search engine (this is done in the tool configuration, and not controlled by Bright Data).
## What is MuLogin?
MuLogin is a multi-profile browser management tool that helps you run multiple online accounts without them interfering with each other. It’s designed to protect your privacy, prevent detection, and streamline your digital operations. With MuLogin, you can handle multiple sessions seamlessly, perfect for web scraping, market research, and other data collection projects.
Maintain a consistent IP throughout your browser session by using the `-session` parameter in your username. This is essential because BrightData proxies default to rotating IPs with each request. [Learn more](https://docs.brightdata.com/proxy-networks/faqs#how-to-use-the-same-ip-for-an-extended-period-of-time-and-how-long-can-i-keep-it-long-session)
New users should begin with ISP or Data Center proxies, as residential proxies are incompatible with browser integration in [Immediate-Access mode](https://docs.brightdata.com/proxy-networks/residential/network-access#immediate-access) .
## Why Integrate Bright Data with MuLogin?
By adding Bright Data proxies to MuLogin, you’ll:
* **Protect Your Identity**: Keep your real IP hidden behind secure, anonymous proxies.
* **Reduce Detection Risks**: Spread out your activities over diverse IP addresses, minimizing the chance of blocks or bans.
* **Improve Reliability**: Access geo-targeted content smoothly and maintain stable connections across sessions.
## How to Integrate Bright Data with MuLogin
Follow these steps to configure Bright Data proxies in MuLogin:
1. Visit [MuLogin ](https://www.mulogin.com/) and sign in to your account.
2. Once logged in, you’ll see your dashboard with existing browser profiles (if any).
1. If you need a new profile, click **"Quick create"** or a similar button.
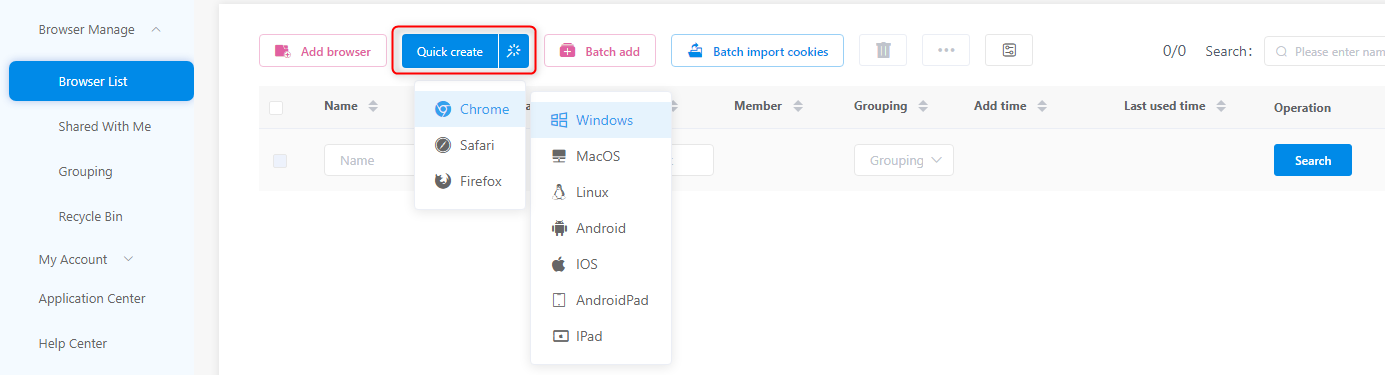 2. If you want to modify an existing profile, select it from the list and click on **"Edit"**, **"Settings"**, or the **gear icon**, the exact naming may vary based on MuLogin’s current UI.
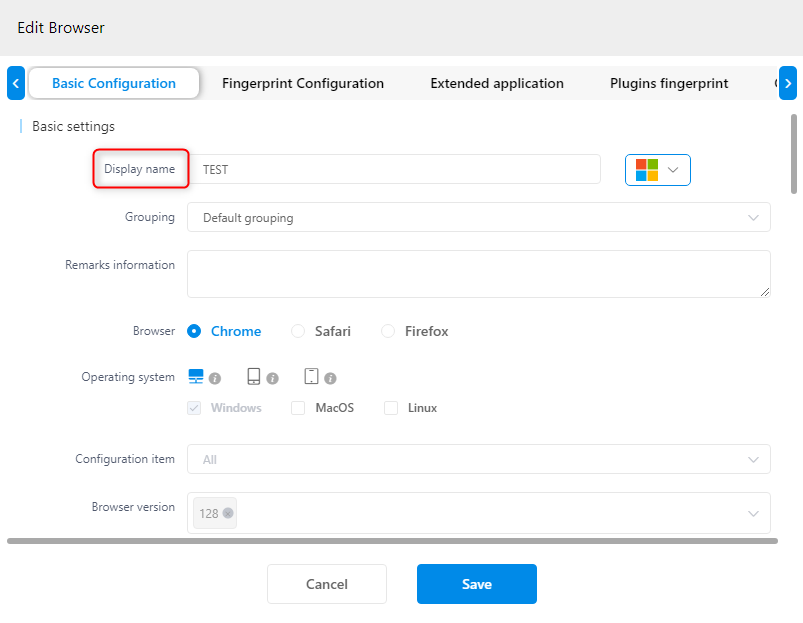
 1. On the profile configuration page, under the **“Basic Configuration”** section, locate the **“Display name”** field.
2. Enter a clear, recognizable name for your browser profile to make it easier to identify later.
1. On the profile configuration page, under the **“Basic Configuration”** section, locate the **“Display name”** field.
2. Enter a clear, recognizable name for your browser profile to make it easier to identify later.
 3. Scroll down the page to find the **“Proxy Settings”** option. Click on it to open the proxy configuration window.
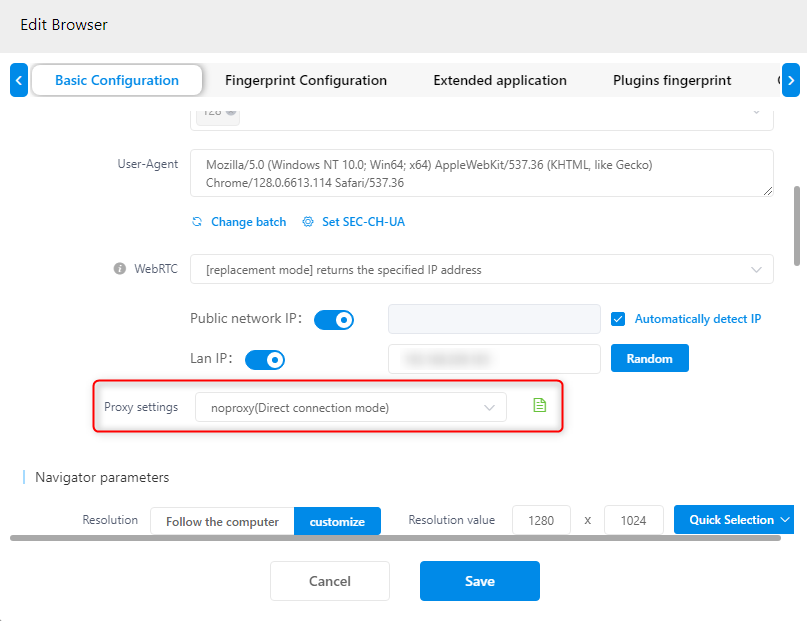 1. Once you’ve opened the proxy configuration window, you should see fields for the following:
* **Protocol/Type:** Choose HTTP, HTTPS, or SOCKS5 depending on the proxy type you have from Bright Data.
1. Once you’ve opened the proxy configuration window, you should see fields for the following:
* **Protocol/Type:** Choose HTTP, HTTPS, or SOCKS5 depending on the proxy type you have from Bright Data.
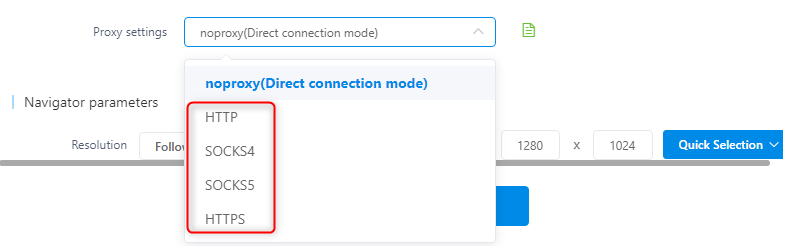 * **Host:** Enter `http://brd.superproxy.io/` or the host provided by Bright Data.
* **Port:** Input the port number from your [Bright Data dashboard](https://brightdata.com/cp/zones).
* **Username & Password:** Type in your Bright Data credentials.
If you need a region-specific node (e.g., US), adjust your username to `your-username-country-US`.
2. After entering your Bright Data proxy details (Host, Port, Username, and Password), look for a **“Check the network”** or **“Test Proxy”** button. Click it to verify that the proxy connection works correctly.
3. If the test is successful, confirm your setup by clicking **“Save”**.
1. After saving, launch the profile from your MuLogin dashboard.
2. Inside this isolated browser, navigate to a site like [httpbin.org/ip](http://httpbin.org/ip) to verify that the displayed IP matches your Bright Data proxy’s IP instead of your own.
3. If the IP matches, congratulations, your MuLogin profile is now using Bright Data proxies.
With **Bright Data** integrated into **MuLogin**, you’ve taken your online operations up a notch. Now you can manage multiple profiles more confidently, enjoying greater privacy, fewer detection issues, and a smooth, reliable workflow.
* **Host:** Enter `http://brd.superproxy.io/` or the host provided by Bright Data.
* **Port:** Input the port number from your [Bright Data dashboard](https://brightdata.com/cp/zones).
* **Username & Password:** Type in your Bright Data credentials.
If you need a region-specific node (e.g., US), adjust your username to `your-username-country-US`.
2. After entering your Bright Data proxy details (Host, Port, Username, and Password), look for a **“Check the network”** or **“Test Proxy”** button. Click it to verify that the proxy connection works correctly.
3. If the test is successful, confirm your setup by clicking **“Save”**.
1. After saving, launch the profile from your MuLogin dashboard.
2. Inside this isolated browser, navigate to a site like [httpbin.org/ip](http://httpbin.org/ip) to verify that the displayed IP matches your Bright Data proxy’s IP instead of your own.
3. If the IP matches, congratulations, your MuLogin profile is now using Bright Data proxies.
With **Bright Data** integrated into **MuLogin**, you’ve taken your online operations up a notch. Now you can manage multiple profiles more confidently, enjoying greater privacy, fewer detection issues, and a smooth, reliable workflow.