> ## Documentation Index
> Fetch the complete documentation index at: https://docs.brightdata.com/llms.txt
> Use this file to discover all available pages before exploring further.
# How to Set Up Bright Data With NGINX
> Step-by-step guide to configuring NGINX with Bright Data proxies for upstream traffic routing, domain masking, and connection management. Spans 195 countries.
### Your proxy access information
Bright Data proxies are grouped in "Proxy zones". Each zone holds the configuration for the proxies it holds.
To get access to the proxy zone:
1. Login to Bright Data control panel
2. Select the proxy zone or setup a new one
3. Click on the new zone name, and select the **Overview** tab.
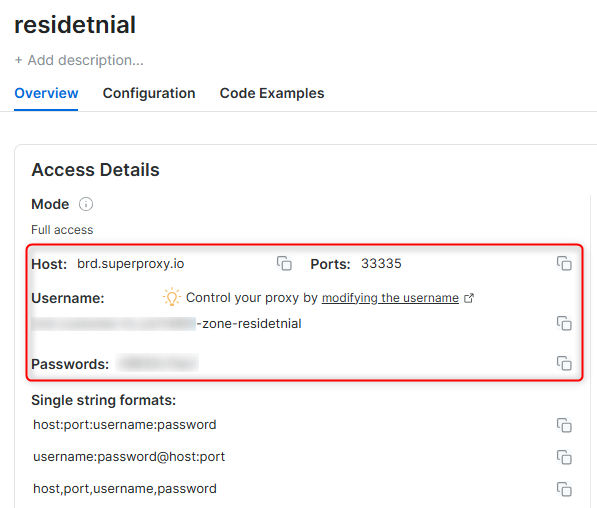
4. In the overview tab, under **Access details** you can find the proxy access details, and copy them to clipboard on click.
5. You will need: Proxy Host, Proxy Port, Proxy Zone username and Proxy Zone password.
6. Click on the copy icons to copy the text to your clipboard and paste in your tool's proxy configuration.
### Access Details Section Example
 ### Residential proxy access
To access Bright Data's **Residential Proxies** you will need to either get verified by our compliance team, or install a certificate. [Read more...](https://docs.brightdata.com/proxy-networks/residential/network-access)
### Targeting search engines?
If you target a search engine like google, bing or yandex, you need a special Search Engine Results Page (**SERP**) proxy API. Use Bright Data SERP API to target search engines.
[Click here to read more about Bright Data SERP proxy API.](https://docs.brightdata.com/scraping-automation/serp-api/introduction)
### Correct setup of proxy test to avoid "PROXY ERROR"
In many tools you will see a "test proxy" function, which performs a conncectivity test to your proxy, and some add a geolocation test as well, to identify the location of the proxy.
To correctly test your proxy you should target those search queries to:
`https://geo.brdtest.com/welcome.txt` .
Some tools use popular search engines (like google.com) as a default test target. Bright Data will block those requests and you tool will show **proxy error** although your proxy is perfectly fine.
If your proxy test fails, this is probably the reason. Make sure that your test domain is not a search engine (this is done in the tool configuration, and not controlled by Bright Data).
## What is NGINX?
**NGINX** is a high-performance web server and reverse proxy used for load balancing, caching, and securing connections. By integrating NGINX with **Bright Data**, you can mask proxy domains, route traffic seamlessly, and optimize your infrastructure for better performance.
## How to Set Up Bright Data With NGINX
1. Install **NGINX** on your server following the [official installation guide](https://nginx.org/en/download.html).
2. Ensure you’re using version **1.15.10 or higher**.
3. Verify that your server’s IP is **not** added to the Bright Data proxy allowlist to avoid conflicts.
1. Open the main NGINX configuration file:
```bash theme={null}
sudo nano /etc/nginx/nginx.conf
```
2. Update the following parameters:
* **Set `worker_processes`** to `auto` for dynamic optimization.
* **Set `worker_connections`** to `200` (or more, depending on your required number of ports).
3. At the end of the `http` section, add:
```nginx theme={null}
include /etc/nginx/sites-enabled/*;
```
4. Save the changes and exit the editor.
5. Your updated `nginx.conf` should look like this:
```nginx theme={null}
worker_processes auto;
user www-data;
error_log /var/log/nginx/error.log info;
events {
worker_connections 200;
}
http {
include /etc/nginx/mime.types;
access_log /var/log/nginx/access.log combined;
server {
server_name localhost;
listen 127.0.0.1:80;
error_page 500 502 503 504 /50x.html;
}
include /etc/nginx/sites-enabled/*;
}
```
1. Create the directory for custom configurations:
```bash theme={null}
sudo mkdir -p /etc/nginx/sites-enabled
```
2. Create a new configuration file:
```bash theme={null}
sudo nano /etc/nginx/sites-enabled/brightdata.conf
```
3. Add the following configuration to the file, adjusting the port range as needed:
```nginx theme={null}
server {
listen 24000-24100;
location / {
resolver 8.8.8.8;
proxy_pass http://127.0.0.1:$server_port;
proxy_set_header Host $host;
proxy_set_header X-Real-IP $remote_addr;
}
}
```
3. Save and close the file.
1. Apply the changes by restarting NGINX:
```bash theme={null}
sudo service nginx restart
```
1. Verify the proxy connection with the following command, replacing `10.0.2.15` with your server's IP:
```bash theme={null}
curl --proxy http://10.0.2.15:24000 "http://brdtest.com/myip.json" -v
```
2. Confirm that the response includes the expected proxy IP and location.
**Expected output:**
```json theme={null}
{
"ip": "43.252.31.41",
"country": "US",
"asn": {
"asnum": 207990,
"org_name": "HostRoyale Technologies Pvt Ltd"
},
"geo": {
"city": "Chicago",
"region": "IL",
"region_name": "Illinois",
"postal_code": "60602",
"latitude": 41.8874,
"longitude": -87.6318,
"tz": "America/Chicago",
"lum_city": "chicago",
"lum_region": "il"
}
}
```
1. To ensure that traffic routes through NGINX, monitor your proxy manager logs.
2. Confirm that the "sent from" IP matches your NGINX server’s IP address.
Your **Bright Data** are now successfully integrated with **NGINX**, providing secure, efficient traffic routing and domain masking. This setup is ideal for optimizing web scraping, load balancing, and secure proxy management. Enjoy streamlined operations!
### Residential proxy access
To access Bright Data's **Residential Proxies** you will need to either get verified by our compliance team, or install a certificate. [Read more...](https://docs.brightdata.com/proxy-networks/residential/network-access)
### Targeting search engines?
If you target a search engine like google, bing or yandex, you need a special Search Engine Results Page (**SERP**) proxy API. Use Bright Data SERP API to target search engines.
[Click here to read more about Bright Data SERP proxy API.](https://docs.brightdata.com/scraping-automation/serp-api/introduction)
### Correct setup of proxy test to avoid "PROXY ERROR"
In many tools you will see a "test proxy" function, which performs a conncectivity test to your proxy, and some add a geolocation test as well, to identify the location of the proxy.
To correctly test your proxy you should target those search queries to:
`https://geo.brdtest.com/welcome.txt` .
Some tools use popular search engines (like google.com) as a default test target. Bright Data will block those requests and you tool will show **proxy error** although your proxy is perfectly fine.
If your proxy test fails, this is probably the reason. Make sure that your test domain is not a search engine (this is done in the tool configuration, and not controlled by Bright Data).
## What is NGINX?
**NGINX** is a high-performance web server and reverse proxy used for load balancing, caching, and securing connections. By integrating NGINX with **Bright Data**, you can mask proxy domains, route traffic seamlessly, and optimize your infrastructure for better performance.
## How to Set Up Bright Data With NGINX
1. Install **NGINX** on your server following the [official installation guide](https://nginx.org/en/download.html).
2. Ensure you’re using version **1.15.10 or higher**.
3. Verify that your server’s IP is **not** added to the Bright Data proxy allowlist to avoid conflicts.
1. Open the main NGINX configuration file:
```bash theme={null}
sudo nano /etc/nginx/nginx.conf
```
2. Update the following parameters:
* **Set `worker_processes`** to `auto` for dynamic optimization.
* **Set `worker_connections`** to `200` (or more, depending on your required number of ports).
3. At the end of the `http` section, add:
```nginx theme={null}
include /etc/nginx/sites-enabled/*;
```
4. Save the changes and exit the editor.
5. Your updated `nginx.conf` should look like this:
```nginx theme={null}
worker_processes auto;
user www-data;
error_log /var/log/nginx/error.log info;
events {
worker_connections 200;
}
http {
include /etc/nginx/mime.types;
access_log /var/log/nginx/access.log combined;
server {
server_name localhost;
listen 127.0.0.1:80;
error_page 500 502 503 504 /50x.html;
}
include /etc/nginx/sites-enabled/*;
}
```
1. Create the directory for custom configurations:
```bash theme={null}
sudo mkdir -p /etc/nginx/sites-enabled
```
2. Create a new configuration file:
```bash theme={null}
sudo nano /etc/nginx/sites-enabled/brightdata.conf
```
3. Add the following configuration to the file, adjusting the port range as needed:
```nginx theme={null}
server {
listen 24000-24100;
location / {
resolver 8.8.8.8;
proxy_pass http://127.0.0.1:$server_port;
proxy_set_header Host $host;
proxy_set_header X-Real-IP $remote_addr;
}
}
```
3. Save and close the file.
1. Apply the changes by restarting NGINX:
```bash theme={null}
sudo service nginx restart
```
1. Verify the proxy connection with the following command, replacing `10.0.2.15` with your server's IP:
```bash theme={null}
curl --proxy http://10.0.2.15:24000 "http://brdtest.com/myip.json" -v
```
2. Confirm that the response includes the expected proxy IP and location.
**Expected output:**
```json theme={null}
{
"ip": "43.252.31.41",
"country": "US",
"asn": {
"asnum": 207990,
"org_name": "HostRoyale Technologies Pvt Ltd"
},
"geo": {
"city": "Chicago",
"region": "IL",
"region_name": "Illinois",
"postal_code": "60602",
"latitude": 41.8874,
"longitude": -87.6318,
"tz": "America/Chicago",
"lum_city": "chicago",
"lum_region": "il"
}
}
```
1. To ensure that traffic routes through NGINX, monitor your proxy manager logs.
2. Confirm that the "sent from" IP matches your NGINX server’s IP address.
Your **Bright Data** are now successfully integrated with **NGINX**, providing secure, efficient traffic routing and domain masking. This setup is ideal for optimizing web scraping, load balancing, and secure proxy management. Enjoy streamlined operations!