> ## Documentation Index
> Fetch the complete documentation index at: https://docs.brightdata.com/llms.txt
> Use this file to discover all available pages before exploring further.
# How to Set Up Bright Data With Octoparse
> Configure Bright Data proxies (400M+ residential IPs) inside Octoparse to extract data from complex sites without IP blocks, with geo-targeted exits.
### Your proxy access information
Bright Data proxies are grouped in "Proxy zones". Each zone holds the configuration for the proxies it holds.
To get access to the proxy zone:
1. Login to Bright Data control panel
2. Select the proxy zone or setup a new one
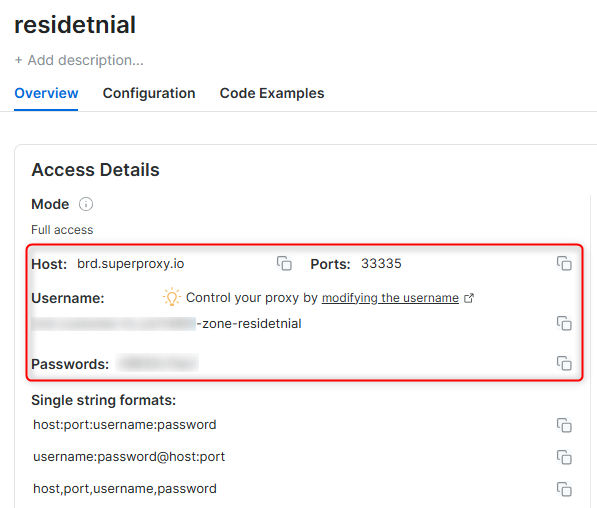
3. Click on the new zone name, and select the **Overview** tab.
4. In the overview tab, under **Access details** you can find the proxy access details, and copy them to clipboard on click.
5. You will need: Proxy Host, Proxy Port, Proxy Zone username and Proxy Zone password.
6. Click on the copy icons to copy the text to your clipboard and paste in your tool's proxy configuration.
### Access Details Section Example
 ### Residential proxy access
To access Bright Data's **Residential Proxies** you will need to either get verified by our compliance team, or install a certificate. [Read more...](https://docs.brightdata.com/proxy-networks/residential/network-access)
### Targeting search engines?
If you target a search engine like google, bing or yandex, you need a special Search Engine Results Page (**SERP**) proxy API. Use Bright Data SERP API to target search engines.
[Click here to read more about Bright Data SERP proxy API.](https://docs.brightdata.com/scraping-automation/serp-api/introduction)
### Correct setup of proxy test to avoid "PROXY ERROR"
In many tools you will see a "test proxy" function, which performs a conncectivity test to your proxy, and some add a geolocation test as well, to identify the location of the proxy.
To correctly test your proxy you should target those search queries to:
`https://geo.brdtest.com/welcome.txt` .
Some tools use popular search engines (like google.com) as a default test target. Bright Data will block those requests and you tool will show **proxy error** although your proxy is perfectly fine.
If your proxy test fails, this is probably the reason. Make sure that your test domain is not a search engine (this is done in the tool configuration, and not controlled by Bright Data).
## What is Octoparse?
Octoparse is a user-friendly web scraping tool that allows you to collect data from websites without needing any coding knowledge. With its simple point-and-click interface, Octoparse enables you to extract information from even the most complex sites. It offers the flexibility to customize, automate, and schedule scraping tasks, saving the extracted data in formats such as CSV or Excel. Perfect for market research, price tracking, or lead generation, Octoparse makes data collection fast, easy, and efficient!
## Octoparse Proxy Integration
Follow these simple steps to integrate Bright Data proxies with Octoparse:
Visit the [Octoparse website](https://www.octoparse.com/download) to download and install Octoparse.
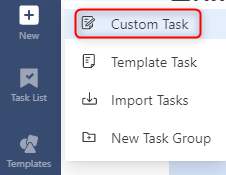
Click the **+New** button in the top-left corner, then select **Custom Task**.
### Residential proxy access
To access Bright Data's **Residential Proxies** you will need to either get verified by our compliance team, or install a certificate. [Read more...](https://docs.brightdata.com/proxy-networks/residential/network-access)
### Targeting search engines?
If you target a search engine like google, bing or yandex, you need a special Search Engine Results Page (**SERP**) proxy API. Use Bright Data SERP API to target search engines.
[Click here to read more about Bright Data SERP proxy API.](https://docs.brightdata.com/scraping-automation/serp-api/introduction)
### Correct setup of proxy test to avoid "PROXY ERROR"
In many tools you will see a "test proxy" function, which performs a conncectivity test to your proxy, and some add a geolocation test as well, to identify the location of the proxy.
To correctly test your proxy you should target those search queries to:
`https://geo.brdtest.com/welcome.txt` .
Some tools use popular search engines (like google.com) as a default test target. Bright Data will block those requests and you tool will show **proxy error** although your proxy is perfectly fine.
If your proxy test fails, this is probably the reason. Make sure that your test domain is not a search engine (this is done in the tool configuration, and not controlled by Bright Data).
## What is Octoparse?
Octoparse is a user-friendly web scraping tool that allows you to collect data from websites without needing any coding knowledge. With its simple point-and-click interface, Octoparse enables you to extract information from even the most complex sites. It offers the flexibility to customize, automate, and schedule scraping tasks, saving the extracted data in formats such as CSV or Excel. Perfect for market research, price tracking, or lead generation, Octoparse makes data collection fast, easy, and efficient!
## Octoparse Proxy Integration
Follow these simple steps to integrate Bright Data proxies with Octoparse:
Visit the [Octoparse website](https://www.octoparse.com/download) to download and install Octoparse.
Click the **+New** button in the top-left corner, then select **Custom Task**.
 In the **URL Input** field, enter the URL of the website you wish to scrape, then click **Save**.
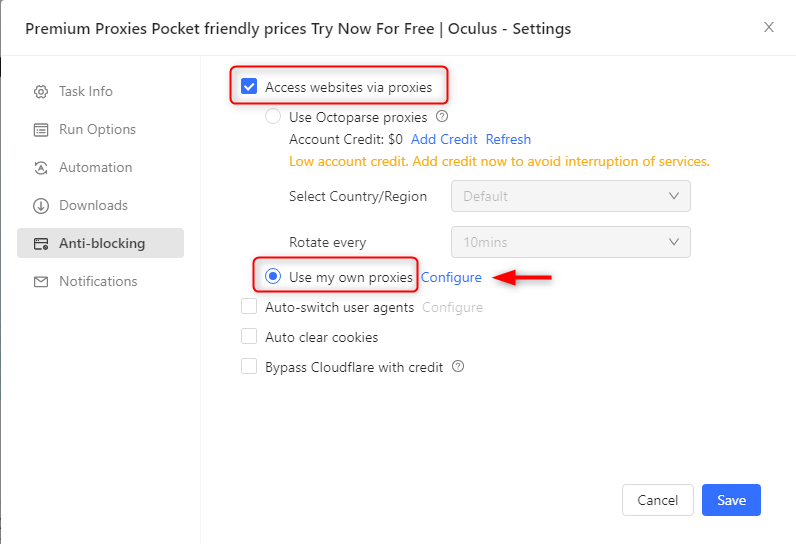
Once the page loads, navigate to **Task Settings > Anti-blocking**.
In the **URL Input** field, enter the URL of the website you wish to scrape, then click **Save**.
Once the page loads, navigate to **Task Settings > Anti-blocking**.
 Check **Access websites via proxies** and select **Use my own proxies**. Then click **Configure**.
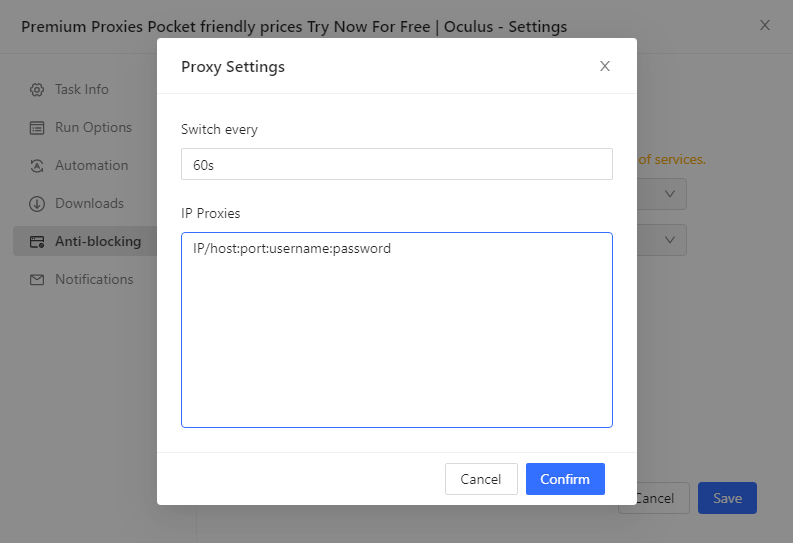
 In the pop-up window, enter your Bright Data proxy details in the following format:
```sh theme={null}
IP/host:port:username:password
```
* **IP/host**: Enter `http://brd.superproxy.io/`.
* **Port**: Use the port number provided in your [Bright Data dashboard](https://brightdata.com/cp/zones/page/plans).
* **Username**: Enter your Bright Data proxy `username`.
* **Password**: Enter your Bright Data proxy `password`.
For country-specific proxies, you can enter a format like `your-username-country-US` to receive a US exit node.
If you're using rotating proxies, set the **Switch interval** to specify how often the IPs should rotate. For sticky sessions, adjust it according to your preferred session length.
In the pop-up window, enter your Bright Data proxy details in the following format:
```sh theme={null}
IP/host:port:username:password
```
* **IP/host**: Enter `http://brd.superproxy.io/`.
* **Port**: Use the port number provided in your [Bright Data dashboard](https://brightdata.com/cp/zones/page/plans).
* **Username**: Enter your Bright Data proxy `username`.
* **Password**: Enter your Bright Data proxy `password`.
For country-specific proxies, you can enter a format like `your-username-country-US` to receive a US exit node.
If you're using rotating proxies, set the **Switch interval** to specify how often the IPs should rotate. For sticky sessions, adjust it according to your preferred session length.
 Click **Confirm** to apply the changes, then click **Save**.
And that's it! You've now successfully integrated Bright Data proxies with Octoparse.
Click **Confirm** to apply the changes, then click **Save**.
And that's it! You've now successfully integrated Bright Data proxies with Octoparse.