> ## Documentation Index
> Fetch the complete documentation index at: https://docs.brightdata.com/llms.txt
> Use this file to discover all available pages before exploring further.
# How to Set Up Bright Data With OpenBullet
> Configure Bright Data proxies (port 33335) in OpenBullet to run HTTP automation and testing workflows with geo-targeted IPs and reduced detection risk.
### Your proxy access information
Bright Data proxies are grouped in "Proxy zones". Each zone holds the configuration for the proxies it holds.
To get access to the proxy zone:
1. Login to Bright Data control panel
2. Select the proxy zone or setup a new one
3. Click on the new zone name, and select the **Overview** tab.
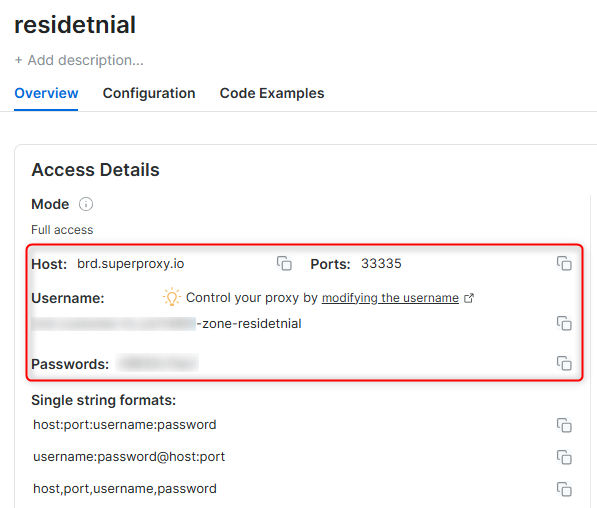
4. In the overview tab, under **Access details** you can find the proxy access details, and copy them to clipboard on click.
5. You will need: Proxy Host, Proxy Port, Proxy Zone username and Proxy Zone password.
6. Click on the copy icons to copy the text to your clipboard and paste in your tool's proxy configuration.
### Access Details Section Example
 ### Residential proxy access
To access Bright Data's **Residential Proxies** you will need to either get verified by our compliance team, or install a certificate. [Read more...](https://docs.brightdata.com/proxy-networks/residential/network-access)
### Targeting search engines?
If you target a search engine like google, bing or yandex, you need a special Search Engine Results Page (**SERP**) proxy API. Use Bright Data SERP API to target search engines.
[Click here to read more about Bright Data SERP proxy API.](https://docs.brightdata.com/scraping-automation/serp-api/introduction)
### Correct setup of proxy test to avoid "PROXY ERROR"
In many tools you will see a "test proxy" function, which performs a conncectivity test to your proxy, and some add a geolocation test as well, to identify the location of the proxy.
To correctly test your proxy you should target those search queries to:
`https://geo.brdtest.com/welcome.txt` .
Some tools use popular search engines (like google.com) as a default test target. Bright Data will block those requests and you tool will show **proxy error** although your proxy is perfectly fine.
If your proxy test fails, this is probably the reason. Make sure that your test domain is not a search engine (this is done in the tool configuration, and not controlled by Bright Data).
## What is OpenBullet?
**OpenBullet** is an automation and testing framework used to manage HTTP requests, perform automated workflows, and validate responses at scale. It is commonly used for scraping, testing, and automation scenarios that require precise control over requests and proxy usage. When combined with Bright Data, OpenBullet gains improved anonymity, geo-targeting, and reduced detection risk.
***
## Why Use Bright Data With OpenBullet?
* **Enhanced Anonymity**: Mask your real IP address during automated workflows
* **Geo-Targeting**: Route traffic through specific countries or regions
* **Improved Stability**: Reduce connection errors and IP bans
* **Scalable Automation**: Safely handle large volumes of automated requests
***
## How to Set Up Bright Data With OpenBullet
Follow the steps below to integrate Bright Data proxies into OpenBullet.
Before you begin, ensure you have:
* An active Bright Data account
* A configured Bright Data proxy zone (ISP or Datacenter recommended)
* Your Bright Data proxy credentials (host, port, username, password)
* OpenBullet installed on your system
1. Visit the [OpenBullet GitHub page](https://github.com/openbullet/OpenBullet2) and download the latest release.
2. Extract the downloaded archive.
3. Launch the OpenBullet application on your system.
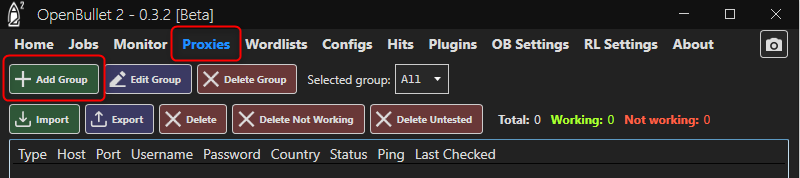
1. Open OpenBullet and navigate to the **Proxies** tab.
2. Click **Add Group** to create a new proxy group.
### Residential proxy access
To access Bright Data's **Residential Proxies** you will need to either get verified by our compliance team, or install a certificate. [Read more...](https://docs.brightdata.com/proxy-networks/residential/network-access)
### Targeting search engines?
If you target a search engine like google, bing or yandex, you need a special Search Engine Results Page (**SERP**) proxy API. Use Bright Data SERP API to target search engines.
[Click here to read more about Bright Data SERP proxy API.](https://docs.brightdata.com/scraping-automation/serp-api/introduction)
### Correct setup of proxy test to avoid "PROXY ERROR"
In many tools you will see a "test proxy" function, which performs a conncectivity test to your proxy, and some add a geolocation test as well, to identify the location of the proxy.
To correctly test your proxy you should target those search queries to:
`https://geo.brdtest.com/welcome.txt` .
Some tools use popular search engines (like google.com) as a default test target. Bright Data will block those requests and you tool will show **proxy error** although your proxy is perfectly fine.
If your proxy test fails, this is probably the reason. Make sure that your test domain is not a search engine (this is done in the tool configuration, and not controlled by Bright Data).
## What is OpenBullet?
**OpenBullet** is an automation and testing framework used to manage HTTP requests, perform automated workflows, and validate responses at scale. It is commonly used for scraping, testing, and automation scenarios that require precise control over requests and proxy usage. When combined with Bright Data, OpenBullet gains improved anonymity, geo-targeting, and reduced detection risk.
***
## Why Use Bright Data With OpenBullet?
* **Enhanced Anonymity**: Mask your real IP address during automated workflows
* **Geo-Targeting**: Route traffic through specific countries or regions
* **Improved Stability**: Reduce connection errors and IP bans
* **Scalable Automation**: Safely handle large volumes of automated requests
***
## How to Set Up Bright Data With OpenBullet
Follow the steps below to integrate Bright Data proxies into OpenBullet.
Before you begin, ensure you have:
* An active Bright Data account
* A configured Bright Data proxy zone (ISP or Datacenter recommended)
* Your Bright Data proxy credentials (host, port, username, password)
* OpenBullet installed on your system
1. Visit the [OpenBullet GitHub page](https://github.com/openbullet/OpenBullet2) and download the latest release.
2. Extract the downloaded archive.
3. Launch the OpenBullet application on your system.
1. Open OpenBullet and navigate to the **Proxies** tab.
2. Click **Add Group** to create a new proxy group.
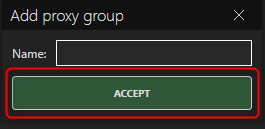
 3. Enter a descriptive name for the group (for example, `brightdata-dc`).
4. Click **Accept** to save the group.
3. Enter a descriptive name for the group (for example, `brightdata-dc`).
4. Click **Accept** to save the group.
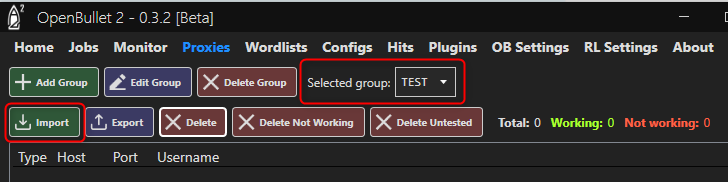
 1. Select the proxy group you created.
2. Click **Import** to open the proxy import panel.
1. Select the proxy group you created.
2. Click **Import** to open the proxy import panel.
 3. In the **Import proxies** dialog:
* Switch to the **Paste** tab.
* Paste your proxy credentials using the format:\
`HOST:PORT:USERNAME:PASSWORD`
* Click **Accept** to import the proxies.
To maintain a consistent IP, append a session parameter to the username\
(for example, `your-username-session-1`).
For geo-targeting, format the username as\
`your-username-country-XX` (for example, `your-username-country-US`).
1. Select the imported proxy group.
2. Use OpenBullet’s built-in proxy checker to test connectivity.
3. Confirm that proxies return valid responses before running automation jobs.
***
## Best Practices
* Use **ISP or Datacenter proxies** for long-running automation
* Assign separate proxy groups for different projects
* Avoid excessive parallel requests from a single proxy
* Rotate sessions periodically for high-volume workflows
* Monitor OpenBullet logs for proxy-related failures
***
## Conclusion
By integrating Bright Data with OpenBullet, you create a secure and scalable automation environment. This setup protects your identity, enables geo-specific workflows, and improves reliability across automated tasks. With Bright Data proxies configured, you can run OpenBullet workflows with confidence and consistency.
3. In the **Import proxies** dialog:
* Switch to the **Paste** tab.
* Paste your proxy credentials using the format:\
`HOST:PORT:USERNAME:PASSWORD`
* Click **Accept** to import the proxies.
To maintain a consistent IP, append a session parameter to the username\
(for example, `your-username-session-1`).
For geo-targeting, format the username as\
`your-username-country-XX` (for example, `your-username-country-US`).
1. Select the imported proxy group.
2. Use OpenBullet’s built-in proxy checker to test connectivity.
3. Confirm that proxies return valid responses before running automation jobs.
***
## Best Practices
* Use **ISP or Datacenter proxies** for long-running automation
* Assign separate proxy groups for different projects
* Avoid excessive parallel requests from a single proxy
* Rotate sessions periodically for high-volume workflows
* Monitor OpenBullet logs for proxy-related failures
***
## Conclusion
By integrating Bright Data with OpenBullet, you create a secure and scalable automation environment. This setup protects your identity, enables geo-specific workflows, and improves reliability across automated tasks. With Bright Data proxies configured, you can run OpenBullet workflows with confidence and consistency.