> ## Documentation Index
> Fetch the complete documentation index at: https://docs.brightdata.com/llms.txt
> Use this file to discover all available pages before exploring further.
# How to Set Up Bright Data With ParseHub
> Integrate Bright Data proxies (400M+ IPs) with ParseHub for secure, anonymous web scraping access, reducing the risk of detection and IP bans at scale.
### Your proxy access information
Bright Data proxies are grouped in "Proxy zones". Each zone holds the configuration for the proxies it holds.
To get access to the proxy zone:
1. Login to Bright Data control panel
2. Select the proxy zone or setup a new one
3. Click on the new zone name, and select the **Overview** tab.
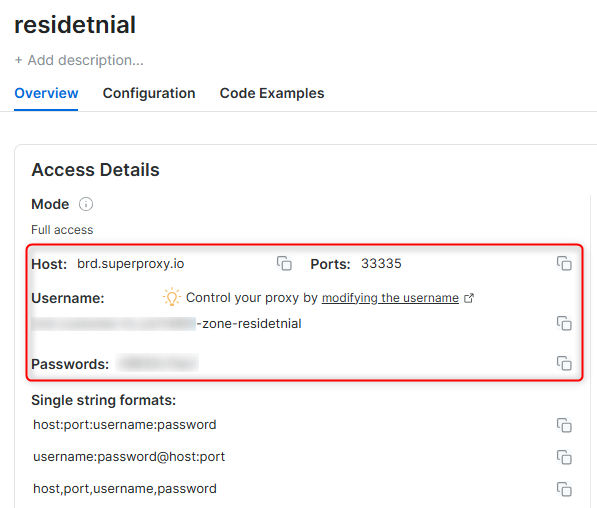
4. In the overview tab, under **Access details** you can find the proxy access details, and copy them to clipboard on click.
5. You will need: Proxy Host, Proxy Port, Proxy Zone username and Proxy Zone password.
6. Click on the copy icons to copy the text to your clipboard and paste in your tool's proxy configuration.
### Access Details Section Example
 ### Residential proxy access
To access Bright Data's **Residential Proxies** you will need to either get verified by our compliance team, or install a certificate. [Read more...](https://docs.brightdata.com/proxy-networks/residential/network-access)
### Targeting search engines?
If you target a search engine like google, bing or yandex, you need a special Search Engine Results Page (**SERP**) proxy API. Use Bright Data SERP API to target search engines.
[Click here to read more about Bright Data SERP proxy API.](https://docs.brightdata.com/scraping-automation/serp-api/introduction)
### Correct setup of proxy test to avoid "PROXY ERROR"
In many tools you will see a "test proxy" function, which performs a conncectivity test to your proxy, and some add a geolocation test as well, to identify the location of the proxy.
To correctly test your proxy you should target those search queries to:
`https://geo.brdtest.com/welcome.txt` .
Some tools use popular search engines (like google.com) as a default test target. Bright Data will block those requests and you tool will show **proxy error** although your proxy is perfectly fine.
If your proxy test fails, this is probably the reason. Make sure that your test domain is not a search engine (this is done in the tool configuration, and not controlled by Bright Data).
## What is ParseHub?
ParseHub stands out as a user-friendly, powerful web scraping tool that revolutionizes data extraction from the web. Its intuitive design allows users to effortlessly interact with complex sites, manage AJAX and JavaScript elements, and navigate through forms and infinite scrolls, all without writing a single line of code. By integrating Bright Data proxies with ParseHub, users gain an unmatched advantage, seamlessly handling even the most challenging data extraction tasks with ease. This combination ensures not only efficient data scraping but also a high level of privacy and security, making it an ideal solution for professionals seeking comprehensive data collection capabilities.
## Bright Data Proxies: Empowering Your ParseHub Experience
Integrating Bright Data [proxies](https://brightdata.com/proxy-types) with ParseHub transforms your web scraping capabilities, bringing a new level of efficiency and reliability to your data extraction tasks. Here’s why Bright Data’s proxy solutions are an ideal match for ParseHub’s powerful scraping features:
**Extensive Proxy Network**
* Global Reach: Access 400M+ monthly residential IPs across 195+ countries, ensuring you can scrape data from any geographic region.
* Diverse Proxy Types: Choose from residential, datacenter, static residential, and mobile proxies to fit the specific needs of your scraping projects.
**Enhanced Anonymity and Security**
* Robust Privacy: Protect your scraping activities from detection and blocking, maintaining the anonymity of your operations.
* Secure Data Collection: Confidently scrape sensitive data with the assurance of Bright Data’s advanced security measures.
**High Performance and Reliability**
* Speed and Efficiency: Experience fast and efficient data extraction, even from complex, JavaScript-heavy websites.
* Reliable Connectivity: Minimize disruptions and maintain consistent performance with Bright Data’s stable proxy infrastructure.
**Versatile and Scalable Solutions**
* Adaptable to Various Use Cases: Whether for market research, web scraping, SEO analysis, or competitive intelligence, Bright Data’s proxies are versatile enough to handle diverse scraping scenarios.
* Scalability: Effortlessly scale your scraping operations to handle large volumes of data without compromising on speed or accuracy.
**User-Friendly Integration**
* Simple Setup: Easily integrate Bright Data proxies with ParseHub, regardless of your technical expertise.
* Comprehensive Support: Benefit from Bright Data’s extensive documentation and customer support for a smooth integration process.
## How to integrate ParseHub proxies:
1. After signing up, go to the Bright Data dashboard
2. Navigate to the “**Proxy & Scraping Infrastructure**” section
3. **Add** a new designated **Zone** for your proxy usage.
### Residential proxy access
To access Bright Data's **Residential Proxies** you will need to either get verified by our compliance team, or install a certificate. [Read more...](https://docs.brightdata.com/proxy-networks/residential/network-access)
### Targeting search engines?
If you target a search engine like google, bing or yandex, you need a special Search Engine Results Page (**SERP**) proxy API. Use Bright Data SERP API to target search engines.
[Click here to read more about Bright Data SERP proxy API.](https://docs.brightdata.com/scraping-automation/serp-api/introduction)
### Correct setup of proxy test to avoid "PROXY ERROR"
In many tools you will see a "test proxy" function, which performs a conncectivity test to your proxy, and some add a geolocation test as well, to identify the location of the proxy.
To correctly test your proxy you should target those search queries to:
`https://geo.brdtest.com/welcome.txt` .
Some tools use popular search engines (like google.com) as a default test target. Bright Data will block those requests and you tool will show **proxy error** although your proxy is perfectly fine.
If your proxy test fails, this is probably the reason. Make sure that your test domain is not a search engine (this is done in the tool configuration, and not controlled by Bright Data).
## What is ParseHub?
ParseHub stands out as a user-friendly, powerful web scraping tool that revolutionizes data extraction from the web. Its intuitive design allows users to effortlessly interact with complex sites, manage AJAX and JavaScript elements, and navigate through forms and infinite scrolls, all without writing a single line of code. By integrating Bright Data proxies with ParseHub, users gain an unmatched advantage, seamlessly handling even the most challenging data extraction tasks with ease. This combination ensures not only efficient data scraping but also a high level of privacy and security, making it an ideal solution for professionals seeking comprehensive data collection capabilities.
## Bright Data Proxies: Empowering Your ParseHub Experience
Integrating Bright Data [proxies](https://brightdata.com/proxy-types) with ParseHub transforms your web scraping capabilities, bringing a new level of efficiency and reliability to your data extraction tasks. Here’s why Bright Data’s proxy solutions are an ideal match for ParseHub’s powerful scraping features:
**Extensive Proxy Network**
* Global Reach: Access 400M+ monthly residential IPs across 195+ countries, ensuring you can scrape data from any geographic region.
* Diverse Proxy Types: Choose from residential, datacenter, static residential, and mobile proxies to fit the specific needs of your scraping projects.
**Enhanced Anonymity and Security**
* Robust Privacy: Protect your scraping activities from detection and blocking, maintaining the anonymity of your operations.
* Secure Data Collection: Confidently scrape sensitive data with the assurance of Bright Data’s advanced security measures.
**High Performance and Reliability**
* Speed and Efficiency: Experience fast and efficient data extraction, even from complex, JavaScript-heavy websites.
* Reliable Connectivity: Minimize disruptions and maintain consistent performance with Bright Data’s stable proxy infrastructure.
**Versatile and Scalable Solutions**
* Adaptable to Various Use Cases: Whether for market research, web scraping, SEO analysis, or competitive intelligence, Bright Data’s proxies are versatile enough to handle diverse scraping scenarios.
* Scalability: Effortlessly scale your scraping operations to handle large volumes of data without compromising on speed or accuracy.
**User-Friendly Integration**
* Simple Setup: Easily integrate Bright Data proxies with ParseHub, regardless of your technical expertise.
* Comprehensive Support: Benefit from Bright Data’s extensive documentation and customer support for a smooth integration process.
## How to integrate ParseHub proxies:
1. After signing up, go to the Bright Data dashboard
2. Navigate to the “**Proxy & Scraping Infrastructure**” section
3. **Add** a new designated **Zone** for your proxy usage.
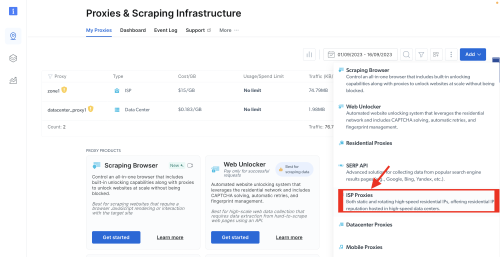
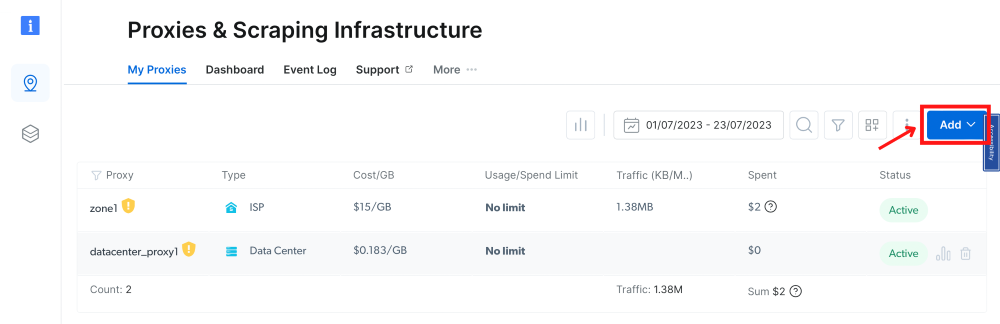 In this example, we will show how to set up ISP proxies.
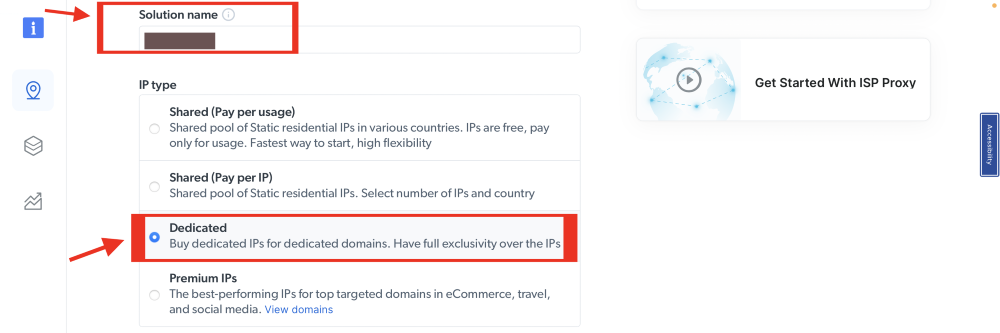 Fill in the number of IPs you need.
 Choose your desired country and city for the IP location.
 Use specific domains or use ‘All domains’ for one IP to target websites using the same IP.
 Click the “**Add**” button to create the Zone.
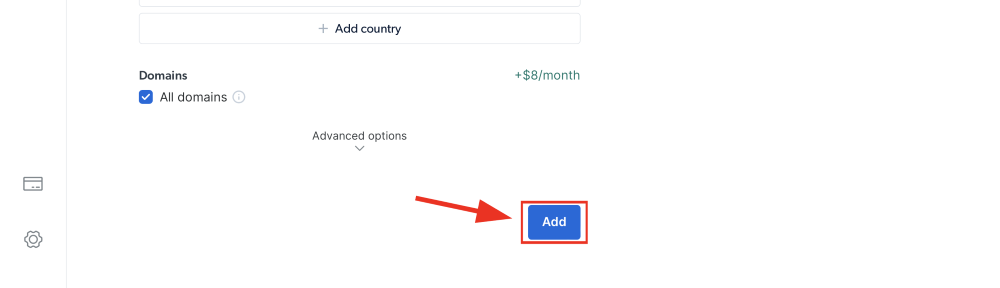 Click on the name of your Zone, navigate to the “Access Parameters” tab, and note down the proxy credentials:
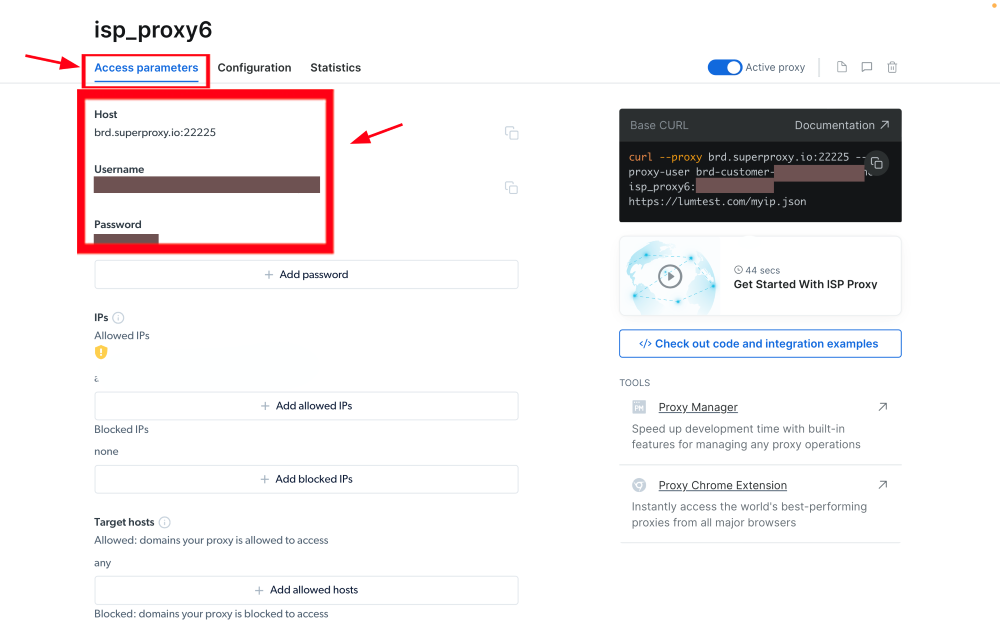 1. host: brd.superproxy.io
2. port: 33335
3. username: `your-zone-username`
4. password: `your-zone-password`
1. host: brd.superproxy.io
2. port: 33335
3. username: `your-zone-username`
4. password: `your-zone-password`
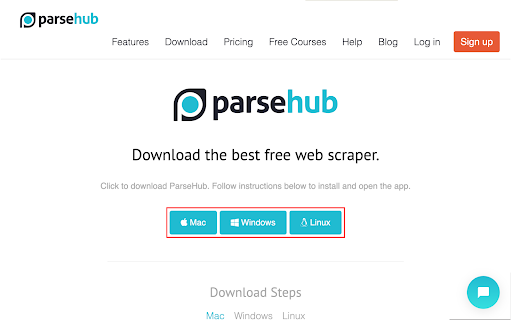 * Visit the official website of ParseHub, download, and install the ParseHub application suitable for your operating system.
* Launch ParseHub and either create a new account or log into your existing account.
Click on the “+ New Project” button from the ParseHub home screen.
* Visit the official website of ParseHub, download, and install the ParseHub application suitable for your operating system.
* Launch ParseHub and either create a new account or log into your existing account.
Click on the “+ New Project” button from the ParseHub home screen.
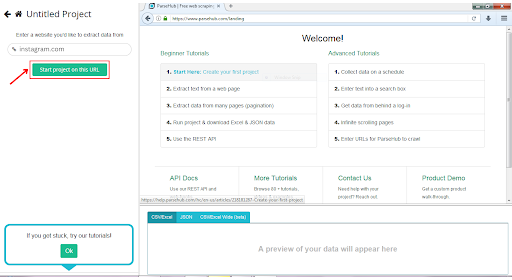
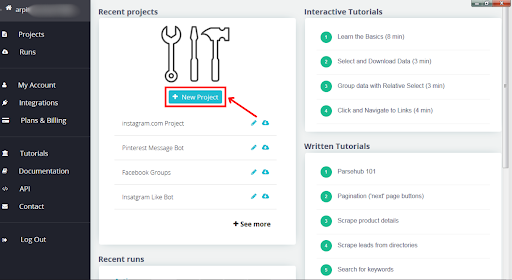 Insert a URL from which you wish to scrape data (for example, instagram.com) and press “Start project on this URL”.
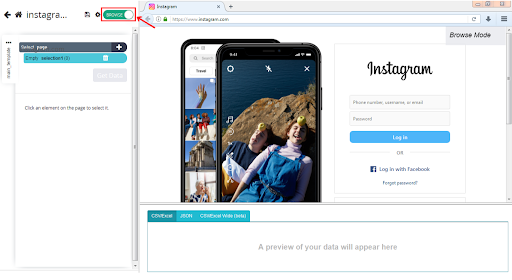
 Switch to the Browser mode, slider turns green to indicate browsing mode.
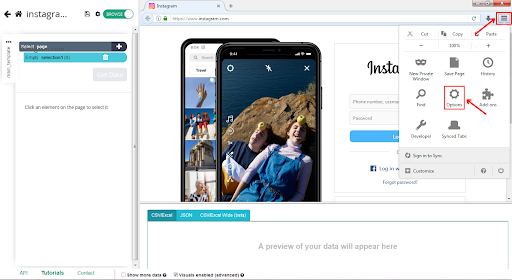
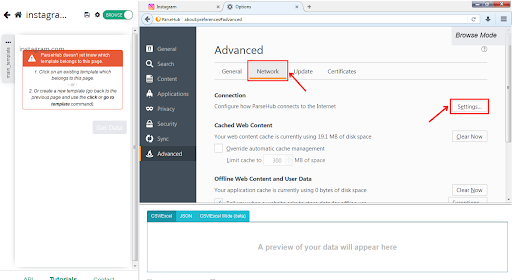
 Open the settings located at the top-right side of the Browser interface and click on “options”.
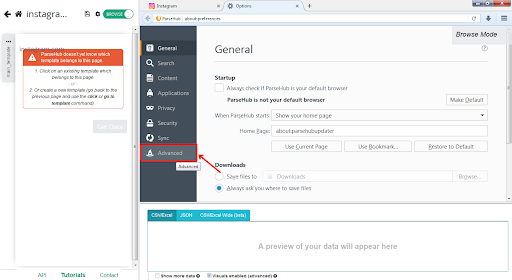
 Select the “Advanced” tab.
 Under “Connection” choose “Settings”.
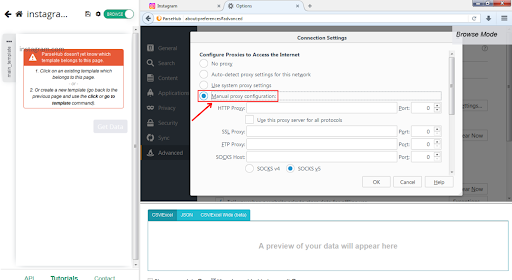
 In the network settings, select “Manual proxy configuration”.
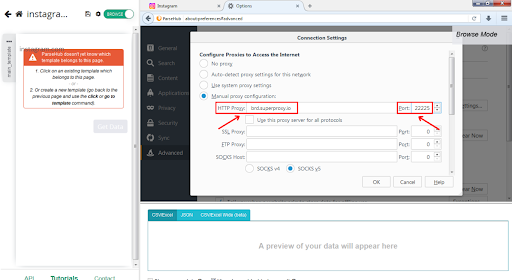
 Under HTTP Proxy field enter the Bright Data proxy URL **brd.superproxy.io** and port as **33335**.
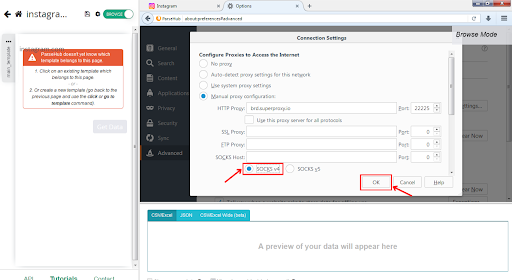
 After you switched to the SOCKS v4, click the ‘OK’ button.
 Insert your proxy zone’s credentials , they can be found on your proxy zone’s access parameters.
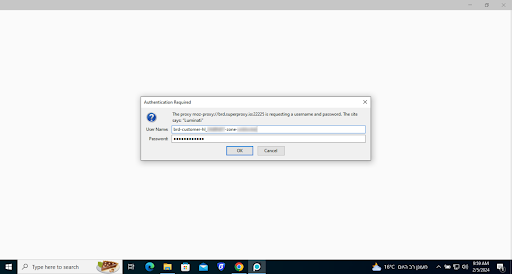 * Format your proxy details as IPAddress:Port:Username:Password:Realm.
* In case of Bright Data Proxies it will be:\
`brd.superproxy.io:33335:brd-customer-hl_******-zone-isp_proxy6:b1s*****:BrightData`
Apply Configured Proxy to ParseHub Project:
* Navigate to your project settings in ParseHub.
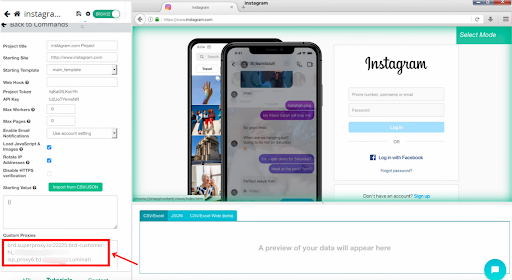
* Format your proxy details as IPAddress:Port:Username:Password:Realm.
* In case of Bright Data Proxies it will be:\
`brd.superproxy.io:33335:brd-customer-hl_******-zone-isp_proxy6:b1s*****:BrightData`
Apply Configured Proxy to ParseHub Project:
* Navigate to your project settings in ParseHub.
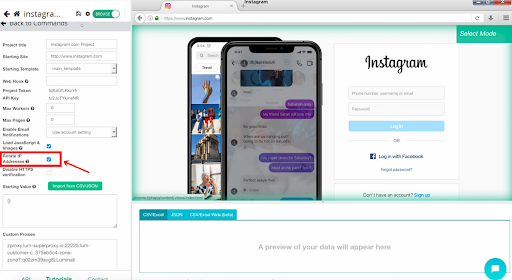
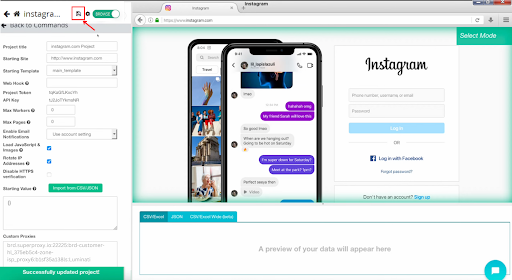
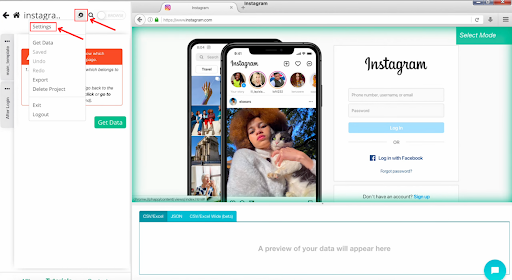 Check “Rotate IP Addresses” to enable the “Custom Proxy” text box.
 Paste your formatted proxy into the “Custom Proxies” field. For multiple proxies, list each one on a separate line.
 After saving, run it with your Bright Data Proxies.
 **Important note**:
If you are using Bright Data’s Residential Proxies, Unlocker API or SERP API, you need to install an SSL certificate to enable end-to-end secure connections to your target website(s).
This is a simple process, see [this guide](https://docs.brightdata.com/general/account/ssl-certificate#installation-of-the-ssl-certificate) for instructions.
**Important note**:
If you are using Bright Data’s Residential Proxies, Unlocker API or SERP API, you need to install an SSL certificate to enable end-to-end secure connections to your target website(s).
This is a simple process, see [this guide](https://docs.brightdata.com/general/account/ssl-certificate#installation-of-the-ssl-certificate) for instructions.