> ## Documentation Index
> Fetch the complete documentation index at: https://docs.brightdata.com/llms.txt
> Use this file to discover all available pages before exploring further.
# Set Up Bright Data With PhantomBuster
> Step-by-step guide to configuring Bright Data proxies in PhantomBuster automations for safer, higher-success-rate data gathering workflows. Spans 195 countries.
### Your proxy access information
Bright Data proxies are grouped in "Proxy zones". Each zone holds the configuration for the proxies it holds.
To get access to the proxy zone:
1. Login to Bright Data control panel
2. Select the proxy zone or setup a new one
3. Click on the new zone name, and select the **Overview** tab.
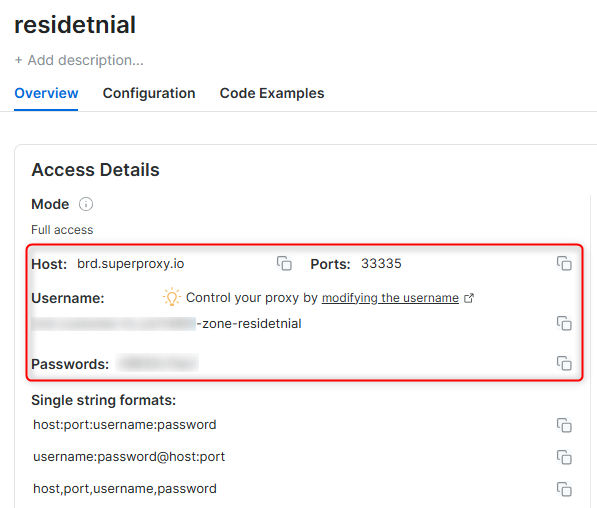
4. In the overview tab, under **Access details** you can find the proxy access details, and copy them to clipboard on click.
5. You will need: Proxy Host, Proxy Port, Proxy Zone username and Proxy Zone password.
6. Click on the copy icons to copy the text to your clipboard and paste in your tool's proxy configuration.
### Access Details Section Example
 ### Residential proxy access
To access Bright Data's **Residential Proxies** you will need to either get verified by our compliance team, or install a certificate. [Read more...](https://docs.brightdata.com/proxy-networks/residential/network-access)
### Targeting search engines?
If you target a search engine like google, bing or yandex, you need a special Search Engine Results Page (**SERP**) proxy API. Use Bright Data SERP API to target search engines.
[Click here to read more about Bright Data SERP proxy API.](https://docs.brightdata.com/scraping-automation/serp-api/introduction)
### Correct setup of proxy test to avoid "PROXY ERROR"
In many tools you will see a "test proxy" function, which performs a conncectivity test to your proxy, and some add a geolocation test as well, to identify the location of the proxy.
To correctly test your proxy you should target those search queries to:
`https://geo.brdtest.com/welcome.txt` .
Some tools use popular search engines (like google.com) as a default test target. Bright Data will block those requests and you tool will show **proxy error** although your proxy is perfectly fine.
If your proxy test fails, this is probably the reason. Make sure that your test domain is not a search engine (this is done in the tool configuration, and not controlled by Bright Data).
## What is PhantomBuster?
PhantomBuster is a cloud-based automation platform designed to handle repetitive online tasks at scale. It enables you to automate actions across social networks, websites, and online services without managing infrastructure or writing complex scripts. By combining PhantomBuster with Bright Data proxies, you gain higher reliability, improved anonymity, and better protection against blocks.
Maintain a consistent IP throughout your browser session by using the `-session` parameter in your username. Bright Data proxies rotate IPs by default.\
[Learn more](https://docs.brightdata.com/proxy-networks/faqs#how-to-use-the-same-ip-for-an-extended-period-of-time-and-how-long-can-i-keep-it-long-session)
New users should begin with **ISP or Data Center proxies**, as residential proxies are incompatible with browser integration in Immediate-Access mode.
***
## How to Integrate Bright Data With PhantomBuster
Integrating Bright Data proxies into PhantomBuster helps you maintain anonymity, reduce the risk of blocks, and improve automation stability. Follow the steps below to complete the setup.
Before you begin, ensure you have:
* An active PhantomBuster account
* An active Bright Data account
* A configured Bright Data proxy zone (ISP or Data Center recommended)
* Your Bright Data proxy credentials (host, port, username, password)
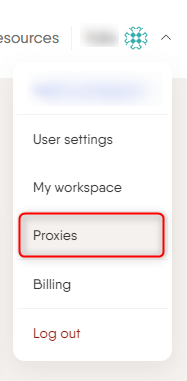
Log in to your [PhantomBuster account](https://phantombuster.com/) and navigate to **Settings → Proxies**.\
This section allows you to manage proxy pools used by your Phantoms.
### Residential proxy access
To access Bright Data's **Residential Proxies** you will need to either get verified by our compliance team, or install a certificate. [Read more...](https://docs.brightdata.com/proxy-networks/residential/network-access)
### Targeting search engines?
If you target a search engine like google, bing or yandex, you need a special Search Engine Results Page (**SERP**) proxy API. Use Bright Data SERP API to target search engines.
[Click here to read more about Bright Data SERP proxy API.](https://docs.brightdata.com/scraping-automation/serp-api/introduction)
### Correct setup of proxy test to avoid "PROXY ERROR"
In many tools you will see a "test proxy" function, which performs a conncectivity test to your proxy, and some add a geolocation test as well, to identify the location of the proxy.
To correctly test your proxy you should target those search queries to:
`https://geo.brdtest.com/welcome.txt` .
Some tools use popular search engines (like google.com) as a default test target. Bright Data will block those requests and you tool will show **proxy error** although your proxy is perfectly fine.
If your proxy test fails, this is probably the reason. Make sure that your test domain is not a search engine (this is done in the tool configuration, and not controlled by Bright Data).
## What is PhantomBuster?
PhantomBuster is a cloud-based automation platform designed to handle repetitive online tasks at scale. It enables you to automate actions across social networks, websites, and online services without managing infrastructure or writing complex scripts. By combining PhantomBuster with Bright Data proxies, you gain higher reliability, improved anonymity, and better protection against blocks.
Maintain a consistent IP throughout your browser session by using the `-session` parameter in your username. Bright Data proxies rotate IPs by default.\
[Learn more](https://docs.brightdata.com/proxy-networks/faqs#how-to-use-the-same-ip-for-an-extended-period-of-time-and-how-long-can-i-keep-it-long-session)
New users should begin with **ISP or Data Center proxies**, as residential proxies are incompatible with browser integration in Immediate-Access mode.
***
## How to Integrate Bright Data With PhantomBuster
Integrating Bright Data proxies into PhantomBuster helps you maintain anonymity, reduce the risk of blocks, and improve automation stability. Follow the steps below to complete the setup.
Before you begin, ensure you have:
* An active PhantomBuster account
* An active Bright Data account
* A configured Bright Data proxy zone (ISP or Data Center recommended)
* Your Bright Data proxy credentials (host, port, username, password)
Log in to your [PhantomBuster account](https://phantombuster.com/) and navigate to **Settings → Proxies**.\
This section allows you to manage proxy pools used by your Phantoms.
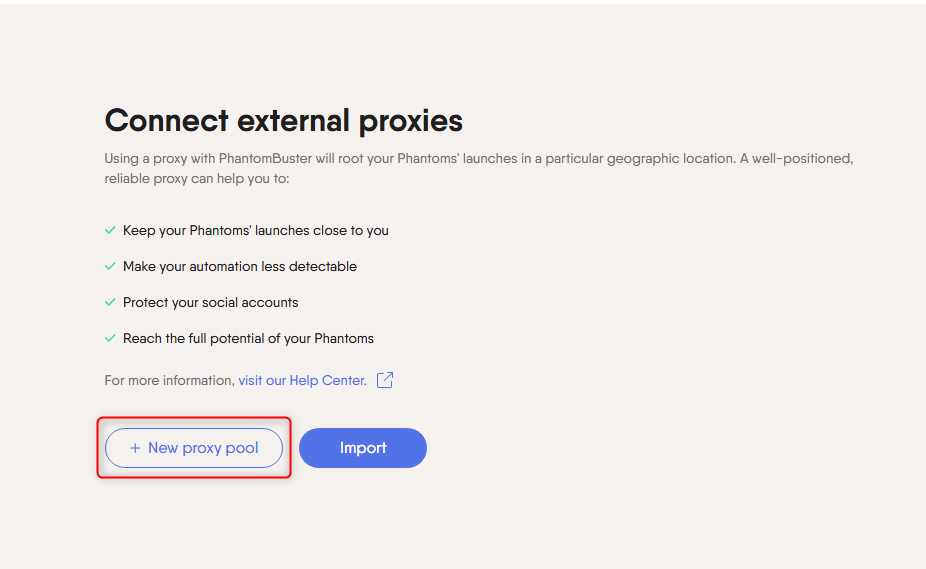
 Click **New proxy pool** to create a dedicated pool for Bright Data proxies.\
Using separate proxy pools for different projects helps isolate workflows and reduce detection risk.
Click **New proxy pool** to create a dedicated pool for Bright Data proxies.\
Using separate proxy pools for different projects helps isolate workflows and reduce detection risk.
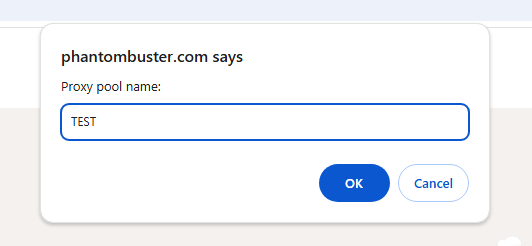
 Assign a clear and descriptive name to your proxy pool (for example, `brightdata-isp-eu`).\
This makes it easier to identify and reuse the pool across multiple Phantoms.
Assign a clear and descriptive name to your proxy pool (for example, `brightdata-isp-eu`).\
This makes it easier to identify and reuse the pool across multiple Phantoms.
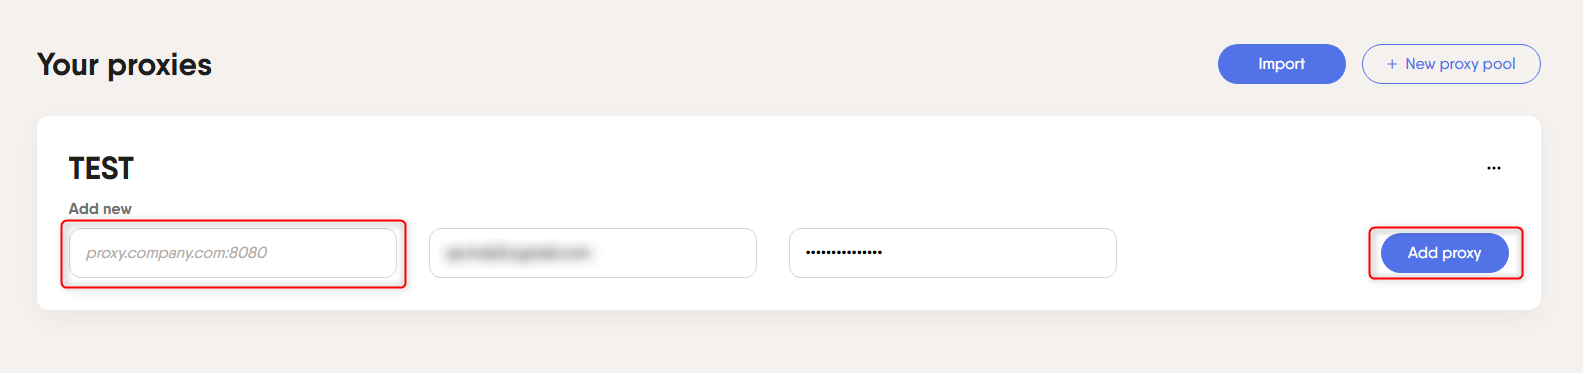
 Enter your Bright Data proxy credentials using the following format:
`host:port:username:password`
You can find these details in your [Bright Data dashboard](https://brightdata.com/cp/zones/page/plans).
After entering the credentials, click **Add proxy** to save them to the pool.
Enter your Bright Data proxy credentials using the following format:
`host:port:username:password`
You can find these details in your [Bright Data dashboard](https://brightdata.com/cp/zones/page/plans).
After entering the credentials, click **Add proxy** to save them to the pool.
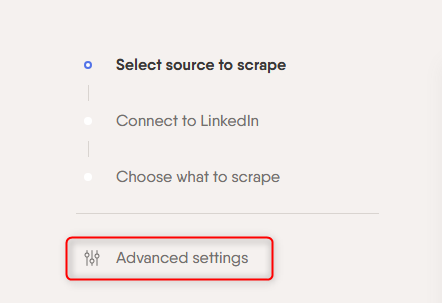
 Open the Phantom you want to run and expand the **Advanced settings** section.\
This is where you define network and execution behavior for your workflow.
Open the Phantom you want to run and expand the **Advanced settings** section.\
This is where you define network and execution behavior for your workflow.
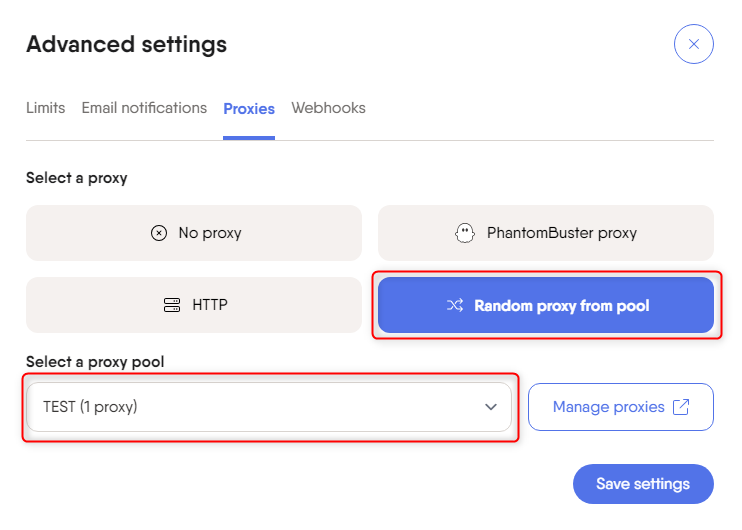
 In **Advanced settings**, select the Bright Data proxy pool you created.\
Click **Save settings** to apply the configuration.
From this point forward, the Phantom will route all traffic through Bright Data proxies.
In **Advanced settings**, select the Bright Data proxy pool you created.\
Click **Save settings** to apply the configuration.
From this point forward, the Phantom will route all traffic through Bright Data proxies.
 Start your Phantom and monitor execution logs.\
If you encounter blocks or slowdowns:
* Reduce execution frequency
* Use session-based usernames for IP consistency
* Assign dedicated proxies to sensitive accounts
***
## Best Practices
* Use one proxy pool per platform or account type
* Avoid running too many Phantoms concurrently from the same pool
* Prefer ISP proxies for logged-in or session-based workflows
* Monitor Phantom execution logs for proxy-related errors
* Rotate sessions periodically for long-running workflows
***
## Conclusion
Your Bright Data proxies are now fully integrated with PhantomBuster. This setup enables more reliable automation, stronger anonymity, and reduced block rates across your workflows. With the technical foundation in place, you can focus on scaling outreach, data collection, and growth initiatives with confidence.
Start your Phantom and monitor execution logs.\
If you encounter blocks or slowdowns:
* Reduce execution frequency
* Use session-based usernames for IP consistency
* Assign dedicated proxies to sensitive accounts
***
## Best Practices
* Use one proxy pool per platform or account type
* Avoid running too many Phantoms concurrently from the same pool
* Prefer ISP proxies for logged-in or session-based workflows
* Monitor Phantom execution logs for proxy-related errors
* Rotate sessions periodically for long-running workflows
***
## Conclusion
Your Bright Data proxies are now fully integrated with PhantomBuster. This setup enables more reliable automation, stronger anonymity, and reduced block rates across your workflows. With the technical foundation in place, you can focus on scaling outreach, data collection, and growth initiatives with confidence.