> ## Documentation Index
> Fetch the complete documentation index at: https://docs.brightdata.com/llms.txt
> Use this file to discover all available pages before exploring further.
# How to Set Up Bright Data With SaleFreaks
> Integrate Bright Data proxies (400M+ IPs) with SaleFreaks to manage dropshipping automation securely, protect seller accounts and reduce IP-related risks.
**Account management is not a supported use case** on the Bright Data platform as of April 1, 2026. This includes managing accounts on platforms like TikTok, Instagram, or similar services. Bright Data proxies cannot be used for this purpose. See [Acceptable Use Policy](https://brightdata.com/acceptable-use-policy) for details.
### Your proxy access information
Bright Data proxies are grouped in "Proxy zones". Each zone holds the configuration for the proxies it holds.
To get access to the proxy zone:
1. Login to Bright Data control panel
2. Select the proxy zone or setup a new one
3. Click on the new zone name, and select the **Overview** tab.
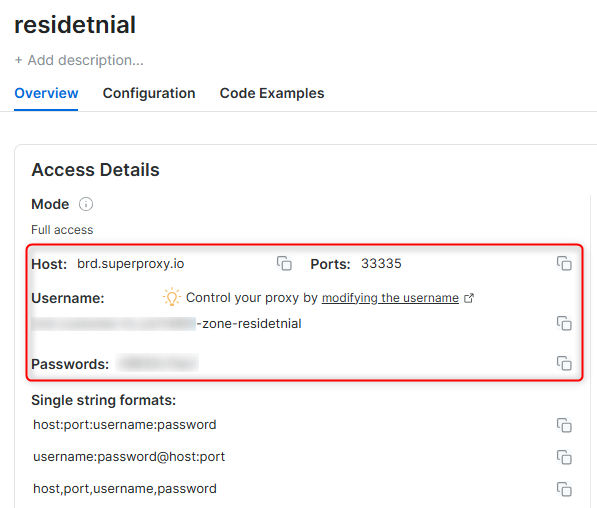
4. In the overview tab, under **Access details** you can find the proxy access details, and copy them to clipboard on click.
5. You will need: Proxy Host, Proxy Port, Proxy Zone username and Proxy Zone password.
6. Click on the copy icons to copy the text to your clipboard and paste in your tool's proxy configuration.
### Access Details Section Example
 ### Residential proxy access
To access Bright Data's **Residential Proxies** you will need to either get verified by our compliance team, or install a certificate. [Read more...](https://docs.brightdata.com/proxy-networks/residential/network-access)
### Targeting search engines?
If you target a search engine like google, bing or yandex, you need a special Search Engine Results Page (**SERP**) proxy API. Use Bright Data SERP API to target search engines.
[Click here to read more about Bright Data SERP proxy API.](https://docs.brightdata.com/scraping-automation/serp-api/introduction)
### Correct setup of proxy test to avoid "PROXY ERROR"
In many tools you will see a "test proxy" function, which performs a conncectivity test to your proxy, and some add a geolocation test as well, to identify the location of the proxy.
To correctly test your proxy you should target those search queries to:
`https://geo.brdtest.com/welcome.txt` .
Some tools use popular search engines (like google.com) as a default test target. Bright Data will block those requests and you tool will show **proxy error** although your proxy is perfectly fine.
If your proxy test fails, this is probably the reason. Make sure that your test domain is not a search engine (this is done in the tool configuration, and not controlled by Bright Data).
## What is SaleFreaks?
SaleFreaks is an automation platform built for dropshippers to manage online stores more efficiently. It helps automate key workflows such as product sourcing, order fulfillment, and inventory synchronization. SaleFreaks commonly integrates with marketplaces like eBay and Amazon, where stable IP usage is critical to avoid account flags or suspensions.
Using Bright Data proxies with SaleFreaks improves account safety, enables geo-targeted operations, and ensures long-term automation stability.
***
## Why Use Bright Data With SaleFreaks?
* **Account Protection**: Reduce the risk of marketplace bans by using dedicated, consistent IPs
* **Geo-Targeting**: Operate seller accounts from specific countries or cities
* **High Stability**: Dedicated datacenter or ISP proxies ensure uninterrupted automation
* **Scalability**: Manage multiple seller accounts with isolated proxy identities
***
## Steps to Integrate SaleFreaks With Bright Data Proxies
### Step 1. Sign Up to Bright Data
1. Log in to your Bright Data dashboard
2. Navigate to **Proxy & Scraping Infrastructure**
3. Click **Add** to create a new proxy **Zone**
### Residential proxy access
To access Bright Data's **Residential Proxies** you will need to either get verified by our compliance team, or install a certificate. [Read more...](https://docs.brightdata.com/proxy-networks/residential/network-access)
### Targeting search engines?
If you target a search engine like google, bing or yandex, you need a special Search Engine Results Page (**SERP**) proxy API. Use Bright Data SERP API to target search engines.
[Click here to read more about Bright Data SERP proxy API.](https://docs.brightdata.com/scraping-automation/serp-api/introduction)
### Correct setup of proxy test to avoid "PROXY ERROR"
In many tools you will see a "test proxy" function, which performs a conncectivity test to your proxy, and some add a geolocation test as well, to identify the location of the proxy.
To correctly test your proxy you should target those search queries to:
`https://geo.brdtest.com/welcome.txt` .
Some tools use popular search engines (like google.com) as a default test target. Bright Data will block those requests and you tool will show **proxy error** although your proxy is perfectly fine.
If your proxy test fails, this is probably the reason. Make sure that your test domain is not a search engine (this is done in the tool configuration, and not controlled by Bright Data).
## What is SaleFreaks?
SaleFreaks is an automation platform built for dropshippers to manage online stores more efficiently. It helps automate key workflows such as product sourcing, order fulfillment, and inventory synchronization. SaleFreaks commonly integrates with marketplaces like eBay and Amazon, where stable IP usage is critical to avoid account flags or suspensions.
Using Bright Data proxies with SaleFreaks improves account safety, enables geo-targeted operations, and ensures long-term automation stability.
***
## Why Use Bright Data With SaleFreaks?
* **Account Protection**: Reduce the risk of marketplace bans by using dedicated, consistent IPs
* **Geo-Targeting**: Operate seller accounts from specific countries or cities
* **High Stability**: Dedicated datacenter or ISP proxies ensure uninterrupted automation
* **Scalability**: Manage multiple seller accounts with isolated proxy identities
***
## Steps to Integrate SaleFreaks With Bright Data Proxies
### Step 1. Sign Up to Bright Data
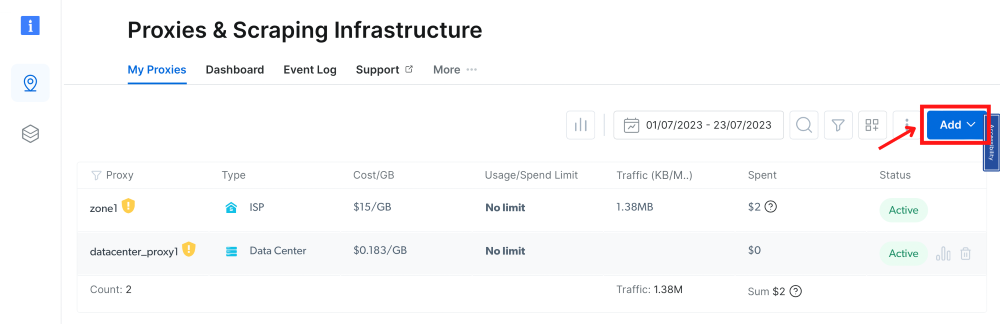
1. Log in to your Bright Data dashboard
2. Navigate to **Proxy & Scraping Infrastructure**
3. Click **Add** to create a new proxy **Zone**
 ***
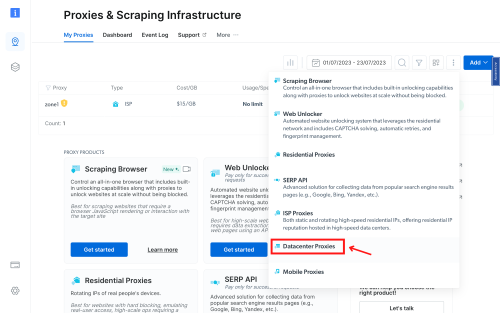
### Step 2. Select Proxy Type
For SaleFreaks, **Datacenter or ISP proxies** are recommended for maximum account stability.
***
### Step 2. Select Proxy Type
For SaleFreaks, **Datacenter or ISP proxies** are recommended for maximum account stability.
 ***
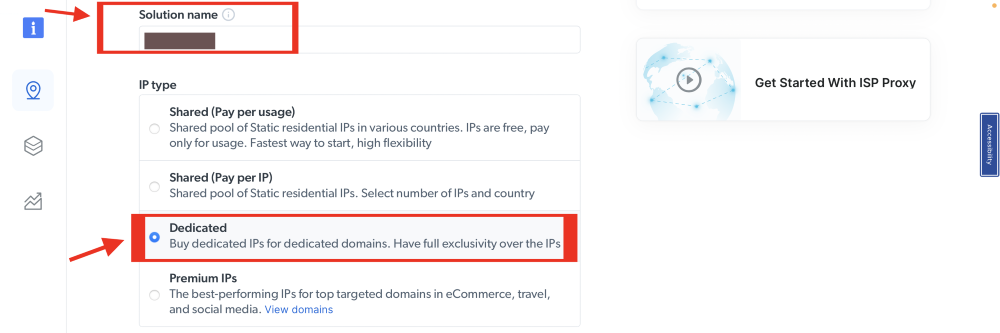
### Step 3. Name the Proxy Zone
Choose a clear name for your proxy zone (for example, `salefreaks-ebay-us`).
***
### Step 3. Name the Proxy Zone
Choose a clear name for your proxy zone (for example, `salefreaks-ebay-us`).
 ***
### Step 4. Select IP Count
Specify the number of IPs required.\
Best practice: **one IP per seller account**.
***
### Step 4. Select IP Count
Specify the number of IPs required.\
Best practice: **one IP per seller account**.
 ***
### Step 5. Country & City Selection
Select the country and city that best match your marketplace region.
***
### Step 5. Country & City Selection
Select the country and city that best match your marketplace region.
 ***
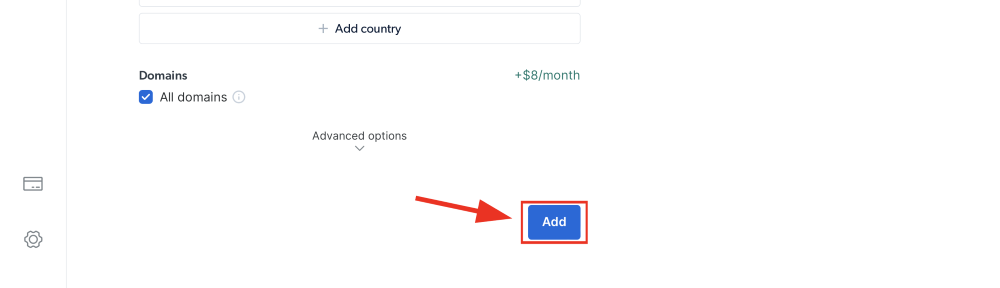
### Step 6. Add the Zone
Click **Add** to create and activate the proxy zone.
***
### Step 6. Add the Zone
Click **Add** to create and activate the proxy zone.
 ***
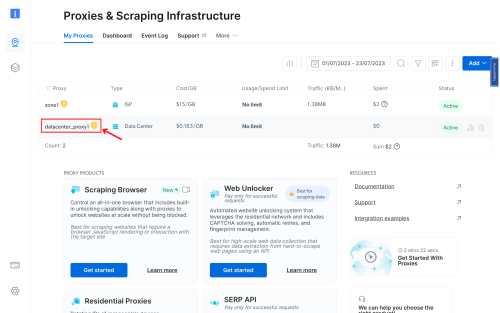
### Step 7. Zone Is Ready
Click on the zone name to view configuration details.\
You can edit settings or add more proxies from the **Configuration** page.
***
### Step 7. Zone Is Ready
Click on the zone name to view configuration details.\
You can edit settings or add more proxies from the **Configuration** page.
 ***
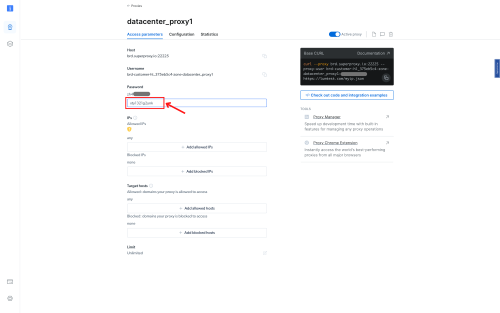
### Step 8. Add a New Proxy Password
Navigate to **Access parameters** and click **Add password** to generate a new proxy password.
***
### Step 8. Add a New Proxy Password
Navigate to **Access parameters** and click **Add password** to generate a new proxy password.
 ***
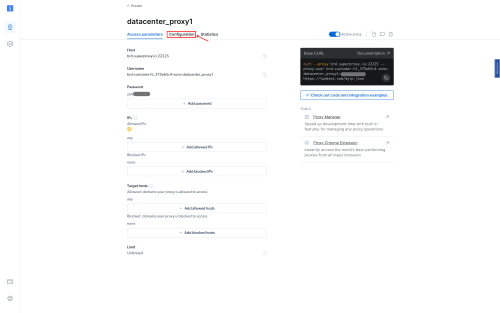
### Step 9. Open the Configuration Page
After adding a password, go back to the configuration page to manage IP access.
***
### Step 9. Open the Configuration Page
After adding a password, go back to the configuration page to manage IP access.
 ***
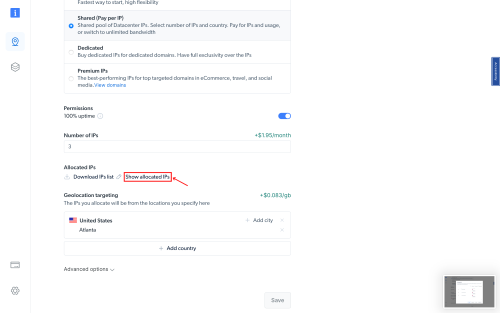
### Step 10. Review Allocated IPs
Click **Show allocated IPs** to view your assigned IP addresses.
***
### Step 10. Review Allocated IPs
Click **Show allocated IPs** to view your assigned IP addresses.
 ***
### Step 11. Download the IP List
Download the allocated IPs list for use in SaleFreaks.
***
### Step 11. Download the IP List
Download the allocated IPs list for use in SaleFreaks.
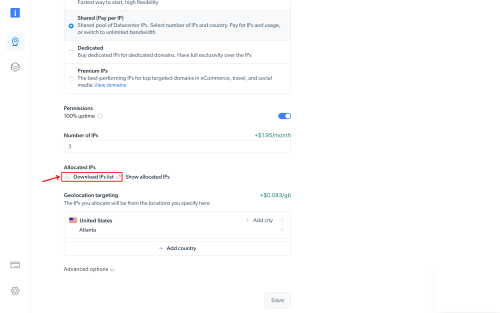 If you added a new password, wait a few minutes before downloading the IP list to allow the password to sync correctly.
***
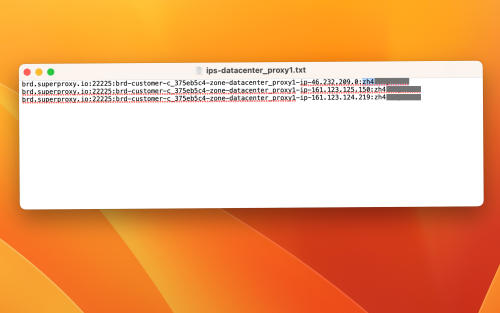
### Step 12. Open the IP File
Open the downloaded file in a text editor of your choice.
If you added a new password, wait a few minutes before downloading the IP list to allow the password to sync correctly.
***
### Step 12. Open the IP File
Open the downloaded file in a text editor of your choice.
 ***
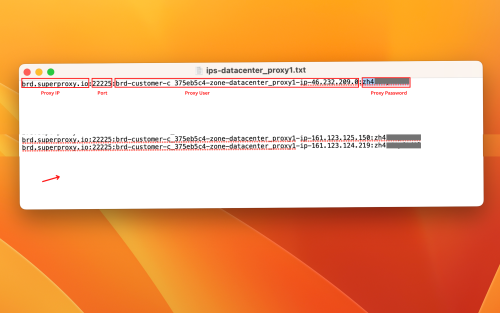
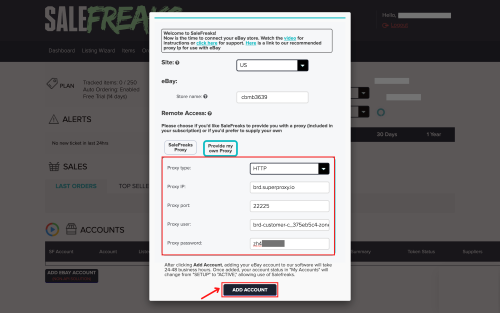
### Step 13. Review Required Proxy Fields
Use the following values when configuring SaleFreaks:
* **Proxy Type**: `HTTP`
* **Proxy IP / Host**: `brd.superproxy.io`
* **Proxy Port**: `33335`
* **Proxy Username**:\
`lum-customer-{your_customer_id}-zone-{your_zone}-ip-{allocated_ip}`
* **Proxy Password**:\
Your generated proxy password
***
### Step 13. Review Required Proxy Fields
Use the following values when configuring SaleFreaks:
* **Proxy Type**: `HTTP`
* **Proxy IP / Host**: `brd.superproxy.io`
* **Proxy Port**: `33335`
* **Proxy Username**:\
`lum-customer-{your_customer_id}-zone-{your_zone}-ip-{allocated_ip}`
* **Proxy Password**:\
Your generated proxy password
 ***
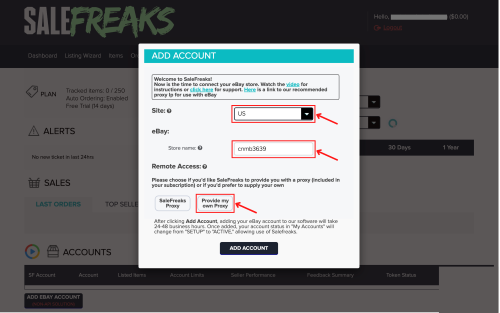
### Step 14. Log In to SaleFreaks
Log in to your SaleFreaks account.\
When prompted to add a marketplace account, choose **Provide my own proxy**.
***
### Step 14. Log In to SaleFreaks
Log in to your SaleFreaks account.\
When prompted to add a marketplace account, choose **Provide my own proxy**.
 ***
### Step 15. Enter Proxy Details in SaleFreaks
Paste the proxy details from the Bright Data IP file into the SaleFreaks proxy fields.
***
### Step 15. Enter Proxy Details in SaleFreaks
Paste the proxy details from the Bright Data IP file into the SaleFreaks proxy fields.
 ***
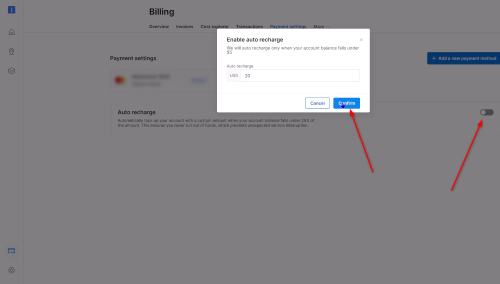
### Step 16. Enable Auto-Recharge (Recommended)
To avoid losing access to allocated IPs, enable **auto-recharge** in your Bright Data billing settings.
***
### Step 16. Enable Auto-Recharge (Recommended)
To avoid losing access to allocated IPs, enable **auto-recharge** in your Bright Data billing settings.
 ***
**Important Note**
If you are using Bright Data **Residential Proxies**, **Unlocker API**, or **SERP API**, you must install an SSL certificate to enable secure connections.
Follow the instructions in this guide to complete the setup:\
[https://docs.brightdata.com/general/account/ssl-certificate#installation-of-the-ssl-certificate](https://docs.brightdata.com/general/account/ssl-certificate#installation-of-the-ssl-certificate)
***
## Best Practices
* Use **one dedicated IP per seller account**
* Avoid reusing IPs across multiple marketplaces
* Monitor SaleFreaks logs for proxy-related errors
* Use ISP or Datacenter proxies for long-term account safety
* Keep auto-recharge enabled to prevent service interruptions
***
## Conclusion
By integrating Bright Data proxies with SaleFreaks, you create a stable and secure automation environment for dropshipping operations. This setup protects seller accounts, enables geo-specific workflows, and ensures reliable performance across sourcing, fulfillment, and inventory management, allowing you to scale your business with confidence.
***
**Important Note**
If you are using Bright Data **Residential Proxies**, **Unlocker API**, or **SERP API**, you must install an SSL certificate to enable secure connections.
Follow the instructions in this guide to complete the setup:\
[https://docs.brightdata.com/general/account/ssl-certificate#installation-of-the-ssl-certificate](https://docs.brightdata.com/general/account/ssl-certificate#installation-of-the-ssl-certificate)
***
## Best Practices
* Use **one dedicated IP per seller account**
* Avoid reusing IPs across multiple marketplaces
* Monitor SaleFreaks logs for proxy-related errors
* Use ISP or Datacenter proxies for long-term account safety
* Keep auto-recharge enabled to prevent service interruptions
***
## Conclusion
By integrating Bright Data proxies with SaleFreaks, you create a stable and secure automation environment for dropshipping operations. This setup protects seller accounts, enables geo-specific workflows, and ensures reliable performance across sourcing, fulfillment, and inventory management, allowing you to scale your business with confidence.