> ## Documentation Index
> Fetch the complete documentation index at: https://docs.brightdata.com/llms.txt
> Use this file to discover all available pages before exploring further.
# How to Set Up Bright Data on Ubuntu
> Step-by-step guide to configuring Bright Data proxies (port 33335) on Ubuntu for terminal commands and apps, with environment variables and system-wide setup.
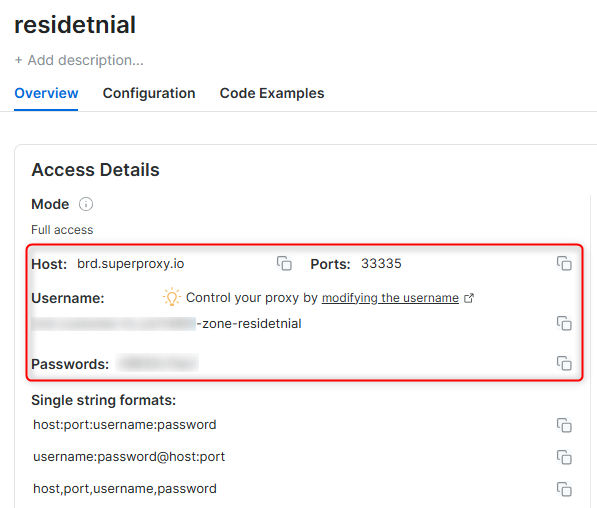
### Your proxy access information
Bright Data proxies are grouped in "Proxy zones". Each zone holds the configuration for the proxies it holds.
To get access to the proxy zone:
1. Login to Bright Data control panel
2. Select the proxy zone or setup a new one
3. Click on the new zone name, and select the **Overview** tab.
4. In the overview tab, under **Access details** you can find the proxy access details, and copy them to clipboard on click.
5. You will need: Proxy Host, Proxy Port, Proxy Zone username and Proxy Zone password.
6. Click on the copy icons to copy the text to your clipboard and paste in your tool's proxy configuration.
### Access Details Section Example
 ### Residential proxy access
To access Bright Data's **Residential Proxies** you will need to either get verified by our compliance team, or install a certificate. [Read more...](https://docs.brightdata.com/proxy-networks/residential/network-access)
### Targeting search engines?
If you target a search engine like google, bing or yandex, you need a special Search Engine Results Page (**SERP**) proxy API. Use Bright Data SERP API to target search engines.
[Click here to read more about Bright Data SERP proxy API.](https://docs.brightdata.com/scraping-automation/serp-api/introduction)
### Correct setup of proxy test to avoid "PROXY ERROR"
In many tools you will see a "test proxy" function, which performs a conncectivity test to your proxy, and some add a geolocation test as well, to identify the location of the proxy.
To correctly test your proxy you should target those search queries to:
`https://geo.brdtest.com/welcome.txt` .
Some tools use popular search engines (like google.com) as a default test target. Bright Data will block those requests and you tool will show **proxy error** although your proxy is perfectly fine.
If your proxy test fails, this is probably the reason. Make sure that your test domain is not a search engine (this is done in the tool configuration, and not controlled by Bright Data).
## Why Use Bright Data on Ubuntu?
Routing traffic through Bright Data proxies on Ubuntu gives you enhanced privacy and the ability to access content from specific locations. Whether you're running scripts, managing remote servers, or using CLI tools, Bright Data ensures secure and efficient connections.
Maintain a consistent IP throughout your browser session by using the `-session` parameter in your username. This is essential because BrightData proxies default to rotating IPs with each request. [Learn more](https://docs.brightdata.com/proxy-networks/faqs#how-to-use-the-same-ip-for-an-extended-period-of-time-and-how-long-can-i-keep-it-long-session)
### Residential proxy access
To access Bright Data's **Residential Proxies** you will need to either get verified by our compliance team, or install a certificate. [Read more...](https://docs.brightdata.com/proxy-networks/residential/network-access)
### Targeting search engines?
If you target a search engine like google, bing or yandex, you need a special Search Engine Results Page (**SERP**) proxy API. Use Bright Data SERP API to target search engines.
[Click here to read more about Bright Data SERP proxy API.](https://docs.brightdata.com/scraping-automation/serp-api/introduction)
### Correct setup of proxy test to avoid "PROXY ERROR"
In many tools you will see a "test proxy" function, which performs a conncectivity test to your proxy, and some add a geolocation test as well, to identify the location of the proxy.
To correctly test your proxy you should target those search queries to:
`https://geo.brdtest.com/welcome.txt` .
Some tools use popular search engines (like google.com) as a default test target. Bright Data will block those requests and you tool will show **proxy error** although your proxy is perfectly fine.
If your proxy test fails, this is probably the reason. Make sure that your test domain is not a search engine (this is done in the tool configuration, and not controlled by Bright Data).
## Why Use Bright Data on Ubuntu?
Routing traffic through Bright Data proxies on Ubuntu gives you enhanced privacy and the ability to access content from specific locations. Whether you're running scripts, managing remote servers, or using CLI tools, Bright Data ensures secure and efficient connections.
Maintain a consistent IP throughout your browser session by using the `-session` parameter in your username. This is essential because BrightData proxies default to rotating IPs with each request. [Learn more](https://docs.brightdata.com/proxy-networks/faqs#how-to-use-the-same-ip-for-an-extended-period-of-time-and-how-long-can-i-keep-it-long-session)
New users should begin with ISP or Data Center proxies, as residential proxies are incompatible with browser integration in [Immediate-Access mode](https://docs.brightdata.com/proxy-networks/residential/network-access#immediate-access) .
For use-cases related to **account management**, use a consistent static dedicated IP for each account you are managing. dedicated [ISP proxies](https://docs.brightdata.com/proxy-networks/isp/introduction) should be used for this.
## How to set up Bright Data on Ubuntu
Before you begin, ensure you have:
* An Ubuntu system (18.04 or later recommended)
* An active Bright Data account
* Bright Data proxy credentials (host, port, username, password)
**Step 1. Open Your Terminal**
1. Press **Ctrl+Alt+T** to open the Terminal.
**Step 2. Set Proxy Environment Variables**
1. Replace `[HOST]`, `[PORT]`, `[USERNAME]`, and `[PASSWORD]` with your Bright Data details.
2. Run the following commands:
```bash theme={null}
export http_proxy="http://[USERNAME]:[PASSWORD]@[HOST]:[PORT]"
export https_proxy="http://[USERNAME]:[PASSWORD]@[HOST]:[PORT]"
```
Use the following commands for SOCKS5 configuration:
```bash theme={null}
export socks_proxy="socks5://[USERNAME]:[PASSWORD]@[HOST]:[PORT]"
```
If you need a country-specific exit node, modify `[USERNAME]` accordingly (e.g., `your-username-country-US`).
**Step 3. Verify Your Proxy Configuration**
1. Test the proxy setup by running:
```bash theme={null}
curl http://httpbin.org/ip
```
2. The output should display the IP address assigned by Bright Data.
**Step 4. Make Proxy Settings Persistent (Optional)**
To apply the proxy settings across sessions:
1. Open the `.bashrc` file in your home directory:
```bash theme={null}
nano ~/.bashrc
```
2. Add the following lines at the end of the file:
```bash theme={null}
export http_proxy="http://[USERNAME]:[PASSWORD]@[HOST]:[PORT]"
export https_proxy="http://[USERNAME]:[PASSWORD]@[HOST]:[PORT]"
export socks_proxy="socks5://[USERNAME]:[PASSWORD]@[HOST]:[PORT]"
```
3. Save and exit (`Ctrl+O`, `Enter`, `Ctrl+X`).
4. Reload the file to apply the changes:
```bash theme={null}
source ~/.bashrc
```
## Best Practices
* Use **ISP or Datacenter proxies** for long-running scripts
* Append `-session-` to usernames for IP consistency
* Avoid committing proxy credentials to version control
* Reapply proxy settings after system updates
By integrating Bright Data with Ubuntu, you can seamlessly manage your connections with enhanced privacy and security. Whether you're performing routine tasks or accessing geo-specific content, Bright Data ensures a smooth and reliable experience. Try it out and enjoy worry-free browsing!