> ## Documentation Index
> Fetch the complete documentation index at: https://docs.brightdata.com/llms.txt
> Use this file to discover all available pages before exploring further.
# How to Configure the Proxy Manager
> Learn more about what Proxy Manager can do, how to tailor it to your needs, and how to implement popular optimized workflows. Connects via port 33335.
## Download and install Proxy Manager
***
Our Proxy Manager is easy to setup and maintain on your local machine or on our hosted cloud server. We recommend the Cloud server setup to get full access to all that Proxy Manager has to offer.
### Bright Data Cloud Hosting
Avoid the hassle of server resources as well as networking setup of an on-premise Proxy Manager - a cloud instance will let your focus on your operations.
We provide a multi-instance cloud with a single UI to control your Proxy Manager's operations.
* To enable this option, select Activate on [the Proxy Manager page](https://brightdata.com/cp/lpm) in your account, and the instance will be provided automatically.
**Allow third party cookies** in your browser must be enabled for proxy manager dashboard to run in your browser.
### Download and install Proxy Manager on your hosted environment (cloud/on premise)
Brigt data provides installers for each platform. The minimum host requirements are at least:
* 4GB RAM
* 2 CPU
* 3GB HDD
Download and installation methods for the respective OS:
Download the [Installer](https://github.com/luminati-io/luminati-proxy/tags) file from our [GitHub](https://github.com/luminati-io/luminati-proxy) releases.
Make sure to download the latest version.
Linux CentOS 8.x is not supported (use CentOS 7.x instead!)
* Confirm the recommended hardware requirements:
1. 4GB RAM
2. 2 CPUs
3. 3GB SSD
* Confirm the recommended software requirements:
* [Node.js](https://nodejs.org/en/about/) supported versions: `12.18.3 - 14.18.1`
* [NPM](https://docs.npmjs.com/about-npm) supported versions: `6.14.6 - 8.1.3`
You can manually install NPM v6.14.6:
```sh theme={null}
sudo npm install -g npm@6.14.6
```
* Confirm that network traffic is not limited:
* The server/computer does not use any VPN or proxy IP!
* The OS firewall is turned off
* in and out traffic is permitted for TCP ports 20000-30000
* Install Proxy Manager by running from a terminal one of the following commands:
```sh theme={null}
curl -L https://brightdata.com/static/lpm/luminati-proxy-latest-setup.sh | bash
wget -qO- https://brightdata.com/static/lpm/luminati-proxy-latest-setup.sh | bash
sudo npm install -g @luminati-io/luminati-proxy
```
You can find more information on [Manual Installation instructions](https://github.com/luminati-io/luminati-proxy#linuxmacos---manual-install).
A docker image can be found [here](https://hub.docker.com/r/luminati/luminati-proxy/)
```sh theme={null}
docker pull luminati/luminati-proxy
docker run luminati/luminati-proxy proxy-manager
docker run luminati/luminati-proxy proxy-manager --version
```
* Make sure to forward appropriate ports. Proxy manager uses by default 22999 for the web console and the API, [`33335 `](https://docs.brightdata.com/general/faqs#which-port-shall-i-use-22225-or-33335) for dropin and 24000-24... for all the ports that you'll create.
* To run docker with cli option see the below example:
```sh theme={null}
sudo docker run -v ~/proxy_manager:/lpm -p 127.0.0.1:22999:22999 -p 127.0.0.1:22998:22998 -p 127.0.0.1:24000:24000 luminati/luminati-proxy pmgr --www_whitelist_ips 172.17.0.1 --config /lpm/config.json
```
***
## Which preset to choose
***
Use this preset if you need full page loads. Connect from the browser manually (for example Chrome/Firefox) or programatically (for example Puppeteer/Selenium). All requests share the same IP. You can control when you refresh the IP from the UI or API.
Use this preset if you want to get a fresh new IP on each single request. This preset also rotates the User-Agent header automatically. It's the best for scraping API when you don't load the full pages.
Build your own preset fit your needs
Using a custom preset requires testing in the internal environment before going to production to verify the process is working as expected
## Rules and Headers
***
Navigate to Rules and start building your own rules based on triggers such as:
* URL suffixes
* Status codes
* String values found in the Response body
* Requests latency
You can choose an action to be taken to each trigger respectively.
For example, an implementation of a rule to save bandwidth by nullifying media URLs' outputs.
In addition, you can implement the desired headers in advance under the Rules section.
For example, adding the user-agent header of a Linux desktop on i686 CPU (More about user-agents can be found [here](https://developers.whatismybrowser.com/useragents/explore/))
## How to target a port
***
Bright Data proxy manager enables targeting the Proxy using IP:PORT format. For example, targeting a [port](https://docs.brightdata.com/api-reference/proxy-manager/create_a_new_proxy_port) indexed as 24000 when the proxy manager is installed locally:
```sh theme={null}
curl --proxy 127.0.0.1:24000 "https://target.site"
```
If installed remotely simply switch 127.0.0.1 with the remote server IP address. (Instead of the IP:PORT USERNAME:PASSWORD)
```sh theme={null}
curl --proxy brd.superproxy.io:33335 --proxy-user brd-customer--zone-: "https://target.site"
```
This allows:
* Removing the username:password section from the request.
* Integration with 3rd party softwares that accept only IP:Port format
* Clean code. Ports can be configured with all necessary headers and rules in advance no need to adjust the command/request itself. More information is available [here](https://docs.brightdata.com/api-reference/proxy-manager/update_a_proxy_port)
## Add External Proxies
***
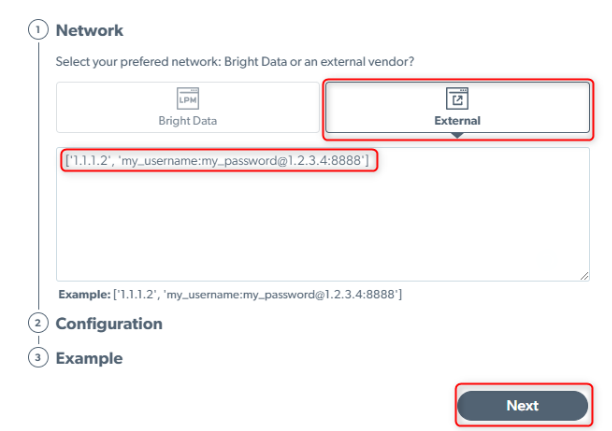
Bright Data Proxy Manager supports external proxies from other vendors. Connecting external proxies will allow you to optimize and manage all of your proxies in one place.
* Login to your Proxy Manager
* Set a new Port.
* Select 'External'
* Add your proxies in the next format
```js theme={null}
[
'', ':@:'
]
```
* Click 'Save' and you will have the external proxies available as one of the Proxy Manager's port
 ## Traffic Calculation Difference
***
Proxy Manager is a middleman between the request initiator and our Super Proxy servers. Proxy Manager statistics can be seen [here](https://brightdata.com/cp/lpm), and Super Proxy statistics can be seen [here](https://brightdata.com/cp/zones). So each request that you send to Proxy Manager eventually reaches Super Proxy. But there could be a difference in traffic calculations, here's why:
* Proxy Manager calculates incoming requests as they are being sent, but after they reach the Proxy Manager, it attaches additional headers, so that request's response will have more information about the request's flow (timeline, proxy IP, etc)
* Requests that reach the Super Proxy server from Proxy Manager are incoming with those additional parameters; that's why Super Proxy calculates slightly bigger requests than it initially was when reached Proxy Manager
* Proxy Manager sometimes adds headers to present a better view of logs, but this data is not being calculated in the billing
In conclusion, the main source of traffic statistics should be [Zones](https://brightdata.com/cp/zones)' page since it represents statistics formulated by Super Proxy.
As a rule - Bright Data uses the [Zones](https://brightdata.com/cp/zones)' page for calculation and one source of truth
Invoices and billing events will be triggered based on the zones calculations
## Traffic Calculation Difference
***
Proxy Manager is a middleman between the request initiator and our Super Proxy servers. Proxy Manager statistics can be seen [here](https://brightdata.com/cp/lpm), and Super Proxy statistics can be seen [here](https://brightdata.com/cp/zones). So each request that you send to Proxy Manager eventually reaches Super Proxy. But there could be a difference in traffic calculations, here's why:
* Proxy Manager calculates incoming requests as they are being sent, but after they reach the Proxy Manager, it attaches additional headers, so that request's response will have more information about the request's flow (timeline, proxy IP, etc)
* Requests that reach the Super Proxy server from Proxy Manager are incoming with those additional parameters; that's why Super Proxy calculates slightly bigger requests than it initially was when reached Proxy Manager
* Proxy Manager sometimes adds headers to present a better view of logs, but this data is not being calculated in the billing
In conclusion, the main source of traffic statistics should be [Zones](https://brightdata.com/cp/zones)' page since it represents statistics formulated by Super Proxy.
As a rule - Bright Data uses the [Zones](https://brightdata.com/cp/zones)' page for calculation and one source of truth
Invoices and billing events will be triggered based on the zones calculations