> ## Documentation Index
> Fetch the complete documentation index at: https://docs.brightdata.com/llms.txt
> Use this file to discover all available pages before exploring further.
# Create Your First Browser API
> Get started with Bright Data’s Browser API in minutes. Follow this step-by-step guide to create your API, configure access, and run your first browser-based scraping workflow.
> Get started with Bright Data’s [Browser API](https://brightdata.com/products/scraping-browser) in just a few steps. This guide walks you through creating your Browser API zone so you can begin running browser-based scraping jobs right away.
**Verify your account and get \$5 credit**
To activate API access, add a payment method to your Bright Data account.\
This verification grants you **\$5 in free credit**, and you won’t be charged at this stage.
## What you’ll accomplish in this guide
By the end of this quick start, you will:
* Create your first **Browser API zone**
* Prepare your account for browser-based scraping
* Be ready to run automated browser sessions using Puppeteer, Playwright, or Selenium
No local browser setup or proxy configuration is required.
## Step-by-step setup
Sign in to Bright Data}>
Log in to your Bright Data account using your credentials. If you don’t have an account yet, you’ll be prompted to create one before proceeding.
Navigate to the Create an API page}>
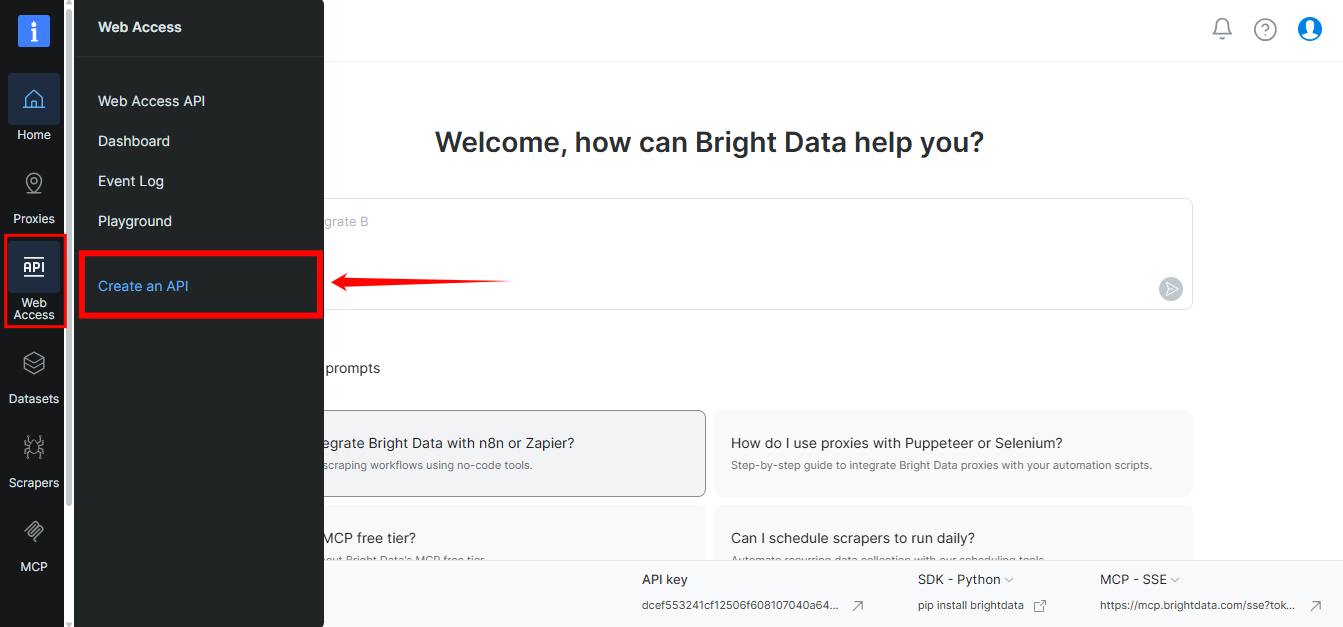
From the Bright Data Control Panel:
**1.** Open the left-hand navigation menu\
**2.** Select **Web Access APIs**\
**3.** Click **Create API** to begin setting up a new API zone
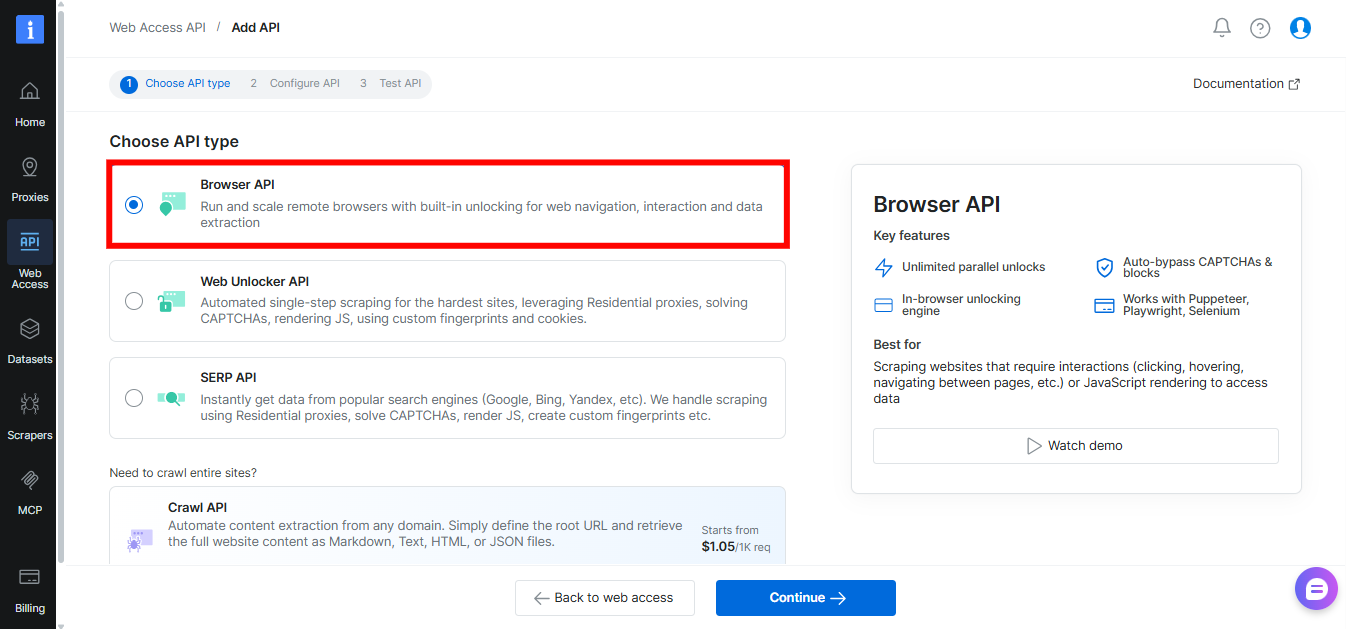
 On the API selection screen, choose **Browser API**. This option enables full browser automation with built-in proxy management, fingerprinting, CAPTCHA handling, and unblocking logic.
Click **Continue** to proceed.
On the API selection screen, choose **Browser API**. This option enables full browser automation with built-in proxy management, fingerprinting, CAPTCHA handling, and unblocking logic.
Click **Continue** to proceed.
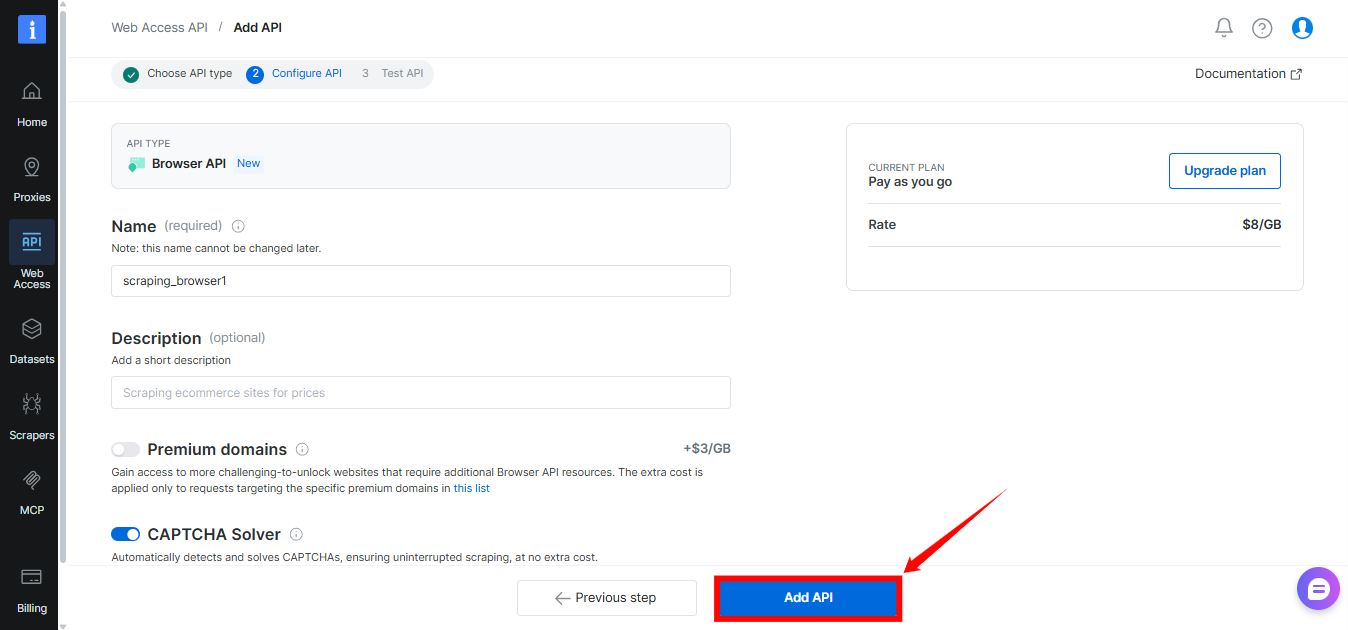
 Enter a **clear and descriptive name** for your Browser API zone. This helps you identify the zone later, especially if you manage multiple APIs.
You may also add an optional description for internal reference.
**The Browser API name cannot be changed once created.** You can modify all other settings later, including concurrency, geography, and browser options.
For details, see [Configure your API](/scraping-automation/scraping-browser/configuration).
Enter a **clear and descriptive name** for your Browser API zone. This helps you identify the zone later, especially if you manage multiple APIs.
You may also add an optional description for internal reference.
**The Browser API name cannot be changed once created.** You can modify all other settings later, including concurrency, geography, and browser options.
For details, see [Configure your API](/scraping-automation/scraping-browser/configuration).
 Review your configuration and click **Add API**. Your Browser API zone is now created and immediately available for use.
 ## What’s next?
Once your Browser API is created, you can:
* Retrieve your **connection details** from the Overview tab
* Connect using **Puppeteer**, **Playwright**, or **Selenium**
* Start running automated browser sessions at scale
Continue to **Send Your First Browser Request** to launch your first browser session and verify everything is working correctly.
> To find navigation and other pages in this documentation, fetch the llms.txt file at: [https://docs.brightdata.com/llms.txt](https://docs.brightdata.com/llms.txt)
## What’s next?
Once your Browser API is created, you can:
* Retrieve your **connection details** from the Overview tab
* Connect using **Puppeteer**, **Playwright**, or **Selenium**
* Start running automated browser sessions at scale
Continue to **Send Your First Browser Request** to launch your first browser session and verify everything is working correctly.
> To find navigation and other pages in this documentation, fetch the llms.txt file at: [https://docs.brightdata.com/llms.txt](https://docs.brightdata.com/llms.txt)