Scraping Browser 常见问题解答
查找有关 Bright Data 的 Scraping Browser 的常见问题的解答,包括支持的语言、调试技巧和集成指南。
使用 Scraping Browser 时,可使用与其他 Bright Data 代理产品相同的国家定位参数。
特定国家/地区
设置脚本时,在 Bright Data 端点的 “USER” 凭据后添加 “-country” 标志,然后添加该国家/地区的 2 个字母的 ISO 代码。
例如,对于在美国使用 Puppeteer 的 Scraping Browser:
欧盟地区
欧盟地区 You can target the entire European Union region in the same manner as “Country” above by adding “eu” after “country” in your request: “-country-eu”. 请求 sent using -country-eu, will use IPs from one of the countries below which are included automatically within “eu”: AL, AZ, KG, BA, UZ, BI, XK, SM, DE, AT, CH, UK, GB,IE, IM, FR, ES, NL, IT, PT, BE, AD, MT, MC, MA, LU, TN, DZ, GI, LI, SE, DK, FI, NO, AX, IS, GG, JE, EU, GL, VA, FX, FO.
Bright Data 的 Scraping Browser 支持多种编程语言和库。目前,我们使用 puppeteer、playwright 和 selenium 为 Node.js 和 Python 提供全面的本地支持,还可以使用下面的其他库集成其他语言,让您可以灵活地将 Scraping Browser 直接集成到您当前的技术栈中。
语言/平台 | puppeteer | playwright | selenium |
---|---|---|---|
Python | N/A | playwright-python | Selenium WebDriver |
JS / Node | 原生支持 | 原生支持 | WebDriverJS |
Ruby | Puppeteer-Ruby | playwright-ruby-client | 适用于 Ruby 的 Selenium WebDriver |
C# | .NET: Puppeteer Sharp | 适用于 .NET 的 Playwright | 适用于 .NET 的 Selenium WebDriver |
Java | Puppeteer Java | 适用于 Java 的 Playwright | 原生支持 |
Go | chromedp | playwright-go | 适用于 Go 的 Selenium WebDriver |
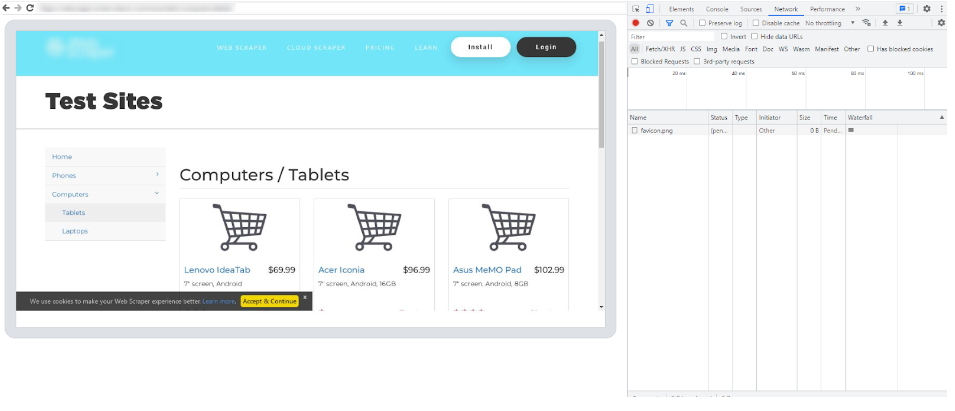
您可以实时查看 Scraping Browser 在本地计算机上的运行情况。 这与在 Puppeteer 上将无头浏览器设置为 “FALSE” 类似。
网络抓取项目通常需要与目标网站进行复杂的交互,调试对于识别和解决开发过程中发现的问题至关重要。
Scraping Browser Debugger是一项宝贵的资源,它使您能够与 Chrome 浏览器开发工具一起检查、分析和微调代码,从而实现更好的控制、可见性和效率。
您可以实时查看 Scraping Browser 在本地计算机上的运行情况。 这与在 Puppeteer 上将无头浏览器设置为 “FALSE” 类似。
我们的 Scraping Browser Debugger 可以通过两种方法启动:通过控制面板手动启动或通过脚本远程启动。
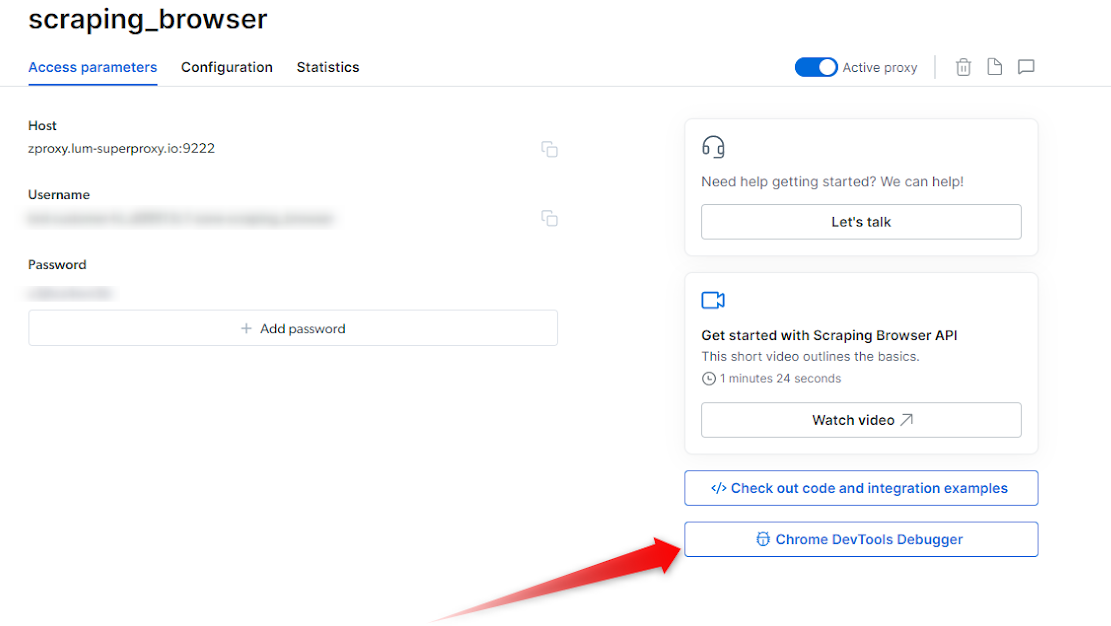
可以在 Bright Data 控制面板中轻松访问 Scraping Browser Debugger。请按照以下步骤操作:
- 在控制面板中,转到我的代理视图
- 点击您的 Scraping Browser 代理
- 点击访问参数或概述选项卡
- 在右侧点击 “Chrome 开发工具调试器”按钮
Debugger 和 Chrome 开发工具入门
打开 Scraping Browser 会话
- 确保有一个活跃的 Scraping Browser 会话
- 如果您还不知道如何启动 Scraping Browser 会话,请参阅我们的快速入门指南: https://docs.brightdata.com/cn/scraping-automation/scraping-browser/introduction
启动 Debugger
- 会话启动并运行后,就可以启动 Debugger 了。
- 点击访问参数选项卡中的 Debugger 按钮,启动 Scraping Browser Debugger 界面(参见上面的截图)
连接您的实时浏览器会话
- 在 Debugger 界面中,您将看到实时 Scraping Browser 会话的列表。
- 选择要调试的首选会话
- 点击会话链接或将其复制/粘贴到所选浏览器中,这将在 Debugger 和所选会话之间建立连接。
利用 Chrome 开发工具
- 将 Scraping Browser Debugger 连接到实时会话后,您就可以使用 Chrome 开发工具的强大功能了: https://chromedevtools.github.io/devtools-protocol/
- 利用开发工具界面检查 HTML 元素、分析网络请求、调试 JavaScript 代码并监控性能。 利用断点、控制台日志和其他调试技术来识别和解决代码中的问题。
如果您想在每次会话中自动启动开发工具以查看实时浏览器会话,可以集成以下代码片段:
// Node.js Puppeteer - launch devtools locally
const {
exec
} = require('child_process');
const chromeExecutable = 'google-chrome';
const delay = ms => new Promise(resolve => setTimeout(resolve, ms));
const openDevtools = async (page, client) => {
// get current frameId
const frameId = page.mainFrame()._id;
// get URL for devtools from scraping browser
const {
url: inspectUrl
} = await client.send('Page.inspect', {
frameId
});
// open devtools URL in local chrome
exec(`"${chromeExecutable}" "${inspectUrl}"`, error => {
if (error)
throw new Error('Unable to open devtools: ' + error);
});
// wait for devtools ui to load
await delay(5000);
};
const page = await browser.newPage();
const client = await page.target().createCDPSession();
await openDevtools(page, client);
await page.goto('http://example.com');
Debugger 演示
下面就来看看 Scraping Browser Debugger 的运行情况
<inser-video-here>
只要在代码中添加以下内容,就能随时轻松触发浏览器截图:
// node.js puppeteer - Taking screenshot to file screenshot.png
await page.screenshot({ path: 'screenshot.png', fullPage: true });
要截取 Python 和 C# 的屏幕截图,请参阅此处: https://docs.brightdata.com/cn/scraping-automation/scraping-browser/code-examples
解锁目标网站需要大量的“幕后”工作。
有些网站只需要几秒钟就能完成导航,而有些网站可能需要长达一两分钟才能完成导航,因为它们需要更复杂的解锁程序。 因此,我们建议将导航超时时间设置为 “2 分钟”,以便在需要时有足够时间完成导航。
在脚本中的 page.goto
调用前添加以下一行,即可将导航超时设置为 2 分钟。
错误代码 | 含义 | 您能做些什么? |
服务器意外响应:407 | 远程浏览器的端口有问题 | 请检查您的远程浏览器的端口。Scraping Browser 的正确端口是端口:9222 |
服务器意外响应:403 | 身份验证错误 | 从 Bright Data 控制面板检查身份验证凭据(用户名和密码),并检查是否使用了正确的 “Browser API” 区域。 |
服务器意外响应:503 | 服务不可用 | 我们现在可能正在扩展浏览器以满足需求。 请尝试在 1 分钟后重新连接。 |
您可以使用下面的 curl 检查您的连接:
curl -v -u USER:PASS https://brd.superproxy.io:9222/json/protocol
如有任何其他问题,请参阅我们的故障排除指南或联系技术支持: https://help.brightdata.com/hc/en-us/requests/new
使用 C# 与 Scraping Browser 产品集成需要修补 PuppeteerSharp 库,以添加对 websocket 身份验证的支持。 具体方法如下:
using PuppeteerSharp;
using System.Net.WebSockets;
using System.Text;
// Set the authentication credentials
var auth = "USER:PASS";
// Construct the WebSocket URL with authentication
var ws = $"wss://{auth}@zproxy.lum-superproxy.io:9222";
// Custom WebSocket factory function
async Task<WebSocket> ws_factory(Uri url, IConnectionOptions options, CancellationToken cancellationToken)
{
// Create a new ClientWebSocket instance
var socket = new ClientWebSocket();
// Extract the user information (username and password) from the URL
var user_info = url.UserInfo;
if (user_info != "")
{
// Encode the user information in Base64 format
var auth = Convert.ToBase64String(Encoding.Default.GetBytes(user_info));
// Set the "Authorization" header of the WebSocket options with the encoded credentials
socket.Options.SetRequestHeader("Authorization", $"Basic {auth}");
}
// Disable the WebSocket keep-alive interval
socket.Options.KeepAliveInterval = TimeSpan.Zero;
// Connect to the WebSocket endpoint
await socket.ConnectAsync(url, cancellationToken);
return socket;
}
// Create ConnectOptions and configure the options
var options = new ConnectOptions()
{
// Set the BrowserWSEndpoint to the WebSocket URL
BrowserWSEndpoint = ws,
// Set the WebSocketFactory to the custom factory function
WebSocketFactory = ws_factory,
};
// Connect to the browser using PuppeteerSharp
Console.WriteLine("Connecting to browser...");
using (var browser = await Puppeteer.ConnectAsync(options))
{
Console.WriteLine("Connected! Navigating...");
// Create a new page instance
var page = await browser.NewPageAsync();
// Navigate to the specified URL
await page.GoToAsync("https://example.com");
Console.WriteLine("Navigated! Scraping data...");
// Get the content of the page
var content = await page.GetContentAsync();
Console.WriteLine("Done!");
Console.WriteLine(content);
}
Bright Data 的 Scraping Browser 支持多种编程语言和库。目前,我们使用 puppeteer、playwright 和 selenium 为 Node.js 和 Python 提供全面的本地支持,还可以使用下面的其他库集成其他语言,让您可以灵活地将 Scraping Browser 直接集成到您当前的技术栈中。
语言/平台 | puppeteer | playwright | selenium |
---|---|---|---|
Python | N/A | playwright-python | Selenium WebDriver |
JS / Node | 原生支持 | 原生支持 | WebDriverJS |
Ruby | Puppeteer-Ruby | playwright-ruby-client | 适用于 Ruby 的 Selenium WebDriver |
C# | .NET: Puppeteer Sharp | 适用于 .NET 的 Playwright | 适用于 .NET 的 Selenium WebDriver |
Java | Puppeteer Java | 适用于 Java 的 Playwright | 原生支持 |
Go | chromedp | playwright-go | 适用于 Go 的 Selenium WebDriver |
您可以实时查看 Scraping Browser 在本地计算机上的运行情况。 这与在 Puppeteer 上将无头浏览器设置为 “FALSE” 类似。
网络抓取项目通常需要与目标网站进行复杂的交互,调试对于识别和解决开发过程中发现的问题至关重要。
Scraping Browser Debugger是一项宝贵的资源,它使您能够与 Chrome 浏览器开发工具一起检查、分析和微调代码,从而实现更好的控制、可见性和效率。
您可以实时查看 Scraping Browser 在本地计算机上的运行情况。这与在 Puppeteer 上将无头浏览器设置为 “FALSE” 类似。
我们的 Scraping Browser Debugger 可以通过两种方法启动:通过控制面板手动启动或通过脚本远程启动。
可以在 Bright Data 控制面板中轻松访问 Scraping Browser Debugger。
- 在控制面板中,转到我的代理视图
- 点击您的 Scraping Browser 代理
- 点击访问参数或概述选项卡
- 在右侧点击 “Chrome 开发工具调试器”按钮
Debugger 和 Chrome 开发工具入门
打开 Scraping Browser 会话
- 确保有一个活跃的 Scraping Browser 会话
- 如果您还不知道如何启动 Scraping Browser 会话,请参阅我们的快速入门指南: https://docs.brightdata.com/cn/scraping-automation/scraping-browser/introduction
启动 Debugger
- 会话启动并运行后,就可以启动 Debugger 了。
- 点击访问参数选项卡中的 Debugger 按钮,启动 Scraping Browser Debugger 界面(参见上面的截图)
连接您的实时浏览器会话
- 在 Debugger 界面中,您将看到实时 Scraping Browser 会话的列表。
- 选择要调试的首选会话
- 点击会话链接或将其复制/粘贴到所选浏览器中,这将在 Debugger 和所选会话之间建立连接。
利用 Chrome 开发工具
- 将 Scraping Browser Debugger 连接到实时会话后,您就可以使用 Chrome 开发工具的强大功能了: https://chromedevtools.github.io/devtools-protocol/
- 利用开发工具界面检查 HTML 元素、分析网络请求、调试 JavaScript 代码并监控性能。 利用断点、控制台日志和其他调试技术来识别和解决代码中的问题。
如果您想在每次会话中自动启动开发工具以查看实时浏览器会话,可以集成以下代码片段:
// Node.js Puppeteer - launch devtools locally
const {
exec
} = require('child_process');
const chromeExecutable = 'google-chrome';
const delay = ms => new Promise(resolve => setTimeout(resolve, ms));
const openDevtools = async (page, client) => {
// get current frameId
const frameId = page.mainFrame()._id;
// get URL for devtools from scraping browser
const {
url: inspectUrl
} = await client.send('Page.inspect', {
frameId
});
// open devtools URL in local chrome
exec(`"${chromeExecutable}" "${inspectUrl}"`, error => {
if (error)
throw new Error('Unable to open devtools: ' + error);
});
// wait for devtools ui to load
await delay(5000);
};
const page = await browser.newPage();
const client = await page.target().createCDPSession();
await openDevtools(page, client);
await page.goto('http://example.com');
Debugger 演示
下面就来看看 Scraping Browser Debugger 的运行情况
<inser-video-here>
只要在代码中添加以下内容,就能随时轻松触发浏览器截图:
// node.js puppeteer - Taking screenshot to file screenshot.png
await page.screenshot({ path: 'screenshot.png', fullPage: true });
要截取 Python 和 C# 的屏幕截图,请参阅此处: https://docs.brightdata.com/cn/scraping-automation/scraping-browser/code-examples
解锁目标网站需要大量的“幕后”工作。
有些网站只需要几秒钟就能完成导航,而有些网站可能需要长达一两分钟才能完成导航,因为它们需要更复杂的解锁程序。 因此,我们建议将导航超时时间设置为 “2 分钟”,以便在需要时有足够时间完成导航。
在脚本中的 “page.goto” 调用前添加以下一行,即可将导航超时设置为 2 分钟。
错误代码 | 含义 | 您能做些什么? |
服务器意外响应:407 | 远程浏览器的端口有问题 | 请检查您的远程浏览器的端口。Scraping Browser 的正确端口是端口:9222 |
服务器意外响应:403 | 身份验证错误 | 从 Bright Data 控制面板检查身份验证凭据(用户名和密码),并检查是否使用了正确的 “Browser API” 区域。 |
服务器意外响应:503 | 服务不可用 | 我们现在可能正在扩展浏览器以满足需求。 请尝试在 1 分钟后重新连接。 |
您可以使用下面的 curl 检查您的连接:
curl -v -u USER:PASS https://brd.superproxy.io:9222/json/protocol
如有任何其他问题,请参阅我们的故障排除指南或联系技术支持。
使用 C# 与 Scraping Browser 产品集成需要修补 PuppeteerSharp 库,以添加对 websocket 身份验证的支持。 具体方法如下:
using PuppeteerSharp;
using System.Net.WebSockets;
using System.Text;
// Set the authentication credentials
var auth = "USER:PASS";
// Construct the WebSocket URL with authentication
var ws = $"wss://{auth}@zproxy.lum-superproxy.io:9222";
// Custom WebSocket factory function
async Task<WebSocket> ws_factory(Uri url, IConnectionOptions options, CancellationToken cancellationToken)
{
// Create a new ClientWebSocket instance
var socket = new ClientWebSocket();
// Extract the user information (username and password) from the URL
var user_info = url.UserInfo;
if (user_info != "")
{
// Encode the user information in Base64 format
var auth = Convert.ToBase64String(Encoding.Default.GetBytes(user_info));
// Set the "Authorization" header of the WebSocket options with the encoded credentials
socket.Options.SetRequestHeader("Authorization", $"Basic {auth}");
}
// Disable the WebSocket keep-alive interval
socket.Options.KeepAliveInterval = TimeSpan.Zero;
// Connect to the WebSocket endpoint
await socket.ConnectAsync(url, cancellationToken);
return socket;
}
// Create ConnectOptions and configure the options
var options = new ConnectOptions()
{
// Set the BrowserWSEndpoint to the WebSocket URL
BrowserWSEndpoint = ws,
// Set the WebSocketFactory to the custom factory function
WebSocketFactory = ws_factory,
};
// Connect to the browser using PuppeteerSharp
Console.WriteLine("Connecting to browser...");
using (var browser = await Puppeteer.ConnectAsync(options))
{
Console.WriteLine("Connected! Navigating...");
// Create a new page instance
var page = await browser.NewPageAsync();
// Navigate to the specified URL
await page.GoToAsync("https://example.com");
Console.WriteLine("Navigated! Scraping data...");
// Get the content of the page
var content = await page.GetContentAsync();
Console.WriteLine("Done!");
Console.WriteLine(content);
}
This is possible, but not recommended. The reason is that the Scraping Browser utilises Bright Data’s full suite of unblocking capabilities which automatically chooses the best IP type and location to get you the page you want to access.
In case you still want to make the Scraping Browser work from a specific country, simply use the username that includes the country-xx in the configuration.
See the example below for Puppeteer: We added -country-us to our request, so we will send a request originating from the United States (“us”).
const SBR_WS_ENDPOINT = 'wss://brd-customer-<customer_id>-zone-<zone_name>-country-us:<password>@brd.superproxy.io:9222'
Scraping Browser pricing is simple: you only pay for gigabytes of traffic that you transferred through the Scraping Browser.
There is no cost for instances or time using the Scraping Browsers - only traffic.
It doesn’t matter what country you are using, traffic is billed at the same rates. Because you pay by traffic, you probably will want to minimize it.
The only exception to this is premium domains, which cost more per gigabyte, because Bright Data needs to invest a significantly higher amount of effort and resources to unblock. You can find more information about premium domains in your Scraping Browser configuration pages.