Can I restrict access to Remote Proxy Manager on-premise?
Can I restrict access to Remote Proxy Manager on-premise?
- Allowlist IPs
- Token based Authentication using API key
- Permission by Email using the Bright data extension
How to connect to superproxy via HTTPS?
How to connect to superproxy via HTTPS?
How to multiply ports?
How to multiply ports?
How to get IPs from specific locations?
How to get IPs from specific locations?
- Click on the proxy port that you want to use location-specific IPs
- Go to Targeting tab
- Select country, state, city for choosing a peer in a specific geolocation
- Select ASN or carrier name (only for mobile peers)
How to use IPs from multiple countries without creating many ports?
How to use IPs from multiple countries without creating many ports?
How to control targeting dynamically?
How to control targeting dynamically?
- State:
x-lpm-state: <state> - City:
x-lpm-city: <city_name>
How to override the port's country?
How to override the port's country?
How to set an automatically follow redirect?
How to set an automatically follow redirect?
- Open the desired port for Follow redirect activation
- Go to General Tab: Within the Port Settings, click on the “General” tab. This is where you’ll find various settings related to how your proxy handles requests and responses.
- Toggle the Follow Redirect Feature: In the General tab, you will see the “Follow Redirect” feature. It’s presented as a toggle button, allowing you to enable or disable it as needed.
- When the Follow Redirect feature is enabled, it instructs the proxy manager to automatically send a new request in response to a 30X error.
- The URL for the new request is determined based on the Location response header received in the 30X error response.
- This allows your proxy to seamlessly follow the redirection and ensure that the request is sent to the correct destination, as specified by the Location header.
How to control sessions consistency with session header?
How to control sessions consistency with session header?
- Add the header with any random session ID”x-lpm-session: random_session”
- When using the same session the Proxy Manager will try to connect with the same exit node (peer/IP)
- When you change the session value the Proxy Manager will connect with a different exit node (new peer/IP)
- To keep a given session alive you must send a request no less than every 7 minutes
- Note that in order to use it with HTTPS requests you will need to enable SSL Analyzing and install the certificate
How can I Refresh Session on Cloud Proxy Manager?
How can I Refresh Session on Cloud Proxy Manager?
How to export logs from Proxy Manager?
How to export logs from Proxy Manager?
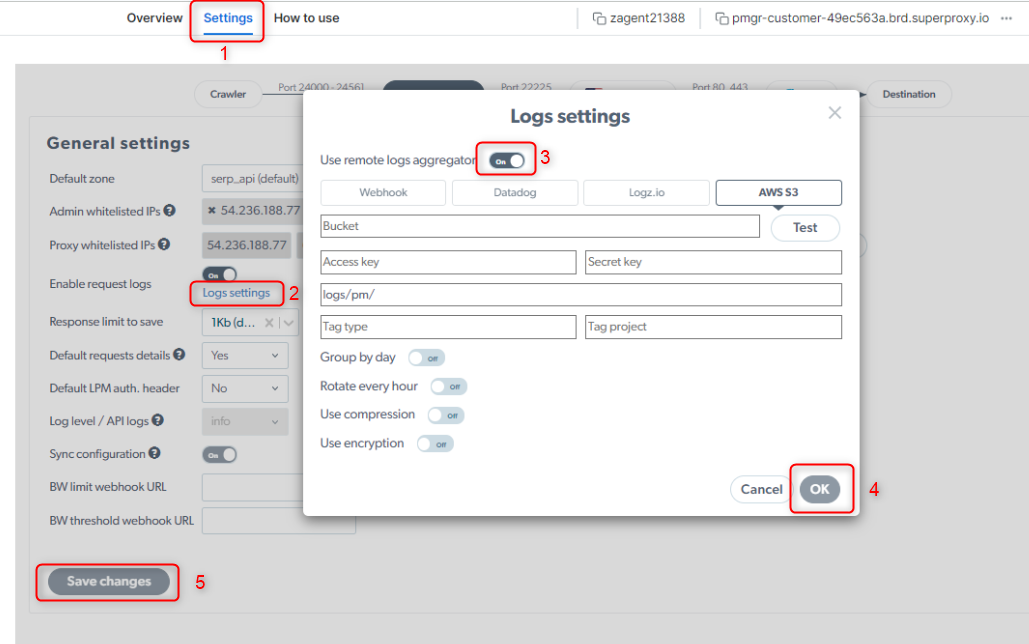
- Access Proxy Manager Settings:
- Navigate to the settings or configuration section.
- Select Log settings option in Enable request logs
- Toggle on Use remote logs aggregator
- Choose the desired log export option (Webhook, Datadog, Logz.io, or AWS S3).
- Provide Configuration Details: For the selected export option, you will typically need to provide specific configuration details. This may include endpoint URLs, API keys, authentication credentials, and storage settings.
- Click on Test to check the configuration
-
Click OK and Save changes

How to unblock error codes?
How to unblock error codes?
- Add a new rule at Proxy Manager, rules tab
- Select ‘Status code’ as the rule type
- Trigger the rule by selecting the relevant status code to scan (i.e 501, 402, 301, etc)
- Select the desired outcome such as ‘Refresh IP’ or ‘Try with new IP’
How to run UI (dashboard) on HTTPS
How to run UI (dashboard) on HTTPS
SSL_CERT and SSL_KEY pointing to the according certificate files. Example command to run in the terminal:How to save request/response history?
How to save request/response history?
--history flag. When history mode is enabled, both request and response headers will be saved to a local database. They can be accessed under the “Proxies” section. The history option can also track HTTPS, by enabling the ‘—ssl’ flag. For additional details, see the Bright Data Proxy Manager GitHub page.This can also be done through the Proxy Manager dashboard by abling Log request history and Enable SSL sniffing under the General settings section.How to use SOCKS5 with Bright Data's Proxy Manager
How to use SOCKS5 with Bright Data's Proxy Manager
- Open Proxy Manager
- Click a port, then ‘Edit Proxy’
- Under ‘General’ add SOCKS port number
- Go to “Performance” - Set Reverse Resolve: DNS
-
Add a resolve file
- Add ‘—resolve PATH’ to the program code
- Follow the hosts file format
- List domains you are going to use and their IPs
- Add domains and IPs from the resolve file editor in the Proxy Manager ‘tools’ page
In order to allow SOCKS5 connections, you need to undergo KYC process shown here: https://brightdata.com/cp/kyc , and request approval from our compliance department. Contact your account manager if you need assistance with this procedure.
How to define a proxy IP country when using SOCKS5 protocol with Proxy Manager?
How to define a proxy IP country when using SOCKS5 protocol with Proxy Manager?
SOCKS5 protocol uses an encrypted base64 string for authentication.Therefore, when using SOCKS5, if you need to define a proxy IP country (-country-<COUNTRY_CODE>), you will have to convert your basic authentication information into base64 token:- Browse https://www.base64encode.org
- Encode
brd-customer-<customer_id>-zone-<zone_name>-country-<COUNTRY>:<zone_password>to Base64 format token - Use the “Basic authorization token” header you generated on the
SOCKS5request that you send the Proxy Manager port:
How to switch from API to Proxy Manager
How to switch from API to Proxy Manager
- Install the Proxy Manager here
- Change the code to send HTTP requests directly to the specified port (for example, 127.0.0.1:24000) instead of to brd.superproxy.io:
- Configure the settings for your custom proxies and Zones through the Proxy Manager dashboard. You do not need to send the user parameter (brd-customer-customer_name-zone-zone_name…) alongside your requests, as all the needed data is wrapped within the manual proxy configuration.
How to mimic a human user?
How to mimic a human user?
How to set up the Proxy Manager as a system service?
How to set up the Proxy Manager as a system service?
How can I view my request details?
How can I view my request details?
-debug flag.x-luminati-ip-destination- IP of the targeted hostx-luminati-ip- IP allocated to the request.x-luminati-timeline- Time it took to complete
- This feature is turned off by default on the cloud proxy manager, if needed, make sure you enable it.
- Enabling ‘Request details’ is necessary in order to implement the action ‘Ban IP’ within a rule.
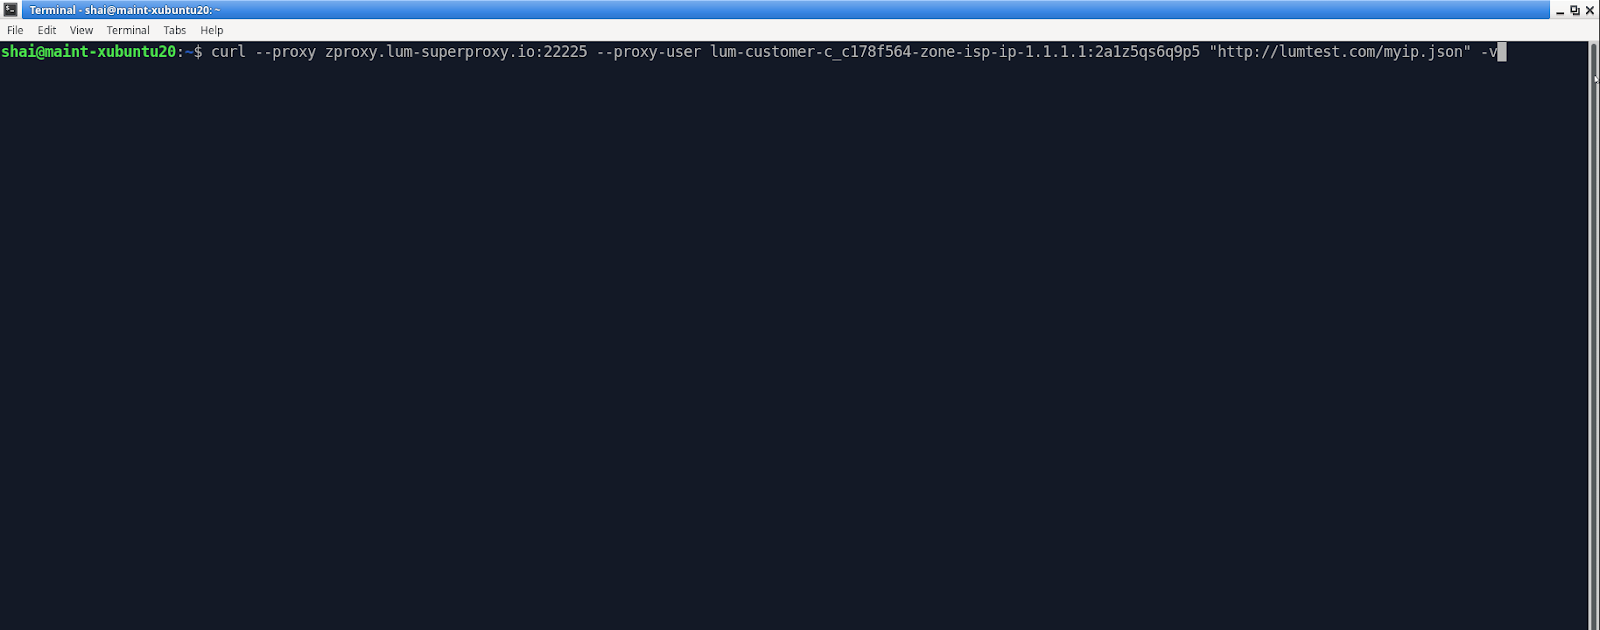
- via the verbose flag (-v)
- Viewing your proxy manager logs
- Viewing it on your browser's 'Network' tab
-v flagHow to reduce the amount of data in a response?
How to reduce the amount of data in a response?
- Go to “General” tab
- Select “On” from “SSL analyzing”
- Go to “Rules” tab
- Select “URL” from “Rule type” drop-down list
- Choose any file type to apply regex expression
- Select “Null response” from “Action type” drop-down list
How can I improve the speed of my web scraping?
How can I improve the speed of my web scraping?
- Open Proxy Manager
- Go to the ‘Overview’ menu
- Click the port of your residential zone
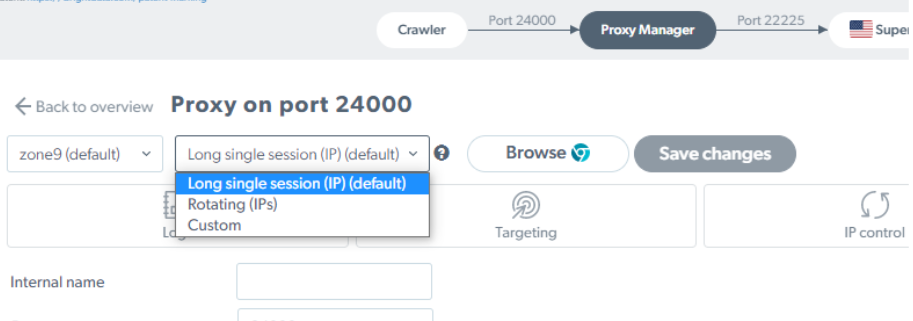
- Edit in the port settings ‘preset’ to ‘Rotating (IPs)’
- Route your requests to
127.0.0.1:<portnum>where theportnumis the port of the residential zone
How do I know if I'm getting cloaked?
How do I know if I'm getting cloaked?
- Open Proxy Manager
- Go to the ‘Overview’ tab
- Click the port of your residential zone
- Edit in the port settings ‘preset’ to ‘Rotating (IPs)’
- Route your requests to
127.0.0.1:<portnum>where theportnumis the port of the residential zone
How to set Long Single Session when using Proxy Manager
How to set Long Single Session when using Proxy Manager

How do I use Remote DNS?
How do I use Remote DNS?
- via Proxy Manager
- via The API
How to use parallel Proxy Manager instances for high performance?
How to use parallel Proxy Manager instances for high performance?
- Install the Proxy Manager locally and set all of the ports as needed
- Save the config file
- Turn on Sync configuration so all the changes will be kept in sync on all the machines automatically
- Install the Proxy Manager on the servers you want to use
- Import the config file to the proxy_manager directory in the servers
I cannot Login to on-Premise Proxy Manager
I cannot Login to on-Premise Proxy Manager
-
Make sure that the computer that runs PM is not using a VPN.\
Mind that using a VPN while running PM might cause login problems, and also slow down the connection to the proxies
- Close PM (the terminal’s black screen where PM is running)
- Delete cookies on your browser
- Open PM again (it takes about 1-2 minutes for PM to load)
- Try to log in on the same method you did before (by using Google, or by using your registered mailbox and password)
Proxy Manager connection error (port status is not "ok")
Proxy Manager connection error (port status is not "ok")
- Make sure that VPN is not turned on
- Make sure that there is no anti-virus or any other security software (such as 360, Norton, etc.) blocking traffic sent from Proxy Manager
- Make sure that the firewall (OS / server / any other security software’s firewall) allows TCP traffic through ports 22000-25000
- If the proxy manager software is installed on macOS/ Linux server - Verify that:
- Node.js version is between 12.18.3 and 14.18.1
- NPM version is between 6.14.6 and 8.1.3
- If versions of NPM and Nodejs are not the one we’re supporting - please remove them and install the versions that we specified. More information regarding Linux/Mac installation can be found at our GitHub page
Why Am I getting '400 Proxy Error: ip_requested_not_allocated_by_customer'?
Why Am I getting '400 Proxy Error: ip_requested_not_allocated_by_customer'?
400 can appear in case the IPs under your zone has been refreshed, removed, or simply changed due to system updates
How to get IPs from specific locations?
How to get IPs from specific locations?
- Click on the proxy port that you want to use location-specific IPs
- Go to Targeting tab
- Select country, state, city for choosing a peer in a specific geolocation
- Select ASN or carrier name (only for mobile peers)
What Bright Data products does Proxy Manager work with?
What Bright Data products does Proxy Manager work with?
Proxy Manager does not support Browser API.
How can I download proxy manager?
How can I download proxy manager?
Windows
Download proxy manager installer for windowsLinux & MacOS
bash Installer:NPM package installer:Dockerimage: