Bright Data Docs home pagelight logodark logo
  • Support
  • Sign up
  • Sign up
Welcome
Proxy Infrastructure
Web Access APIs
Data Feeds
MCP Server
API Reference
General
Integrations
Introduction
  • Overview
Product Guides
  • Unlocker API
  • SERP API
  • Browser API
    • Introduction
    • Quick Start
    • Configuration
    • Features
    • CDP Functions
    • Code Examples
    • FAQs
  • Crawl API
  • Easy Scraper
  • Browser Extension
  • Bright Shield
  • FAQs
Browser API

Browser API FAQs

Find answers to common questions about Bright Data’s Browser API, including supported languages, debugging tips, and integration guidelines.

Can I choose the country that the Browser API will scrape from?

Browser API automatically selects the optimal IP type and location for each request using Bright Data’s advanced unblocking capabilities. While it’s possible to specify a location, this is generally not recommended because the automated system ensures the best success for page access.If you need to launch from a specific country, you can add the -country flag with the appropriate two-letter ISO code after your username in the endpoint. For full instructions and examples, see our location targeting documentation.If you need to target a specific region (not just a country), check out our Proxy.setLocation guide.

Which programming languages and tools are fully supported by Browser API?

  • Browser API has full, native support for these combinations:
    • Node.js: Puppeteer (native), Playwright (native), Selenium WebDriverJS
    • Python: Playwright for Python, Selenium WebDriver for Python
    • Java: Playwright for Java, Selenium WebDriver for Java
    • C# (.NET): Playwright for .NET, Selenium WebDriver for .NET
See the code examples page for a variety of examples using the supported libraries.

How can I use Browser API with other languages and tools?

  • Browser API can also be integrated with other languages using community or third-party libraries:
    • Java: Puppeteer Java
    • Ruby: Puppeteer-Ruby, playwright-ruby-client, Selenium WebDriver for Ruby
    • Go: chromedp, playwright-go, Selenium WebDriver for Go
  • For languages not listed, integration is possible if the library supports remote Chrome DevTools Protocol or WebDriver.
For best results and access to the full feature set, use the native integrations listed in the fully supported languages FAQ.

How do I see the status of the captcha?

You can use the CDP functionality to wait for a captcha to be solved and check its status. For detailed instructions and sample code, see this guideFor example, you can add this code snippet at the point in your script where you expect a captcha to appear:
Copy
const client = await page.target().createCDPSession();  
const {status} = await client.send('Captcha.solve', {detectTimeout: 30*1000});   
console.log(`Captcha solve status: ${status}`)   

How can I debug what's happening behind the scenes during my Browser API session?

You can monitor a live Browser API session by launching the Browser API Debugger on your local machine. This is similar to setting headless browser to ‘FALSE’ on Puppeteer.The Browser API Debugger serves as a valuable resource, enabling you to inspect, analyze, and fine-tune your code alongside Chrome Dev Tools, resulting in better control, visibility, and efficiency.

​
Where do I find the Browser API Debugger?

The Browser API Debugger can be launched via two methods:
  • Manually via Control Panel
  • Remotely via your script.
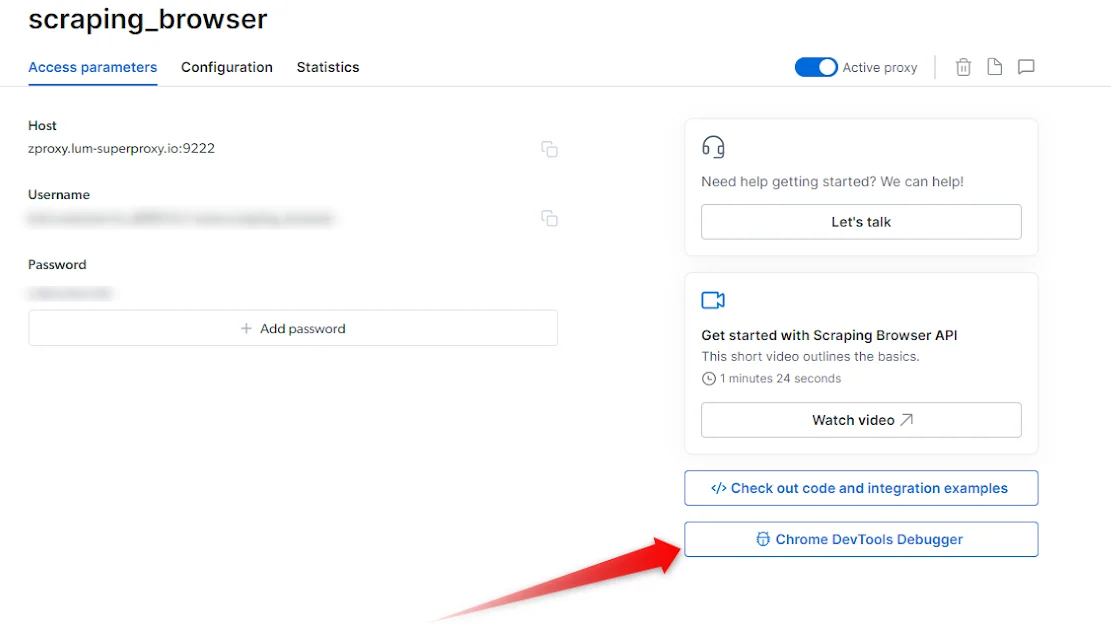
    The Browser API Debugger can be easily accessed within your Bright Data Control Panel. Follow these steps:
    1. Within the control panel, go to My Proxies view
    2. Click on your Browser API proxy
    3. Click on the Overview tab
    4. On the right side, Click on the “Chrome Dev Tools Debugger” button chrome-devtools-debugger.png
    Getting Started with the Debugger & Chrome Dev Tools
    1

    Open a Browser API Session

    • Ensure you have an active Browser API session
    • If you don’t yet know how to launch a Browser API session, see our Quick Start guide.
    2

    Launch the Debugger

    • Once your session is up and running you can now launch the Debugger.
    • Click on the Debugger button within your Overview tab to launch the Browser API Debugger interface (see the screenshot above )
    3

    Connect with your live browser sessions

    • Within the Debugger interface, you will find a list of your live Browser API sessions.
    • Select the preferred session that you wish to debug
    • Click on the session link or copy/paste it into your browser of choice, and this will establish a connection between the Debugger and your selected session.
    Leveraging Chrome Dev Tools
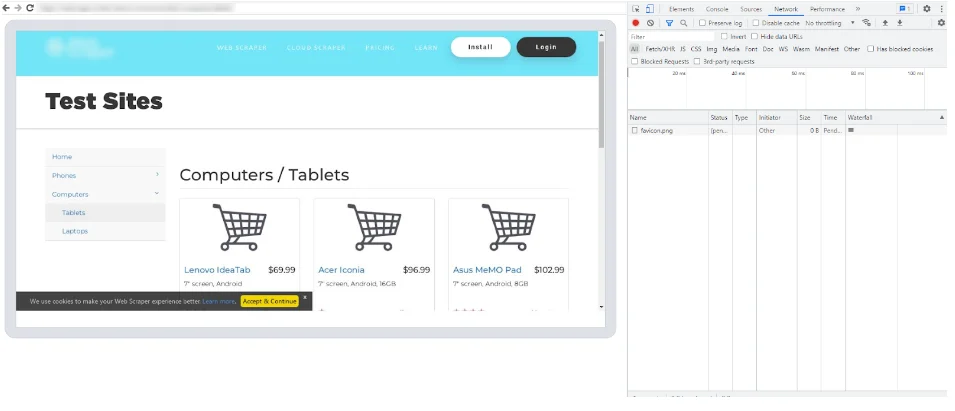
    • With the Browser API Debugger now connected to your live session, you gain access to the powerful features of Chrome Dev Tools.
    • Utilize the Dev Tools interface to inspect HTML elements, analyze network requests, debug JavaScript code, and monitor performance. Leverage breakpoints, console logging, and other debugging techniques to identify and resolve issues within your code.
    test-sites.png

How to automatically launch devtools locally to view your live browser session?

If you would like to automatically launch devtools on every session to view your live browser session, you can integrate the following code snippet:
NodeJS - Puppeteer
Copy
// Node.js Puppeteer - launch devtools locally  

// Add these requirements in addition to the other required imports
const { exec } = require('child_process');  
const chromeExecutable = 'google-chrome';  

// Add these functions to the top of the script  
const delay = ms => new Promise(resolve => setTimeout(resolve, ms));  
const openDevtools = async (page, client) => {  
    // get current frameId  
    const frameId = page.mainFrame()._id;  
    // get URL for devtools from Browser API  
    const { url: inspectUrl } = await client.send('Page.inspect', { frameId });  
    // open devtools URL in local chrome  
    exec(`"${chromeExecutable}" "${inspectUrl}"`, error => {  
        if (error)  
            throw new Error('Unable to open devtools: ' + error);  
    });  
    // wait for devtools ui to load  
    await delay(5000);  
};  

// Add these lines before navigating to the target URL  
const page = await browser.newPage();  
const client = await page.target().createCDPSession();  
await openDevtools(page, client);  
await page.goto('http://example.com');

How can I get a screenshot of what's happening in the browser?

You can easily trigger a screenshot of the browser at any time by adding the following to your code:
NodeJS
Copy
// node.js puppeteer - Taking screenshot to file screenshot.png 
await page.screenshot({ path: 'screenshot.png', fullPage: true });
To take screenshots on Python and C# see here.

Why does the initial navigation for certain pages take longer than others?

There is a lot of “behind the scenes” work that goes into unlocking your targeted site.Some sites will take just a few seconds for navigation, while others might take even up to a minute or two as they require more complex unlocking procedures. As such, we recommend setting your navigation timeout to “2 minutes” to give the navigation enough time to succeed if needed.You can set your navigation timeout to 2 minutes by adding the following line in your script before your “page.goto” call.
Copy
// node.js puppeteer - Navigate to site with 2 min timeout  
page.goto('<https://example.com>', { timeout: 2*60*1000 });  

What are the most Common Error codes?

Error CodeMeaningWhat can you do about it?
Unexpected server response: 407An issue with the remote browser’s portPlease check your remote browser’s port. The correct port for Browser API is port:9222
Unexpected server response: 403Authentication ErrorCheck authentication credentials (username, password) and check that you are using the correct “Browser API” zone from Bright Data control panel
Unexpected server response: 503Service UnavailableWe are likely scaling browsers right now to meet demand. Try to reconnect in 1 minute.

I can't seem to establish a connection with Browser API, do I have a connection issue?

If you’re experiencing connection issues, you can test your local Browser API connection with a simple curl to the following endpoint:
Shell
Copy
curl -v -u SBR_ZONE_FULL_USERNAME:SBR_ZONE_PASSWORD https://brd.superproxy.io:9222/json/protocol

​
If a JSON is returned within the response:

  • Your authentication and connection to Browser API are successful. Confirm you are using these exact configurations in your script.
  • If you are still facing issues connecting to Browser API, contact support for further assistance.

​
If a JSON is not returned within the response:

  • Check your authentication details from your Browser API zone, and ensure the USER and PASS values are correct.
  • Verify network Configuration: Confirm your network and/or firewall is not blocking outbound connections to https://brd.superproxy.io:9222.
  • If the issue persists, please contact support for further assistance.

How to Integrate Browser API with .NET Puppeteer Sharp?

Integration with the Browser API product with C# requires patching the PuppeteerSharp library to add support for websocket authentication. This can be done like the following:
C# PuppeteerSharp
Copy
using PuppeteerSharp;  
using System.Net.WebSockets;  
using System.Text;  
  
// Set the authentication credentials  
var auth = "SBR_ZONE_FULL_USERNAME:SBR_ZONE_PASSWORD";  
// Construct the WebSocket URL with authentication  
var ws = $"wss://{auth}@brd.superproxy.io:9222";  
// Custom WebSocket factory function  
async Task<WebSocket> ws_factory(Uri url, IConnectionOptions options, CancellationToken cancellationToken)  
  
{  
    // Create a new ClientWebSocket instance
    var socket = new ClientWebSocket();  
    // Extract the user information (username and password) from the URL  
    var user_info = url.UserInfo;  
    if (user_info != "")  
    {  
        // Encode the user information in Base64 format  
        var auth = Convert.ToBase64String(Encoding.Default.GetBytes(user_info));  
        // Set the "Authorization" header of the WebSocket options with the encoded credentials  
        socket.Options.SetRequestHeader("Authorization", $"Basic {auth}");  
    }  
  
    // Disable the WebSocket keep-alive interval  
    socket.Options.KeepAliveInterval = TimeSpan.Zero;  
    // Connect to the WebSocket endpoint  
    await socket.ConnectAsync(url, cancellationToken);  
    return socket;  
}  
  
// Create ConnectOptions and configure the options  
var options = new ConnectOptions()  
  
{  
    // Set the BrowserWSEndpoint to the WebSocket URL  
    BrowserWSEndpoint = ws,  
    // Set the WebSocketFactory to the custom factory function  
    WebSocketFactory = ws_factory,  
};  
  
// Connect to the browser using PuppeteerSharp  
Console.WriteLine("Connecting to browser...");  
  
using (var browser = await Puppeteer.ConnectAsync(options))  
{  
    Console.WriteLine("Connected! Navigating...");  
    // Create a new page instance  
    var page = await browser.NewPageAsync();  
    // Navigate to the specified URL  
    await page.GoToAsync("https://example.com");  
    Console.WriteLine("Navigated! Scraping data...");  
    // Get the content of the page  
    var content = await page.GetContentAsync();  
    Console.WriteLine("Done!");  
    Console.WriteLine(content);  
}

How does the Browser API pricing work?

Browser API pricing is simple: you only pay for gigabytes of traffic that you transferred through the Browser API.There is no cost for instances or time using the Browser API - only traffic.It doesn’t matter what country you are using, traffic is billed at the same rates. Because you pay by traffic, you probably will want to minimize it.The only exception to this is premium domains, which cost more per gigabyte, because Bright Data needs to invest a significantly higher amount of effort and resources to unblock. You can find more information about premium domains in your Browser API configuration pages.

How do I reduce data and bandwidth consumption with Browser API?

To reduce bandwidth usage and make your scraping more efficient, you can:
  • Block unnecessary resources such as images, stylesheets, and ads using request interception or CDP custom functions
  • Take advantage of browser caching
  • Follow best practices for request management
For practical tips and code examples, see our Bandwidth Optimization Guide.
For instructions and code on blocking ads using CDP custom functions, see our custom Ad Blocker.

Is password typing allowed with Browser API?

Bright Data is committed to collecting only publicly available data. To uphold this commitment, Browser API is configured by default to prevent any attempts to log in to accounts by disabling password entry. This restriction helps ensure that no non-public data—including any data accessible only behind a login—is scraped. For your reference, please review our Acceptable Use Policy at https://brightdata.com/acceptable-use-policy .In certain cases, it may be possible to override this default block. If you require an exception, you must first complete our Know-Your-Customer (KYC) process available at https://brightdata.com/cp/kyc. Once you have completed the process, please contact our compliance department directly at compliance@brightdata.com to submit your request (you could also request the permissions during your KYC process).

How can I keep the same IP address in Browser API sessions?

The Browser API supports maintaining IP address across multiple browser sessions using a custom CDP function. This allows you to reuse the same proxy peer for consecutive requests by associating them with the same session ID.For implementation details and sample code, see our documentation on Session Persistence

What’s the difference between integrating a proxy with automation scripts and using the Browser API?

1. Integrating a Proxy with Automation Scripts
  • You set up proxies directly in your own scripts using tools like Puppeteer, Playwright, or Selenium.
  • You manage everything: browser setup, sessions, scaling, anti-bot challenges (CAPTCHAs, fingerprints, headers, etc.).
  • Offers full control and flexibility, but you’re responsible for maintaining and troubleshooting all aspects—including unblocking and scalability.
2. Using the Browser API
  • You connect your automation scripts to a managed browser running in Bright Data’s cloud.
  • Bright Data handles infrastructure, scaling, anti-bot/unblocking (CAPTCHAs, fingerprints, etc.), and proxy rotation.
  • You focus only on your scraping logic. It’s easier to scale, especially for complex interactive sites.
  • Ideal if you want powerful scraping without the need to maintain or build your own anti-bot solutions.
Summary: With direct proxy integration, you’re in control but manage all complexity. With Browser API, Bright Data takes care of the hardest parts and you only write your scraping workflow.For more details, see the Browser API introduction.

How to make scraping faster with Browser API?

Browser API performance and optimization are managed on our side. We are always working to improve speed and reliability. There is no user-accessible setting to directly increase browser speed.Blocking unnecessary network requests (such as images, ads, and analytics) in your script can reduce data usage and may sometimes improve page load speed when using Browser API, but faster loading is not guaranteed. The main, reliable benefit is saving bandwidth.For more details and example code, see our bandwidth-saving guide.

How do I know what type of proxies the Browser API is using?

By default, Browser API uses Residential proxies. For some domains that require KYC, it may automatically switch to Datacenter proxies if needed for compliance.Learn more about KYC and Residential proxy access here.
The linked page covers Residential proxy access and KYC requirements. Some details about SSL errors and other proxy types do not apply to Browser API.

How do I connect to Browser API with Playwright, Puppeteer, or Selenium?

To connect to the Browser API, you need your zone username and zone password.
  • For Playwright and Puppeteer, connect using a WebSocket (wss://) endpoint with the host brd.superproxy.io and port 9222.
    • Example connection URL: wss://${AUTH}@brd.superproxy.io:9222
  • For Selenium, connect using an HTTPS endpoint with the host brd.superproxy.io and port 9515.
    • Example connection URL: https://${AUTH}@brd.superproxy.io:9515
See the Configuration page for code examples on how to connect with each library, using your zone username and password in the connection URL.
Do not add extra or custom connection options to your settings, as this can break the connection or degrade performance. Simply use the provided WebSocket or HTTPS endpoints with your zone credentials.
Currently, the only way to connect to Browser API is via WebSocket or HTTPS endpoints using your zone credentials (username and password). There is no REST API connection method at this time.

Proxy vs. Browser API, what’s the difference and which endpoint do I use?

  • Regular Proxy Network: you launch your own browser/process and route traffic through brd.superproxy.io:33335, authenticating with brd-customer-<CID>-zone-<ZONE>:<PASSWORD> .
  • Browser API (formerly Scraping Browser): Bright Data spins up a managed, cloud Chrome for you. You do not start puppeteer.launch(). Instead, you attach to the remote browser:
Copy
const puppeteer = require('puppeteer-core');

const AUTH = 'SBR_ZONE_FULL_USERNAME:SBR_ZONE_PASSWORD';      // found in Browser API Zone → Overview
const WS  = `wss://${AUTH}@brd.superproxy.io:9222`; 

(async () => {
  const browser = await puppeteer.connect({browserWSEndpoint: WS});
  const page = await browser.newPage();
  await page.goto('https://example.com', {timeout: 2*60*1000});
  console.log(await page.title());
  await browser.close();
})(); 

Was this page helpful?

Code ExamplesOverview
linkedinyoutubegithub
Powered by Mintlify
Assistant
Responses are generated using AI and may contain mistakes.