Expand to get your Bright Data Proxy Access Information
Expand to get your Bright Data Proxy Access Information
Your proxy access information
Bright Data proxies are grouped in “Proxy zones”. Each zone holds the configuration for the proxies it holds.To get access to the proxy zone:- Login to Bright Data control panel
- Select the proxy zone or setup a new one
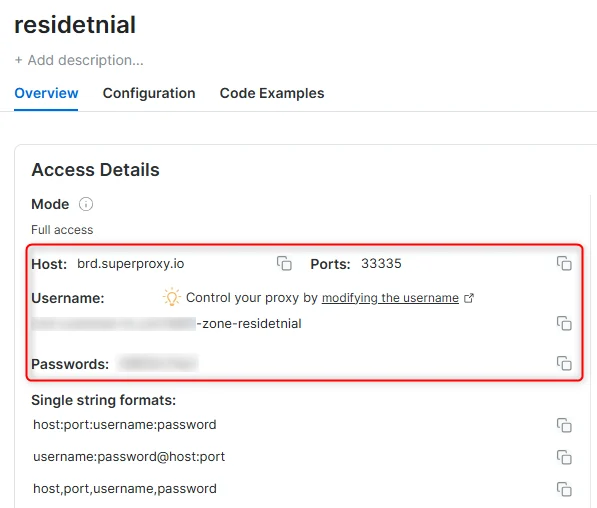
- Click on the new zone name, and select the Overview tab.
- In the overview tab, under Access details you can find the proxy access details, and copy them to clipboard on click.
- You will need: Proxy Host, Proxy Port, Proxy Zone username and Proxy Zone password.
- Click on the copy icons to copy the text to your clipboard and paste in your tool’s proxy configuration.
Access Details Section Example
Residential proxy access
To access Bright Data’s Residential Proxies you will need to either get verified by our compliance team, or install a certificate. Read more…Targeting search engines?
If you target a search engine like google, bing or yandex, you need a special Search Engine Results Page (SERP) proxy API. Use Bright Data SERP API to target search engines. Click here to read more about Bright Data SERP proxy API.Correct setup of proxy test to avoid “PROXY ERROR”
In many tools you will see a “test proxy” function, which performs a conncectivity test to your proxy, and some add a geolocation test as well, to identify the location of the proxy. To correctly test your proxy you should target those search queries to:https://geo.brdtest.com/welcome.txt .Some tools use popular search engines (like google.com) as a default test target. Bright Data will block those requests and you tool will show proxy error although your proxy is perfectly fine.If your proxy test fails, this is probably the reason. Make sure that your test domain is not a search engine (this is done in the tool configuration, and not controlled by Bright Data).What is Selenium?
Selenium is a powerful, open-source tool for automating web browsers. It supports multiple programming languages, including JavaScript, Python, and Java, and provides a robust API for controlling browser actions. Selenium is widely used for:- Web scraping
- Automated testing
- Browser-based workflows
How to Integrate Bright Data with Selenium
Step 0: Prerequisites
Before starting, ensure you have the following:-
Python installed
Download the latest version from https://www.python.org/ -
Install Selenium
-
Bright Data proxy credentials
Get your host, port, username, and password from the Bright Data Control Panel -
WebDriver installed
Download the appropriate driver for your browser
Example (Chrome): https://developer.chrome.com/docs/chromedriver/ -
Optional: WebDriver Manager
For easier driver setup:
If you want to use Selenium with Bright Data’s Browser API, refer to the official documentation: https://docs.brightdata.com/scraping-automation/scraping-browser/introductionThe steps below apply to direct proxy integration, not Browser API usage.
Step 1: Import Required Libraries
Step 2: Configure Your Bright Data Proxy
Step 3: Set Up Chrome Options
Step 4: Initialize the WebDriver
Step 5: Test the Proxy Connection
Step 6: Verify the Output
If the proxy is working correctly, you’ll see an IP address similar to:Summary
By integrating Bright Data proxies with Selenium, you can automate browser workflows securely and efficiently. This setup is ideal for:- Testing web applications
- Scraping dynamic content
- Accessing geo-restricted websites